Revolution Bars
PvME is open-source! If you have a suggested improvement, use #suggestions
This channel lists the recommended Action Bars to use in Revolution combat mode (see section Configuring Revolution+ later in this channel for more info).
The different combinations of bars are:
⬥ Single-target  (e.g., most bosses)
⬥ Multi-target  (e.g., slayer mobs)
⬥ 2-handed (only one weapon can be equipped)
⬥ Dual-wield (where two weapons can be equipped, one in each hand)
If a combination is not displayed, it means the bar scored poorly in tests and is not worth using.
Disclaimer
No revolution bar is perfect for every situation - unless you have accessibility needs, we strongly recommend learning full manual to gain total control over which abilities are fired when. You can find more information in #revo-to-full-manual
Variances may include:
⬥ Single-target bars performing differently based on duration of the fight
• Testing was conducted at both War's Retreat dummies and Vindicta
⬥ Multi-target bars performing differently based on the number of enemies surrounding you, and their life points
• Multi-target testing was conducted at Abyssal Beasts in the Sunken Pyramid
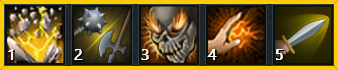
Melee Bars 
Basics only
Single-target / 2-handed

Single-target / Dual-wield

Multi-target / 2-handed
⬥ In testing  increased kph by +10% over

Ranged Bars 
Basics only
⬥ Use  in place of
  if unowned
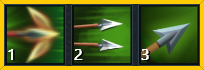
Single-target / 2-handed and Dual-wield ( )
)

Multi-target / 2-handed ()
⬥ It is not worth using Mechanised Chinchompas  if you have access to a T85+ bow
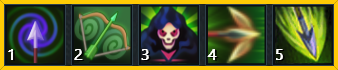
Magic Bars 
Basics only
⬥ Use  in place of
  if unowned
⬥ Include  if using
  and
and  as primary weapons

Single-target / 2-handed and Dual-wield
⬥ Auto-cast 

Multi-target / Dual-wield
⬥ Auto-cast 

Multi-target / 2-handed
⬥ Auto-cast
⬥ In testing (the above bar) increased kph by +10% over  (this bar)

Necromancy Bars 
⬥ Customise  to use all available conjures
• Prioritise Ghost > Skeleton > Zombie > Phantom
Basics only

Single-target

Multi-target

Configuring Revolution++