4000% Solo Zamorak

Intro
This guide contains information for players doing Zamorak at 4000% enrage solo with 
 hybrid.
⬥ The rotations in this guide will help you achieve ~8 kph. This guide expects strong knowledge from #Zamorak Basic Guide and #Zamorak Main Guide. BiS gear is highly recommended.
⬥ This guide uses edict order 2-3-1-6-4-5.
Presets and Relics
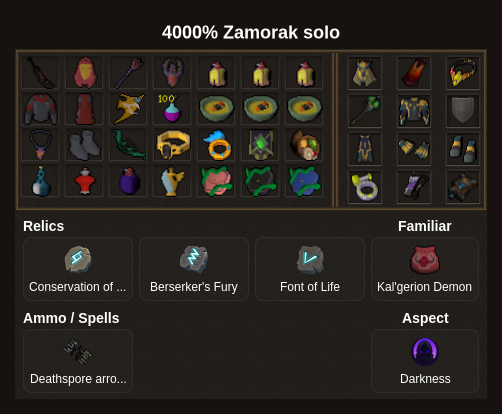
Special attack order
⬥ The following special attack order assumes decent DPS pacing to skip all mechanics in red HP. If struggling to meet this, refer to alternative orders in #Zamorak Main Guide.

Handling Grey HP
⬥ Tips to reduce grey HP regeneration:
• Grey HP healing is based on the total amount of time spent in grey HP over the course of the entire fight. As such, you should always focus on charging the next pad as soon as possible.
• Using 
 in combination with
  should keep grey HP below 150k at all times.
⬩ DoT abilities ( /
/  ) will partially prevent healing if grey HP is above 150k
The Fight
Rotations
⬥ You may opt to replace  with
with  while charging pads to reduce damage taken.
• For charging pads, you can use  +
+  to get
  off earlier.
⬥  can be used freely, but is assumed to cover the
  from the witch.
Phase 1
Phase overview:
⬥ In order to do this phase correctly, aim for the following:
• Zamorak uses Flames of Zamorak in green HP.
• You phase Zamorak immediately before being teleported by Infernal Tomb at 1344k HP
⬩ Allows you to deal with the demon + witch at the same time, removing the need to re-enter Infernus again
⬥ The P1 ability rotation requires some adaptation to not phase Zamorak too quickly. In general, aim to be at around 1400k HP before the Flames of Zamorak bomb goes off.
Phase 1 Rotation:
⬥ Build 10  before the last witch, use
  with on the last witch to proc them, then use
  →
→  →
→  →
→
⬥ tc +  + +
+ +  to pad → s → r +
  →
→  → →
→ →  (refund) →
  →
→  → + → → → → →
  →
→  → or the tick after 2nd auto while swapping to 4p
  →
→  →
→  +
+  →
→  + →
+ →  →
→  →
→  →
→  →
→ 
•  or towards pad 3 and position yourself south-west on the pad during the rotation, for to keep you on the pad
⬥ Infernal Tomb:  + + to the witch →
  → + target witch →
  +
+  → target demon →
  →
→  anything still alive → to rune →
⬩ should be saved to grey HP
Phase 2
Phase overview:
⬥ The phase should proceed as follows:
• Skip the mechanic in red HP and get Adrenaline Cage in green HP
• Surge out from the pad as it fills and + focus down the protector
• Phase before receiving the next mechanic (Flames of Zamorak), preferably in ~2 autos
Phase 2 Rotation:
⬥ tc + → → → + + to protector → → target protector +  → → → target Zamorak + → → → → +
  → → → (improvise if not phased) → → → +
• if is still on cooldown coming out, use: tc + → → → + → instead
⬥ Witch: + → → → →  → → → → (without target)
Phase 3
Phase overview:
⬥ The phase should proceed as follows:
• Skip the mechanic in red HP and get Chaos Blast in green HP
•  to deal with Chaos Blast and deal as much damage as possible to phase Zamorak as he completes the charge
• Do not stun () Zamorak during Chaos Blast
Phase 3 Rotation:
⬥ tc + → (filler if waiting for cooldowns) → → → → (refund) → → → + → → → → → → →  → → → → → +
• Ideally get a big prephase with , but it may be needed just to phase Zamorak
⬩ will not be off cooldown here, but should not be necessary either
• timing can vary, use it when most convenient for your adrenaline
• Can + towards pad 6 right before you press to help deal with the upcoming long movement from pad 1 to pad 6
⬥ Witch: + → → → → → → → → (without target)
Phase 4
Phase overview:
⬥ The phase should proceed as follows:
• Skip mechanic in red HP and get Rune of Destruction in green HP
• Wait for Adrenaline Cage before phasing, building for  during Rune of Destruction
Phase 4 Rotation:
⬥ target Zamorak + → → → + → → → → (refund) → + → → → → / 
 → → → →
  → → → → + md → + → as Adrenaline Cage starts → → → → → + to pad 4 +
•  can be used instead for an even safer phase
⬥ Witch: + → → → → → → → → (without target)
Phase 5
Phase overview:
⬥ The phase should proceed as follows:
• Skip the mechanic in red HP and get Chaos Blast in green HP
• to deal with Chaos Blast and deal as much damage as possible to phase Zamorak as he completes the charge
• Do not stun () Zamorak during Chaos Blast
Phase 5 Rotation:
⬥ target Zamorak + → → → → → (refund) → + + → → → → → → → → → + → → → → → → +
• Can weave in when high on adrenaline
• If you are late on your setup, focus on getting off asap and use until refund, then follow the rot like normal
• timing can vary, use it when most convenient for your adrenaline
• + north before to lure Zamorak north, this is necessary for phase 6
⬥ Witch: + → → → → → → → → (without target)
Phase 6
Phase overview:
⬥ The phase should proceed as follows:
• Skip mechanic in red HP and get Rune of Destruction in green HP
• Phase Zamorak as soon as possible
P6 rotation:
⬥ target Zamorak + → + + to pad 5 → → + → → → → + → (refund) → → → → and south of sun as Rune of Destruction starts → → (optional) → + → → → improvise with and →
• Step off the pad as it finishes charging to avoid getting hit by Chaos Traps 
• Should aim to finish above 30% adrenaline to have enough for
• If Zamorak was not lured far enough north at the end of phase 5 you may lose your as Rune of Destruction starts
Phase 7
⬥ For this phase its important to note your defensives will be very weak because of Disintegrate  , this includes .
⬥ Demon: s  during cutscene → r + + → / → + → → filler if not dead → Zamorak → → + +
⬥ Runes: first rune → while waiting for barge cooldown → second rune → → + to Zamorak
⬥ Zamorak: → → → →
• You need to be above ~50% HP to live the Melee Slam with  and
and
• Equip  before the large bomb hits
• If your  has a sign, unequip it after using
Troubleshooting
⬥ Struggling to get the desired spec order while following the listed rotations is usually an indication that too much time is spent inbetween phases
• Aim to get the next pad charged as quickly as possible from the moment Zamorak enters grey HP, allowing time for to finish and using →
• Efficient movement between pads is important, on some phases it's possible to already be on the next pad by the time you phase Zamorak and use
⬥ You may want to flick  as you set up on each pad. Once the pad is charged you should be able to burst down Zamorak's red HP within 1-2 autos, keeping the incoming damage within manageable ranges.
⬥ If you fail to skip red HP mechs on phase 5 or 6, focus on following the alternative spec order from #Zamorak Main Guide
• You can Flames of Zamorak on phase 5, and then → the smoke with active
• If you get Chaos Blast on phase 6 red HP, you should be able to kill Zamorak before he releases the bomb, otherwise simply
⬥ Once entering phase 7, the kill is basically guaranteed, take it slow and safe if necessary
• You can take as long as you want setting up on phase 7 as the red HP bar is completely irrelevant
• Avoid getting close to the Chaos Demon, you could get hit by his melee swipe as you get hit by Zamorak's mage autos
• There is almost no benefit from staying below 60% HP as you will already overkill Zamorak with the listed rotation