Nex, Angel of Death Basic
Introduction
The aim of this guide is provide a basic overview of how to get consistent kills at Nex, Angel of Death with a low-tier geared team. While writing this guide, we aimed to keep each preset within the confines of tier 1 of #upgrade-order. However due to the endgame nature of the boss, this has not been totally possible. Keeping this in mind, we have instead aimed to provide presets that are as low-tiered as possible without consistent strategies becoming unviable.
Disclaimer
This guide is made with the idea of getting started at AoD, and does not cover meta strategies. For those please refer to the main guides in #angel-of-death-7s. For a detailed description of mechanics, please refer to #AoD Mechanics.
Magic 
Magic is both the cheapest and the easiest style to use at AoD. Provided below are presets and strategies for various roles while using the magic combat style.
Presets and Relics
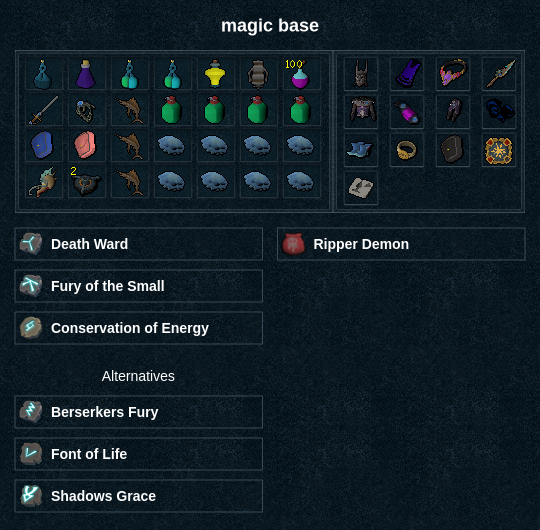
Magic Base
Magic Minion Tank
 with your base and
  . Build back to 100 and wait till your base starts the fight. Place 2
  in your respective quadrant.
 ,
,  ,
,  ,
,  ,
,  and
and  till the boss phases at 2.1m hp.
 spot and lose target to centre it. Instructions on losing target provided below:
• Drop
spot and lose target to centre it. Instructions on losing target provided below:
• Drop  → any basic ability on
  at the amalgamation spot just before it spawns. Release
  once amalgamations spawn and use strong abilities till she is almost at 1.8m hp.
• It is beneficial to use
once amalgamations spawn and use strong abilities till she is almost at 1.8m hp.
• It is beneficial to use  and
and  while standing behind the amalgamation for this step, so as to help phase
  across the centre of the arena to lure it to the centre.
⬥ Once this is done,
across the centre of the arena to lure it to the centre.
⬥ Once this is done,  if necessary to move between pillars or to the middle to pick up bombs. Aim to exit the 3rd pillar with 100% adren or close to it.
Free Magic
Ranged 
Ranged is the most expensive style to use at AoD even at an entry level due to  .
.
This style scales much better at higher levels of investment, and will see large improvements in performance with upgrades such as  and
and 
 .
.
 or
or  can be taken for minion damage, with
  +
+  being a highly effective combo for AoD damage as well.
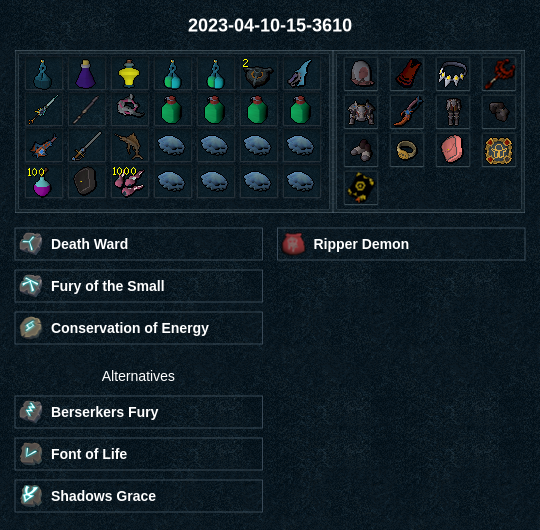
Presets and Relics
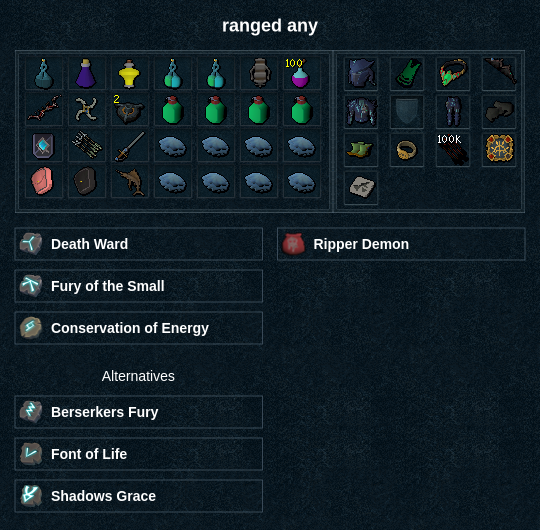
Ranged Minion Tank
 . Build back to 100 and wait till your base starts the fight. Place 2
  ,
,  ,
,  , and
, and 
 , if available, whenever off cooldown.
 if available,
Free Range
Melee 
While being a relatively high damage style at entry AoD, melee does require quite a few more switches to be able to comfortably get through a kill.
Presets and Relics
Melee Minion Tank

 and
and  the boss once attackable. Use your strong abilities such as
  ,
,  ,
,  ,
,  ,
,  and
and  while rotating good basics. Do this until the boss phases at 2.1m hp.

 so that they hit both your amalgamation and
  →
→
Free Melee
Necromancy
Necromancy is currently one of the best styles in general at AoD, and it can be used both at entry level and at the high end.
Presets and Relics
⬥ Necromancy - Minion Tank/Free/Hammer 

 →
→  →
→  →
→  →
→  before the boss spawns. Place 2
  the boss once attackable. Use your strong abilities such as
 /
/  /
/  /
/ 
 +
+  Special Attack as the first ability on the boss.
 with basics while
  →
→  →
→  →
→  and 3/4+ Residual Souls
  +
+  →
→  →
→