The Shadow Reef Melee-Magic (Hybrid) 

Introduction
This is an advanced guide which assumes a strong underlying knowledge of all mechanics and information presented in #ed3-basic.
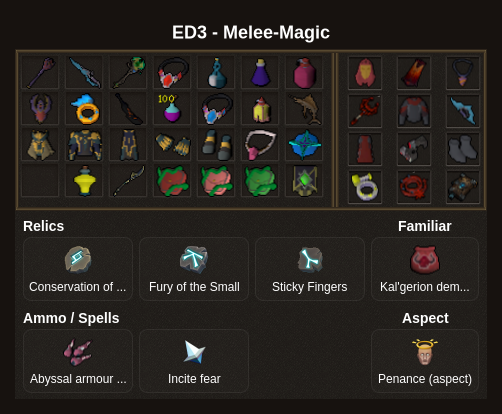
Presets and Relics
Rotations
⬥ Rotations below are more of suggestions to give an idea of AoE opportunities and ability prioritisation at different parts of the dungeon.
• If you find yourself needing more abilities to clear mobs due factors such as the lack of adren or unlucky hits it is expected.
• Target cycling and using basics is a good way to check and finish off leftover mobs as sometimes their bodies take a while to disappear after dying.
⬥ Undead slayer tasks  work on many of the mobs but is not required or needed for GM timer.
⬥ It's recommended to set your anti-spam delay for your  to 1 via the Lectern at Anachronia.
⬥ You can or  a tick before each gate unlocks to save a tick on every entry.
War's Retreat


Pre-Crassian
 +
+  →
→  +
+  diagonally from entrance to start the dungeon and walk to lure the mobs together.
2 Scuttlers 2 Scouts
TC western scuttler  → eastern scout
  → (
→ ( ) →
) →
2 Scuttlers 3 Scouts
TC  while moving towards the edge →
 →
→
Note: generally have to wait for Scuttlers to move closer.
3 Warriors 2 Scouts
Target southwestern crassian 
 → →
→ →
2 Zealots
 → () →
2 Zealots 2 Scouts
 a zealot and to hit all 4 targets → wait 2t for procs to clean up and
6 Zombies
Equip  (tc) +
  → stand in the middle of at least 5 zombies and → () →
6 Zombies
→  → when they clump up
4 Zombies 1 Armoured zombie
+ (tc) + (must hit 4 zombies) → target armoured zombie → 
2 Zealots
→ → () → 
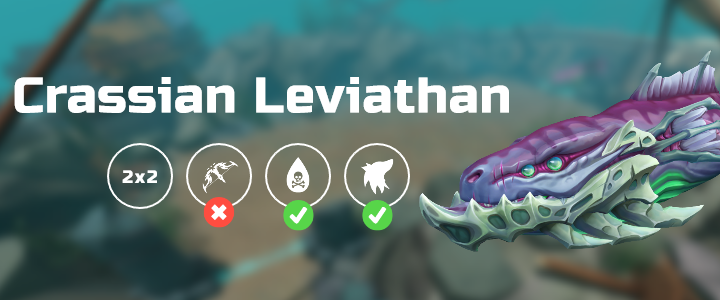
Crassian Leviathan
Wait 2t → →  →
→  →
→  →
→  → →
→ →  → s → r +
  / → finish with / /
Note: procs in the previous room can generate  stacks.
Post-Crassian to Pre-Taraket
After Crassian,  until the next barrier.
Notes:
⬥ not needed for timer.
⬥ → → → target scout + →
1 Zealot 4 Scuttlers
Target Zealots → →
8 Zombies
Stand in the middle of the room and build with basics while waiting for zombies to converge, use →
1 Necromancer 2 Huge Skeletons
Target Necromancer → → leftovers
1 Necromancer
→ →
3 Armoured Zombies
→ ()
2 Necromancers
1st: → → → → to artefact
2nd: → → → to artefact
Can activate  here
here
1 Necromancer 2 Sea Horrors [Bridge of Death]
Target Necromancer  →
→  → Target a Sea Horror
  →
→  →
→
3 Sotapannas
→  →
→  → (
→ ( )
)
2 Necromancers 2 Huge Skeletons
Target a Necromancer  →
→  → basics to cleanup if any
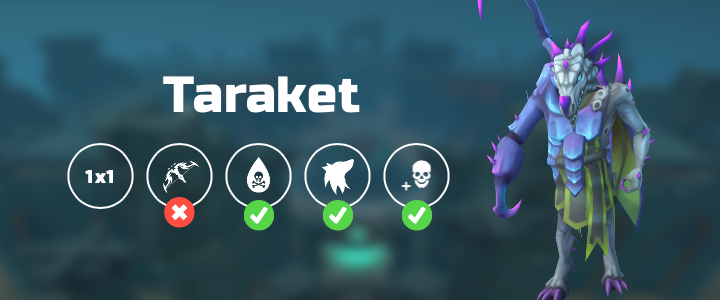
Taraket the Necromancer
Notes:
⬥ *Taraket, corpses, and skeletons are classified as undead for ,  and purposes.
• Generally you ignore the Corpse Carrier and the Bloated Monstrosity.*
⬥ This is a skip rotation, camp  for part 1, DO NOT USE
  /
/
Setup
+ +1t → → → → →  →
→  →
→  →
→
Note: goal is to have Taraket at 255-270k HP after setting up, and not fall below 200k after and first hit of 
Nuke
Equip → → s → 2t r + → → → to next area
Note: entry timing is strict, if → was tick perfect instead of 1t late, delay an additional 2t somewhere in setup.
Post-Taraket to Pre-Ambassador
towards Sea Witch after finishing Taraket.
1 Sea Witch 2 Armoured Zombies
→
1 Kalgerion Demon
 + → → () + → →
1 Necromancer
→
1 Necromancer
→ → () →
1 Necromancer
+
1 Necromancer
→ → / → 1t to jump spot
5 Warriors 1 Scuttler
then diagonally to lure warriors and scuttler. → → ()
2 Warped Skeletons
get while waiting for them to clump → → →
3 Zealots + 2 Warped Skeletons
→ → target central skeleton ideally → → → →  cleanup
2 Warped Skeletons + 2 Scouts
Target 1 skeleton with  , another → → → → get 120 adren
The Ambassador

Phase 1 + Spinner Skip
+ → + → → → → → → s → 2t r + → → → s → 2t r + → + optional → → → (seiryu appears after lands)
Phase 3
→  blackhole →
  → → →
→ → →  →
→ 
 → → → → → → → →
  → → improv
Example Kills