Solo AoD - Ranged
Introduction
This is an advanced guide to hybrid solo AOD  It is assumed you are familiar with the mechanics of the boss as well as having a strong sense of timing for prayer flicking. This guide covers strategies to maximize efficiency in this encounter. For a single kill for the CA, #Solo Necromancy Basic is recommended instead due to ease of access and gentler learning curve.
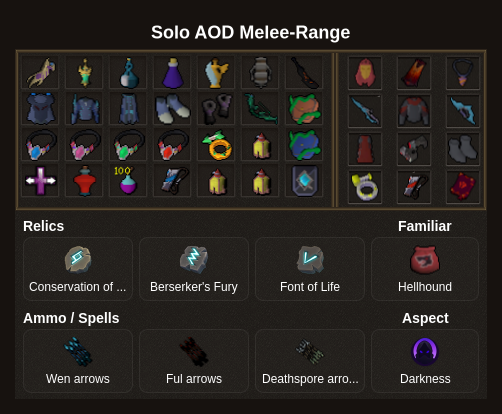
Gear & Preset

Strategy and Rotations
Phase 1
⬥ Start with a  rotation and aim to get to 2500-2600k hp before reavers spawn
⬥ Use 
 to clear out the reavers
  , utilising
  to bind the reavers and simultaneously apply
• Note that the reavers must be close enough for decimation to reach them all, this is automatically timed if following the suggested rotation
⬥ When using defensives, keep in mind that Nex's melee autoattacks will reset defensive cooldowns at 5, 10, and 15 enrage stacks, visible on your debuff bar
⬥ To prepare to phase Nex into phase 2, hold damage slightly before hitting 2.1 million health  and overphase with
  , pushing her somewhere into the 2060k-2080k range ideally
• This is to ensure aod is phased into p3 on the amalg 
Phase 1 Rotation

 :
:  →
→  →
→ 
 →
→  → s
→ s
Instance : r +  → → start fight +
  same tick →
  → s →
→ s → 
: r +  →
→  +
+  →
→  → →
→ →  → → →
→ → →  → (elements) →
 →
→  → →
→ →  →
→  → → →
→ → →  →
→  →
→  →
→ 
 →
→  →
→  → →
→ →  → →
→ →  → → / → (
 ) → overphase with
Phase 2
⬥ Phase 2 will begin as Nex hits 2.1 million health and will be shortly followed by amalgamation  spawns, which will be cleared with Invoke Death
  and threads
⬥ The objective is to kill all 4 amalgamations simultaneously and lure all minions into the center such that you can efficiently aoe them with decimation
⬥ Ideally phase into 1.8m with the second
⬥ Use a combination of , , , , ,  to push nex into the 1820-1850k hp range
⬥ Nex should be centred during this phase if you phased at the beginning of the elements special attack in phase 1, otherwise make sure to recenter her so that threads will hit all amalgamations
Phase 2 Rotation: Clearing Amalgamations
→  → → → → → → → ( if >1850k) →
  → → → →
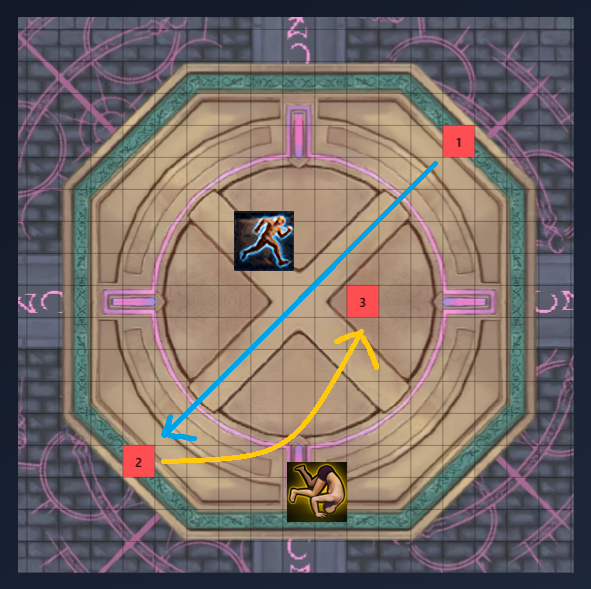
Phase 2: Luring Minions
Follow the diagram below a visual guide:
-
Start in the glaces quadrant,
+ 
-
Target fumus and
 2 ticks after the on glacies
 -
→
 →
→  1-2 tiles away from the minion pile
Phase 2 Rotation: Killing Minions
Recommended: glacies → → → 5-6x
Notes:
⬥ The timing on the is strict, any variation in timing has to be compensated for in order to guarantee hits all 5 and generates 10  stacks
⬥ Use  and re- the boss
⬥ If done correctly, minions should die before they can stun removing the need for  /
/
Phase 3
After the spam sequence, optionally tweak  stacks with / and finish the rest of the with a + sequence. should be at about 1.2m hp by the end of . The remaining hp should be dealt with using a rotation.
Mechanics in phase 3 will happen in a semi-random order, with the primary restrictions being that ice cannot happen first and the same mechanic cannot happen back-to-back:
⬥ Ice: You go into a 'stasis' mode where bled channels will get cancelled and you are no longer able to attack the boss
• Use to use a few more damaging abilities before you are imprisoned,  and
and  can be very helpful for sustain if you just tanked a pool right before being iced
• Disables defensives such as  /
/  but not
• Use + (if using  ) and make sure to keep prayer flicking
• Preparation  isn't put on cooldown so can be used before ice and once you are imprisoned
• The timing for when ice ends is when the cooldown of your mobility abilities reach 4 seconds (they instantly become usable again right after ice ends)
• If you phase into P4 while iced, use to avoid being frozen by glacies pillar while prayer flicking 
 against ice and boss autos.
⬥ Pool: Must have >14k(or 11.2k if  ) health to take the pool
• DPS gear and boosts from bonfire / desert pantheon aura  + thermal spa
  will put you >12.8k maximum health
• Fortitude  may be flicked on for up to 1000 additional maximum health
• Save  for second pools so that you enter pillar phase with high hp
• Be wary of an invisible autoattack as Nex finishes her initial animation of spawning the pool
⬥ Recover from pool damage using 
 + / /
+ / /
Phase 3 Rotation
→ → → (glacies) → click fumus, 2t after the → → + → x 5-6 → adjust with / as needed and do → → some combination of / / / /  → → / → → fillers
Phase 4
⬥ All mechanics are straightforward from here on. Cycle between and to quickly finish the encounter.
⬥ Bombs can be placed at max range on a wall next to a pillar or as close to the pillar as possible to leave as much open space as possible
⬥ /  can be used to deal with the constant autoattacks from Nex
⬥ After all pillars have been defeated, you can reposition middle, only surging out to place bombs
• Make sure to keep track of which bar is the instakill / bomb if doing this to prevent accidentally bombing mid
⬥ BSA stacks will NOT carry over into phase 4, making a strong option
Example Kills