Hardmode Zuk (Melee-Ranged)
Introduction and preface
This guide is targeted towards players with a strong understanding of the encounter, players attempting hardmode Zuk for the first time should read #TzKal-Zuk Basic
Time save breakdown:
⬥ Players should focus on wave clear and try to follow this guide as best as possible.
• Note that movements are specific for certain waves, and stepping on the wrong tiles may lead to failed lures
As such, it is strongly recommended to follow the guide alongside the video examples. The rotations are constructed to allow for continuous usage. If followed correctly, players should not lose ticks between abilities unless otherwise stated.
Presets and Relics
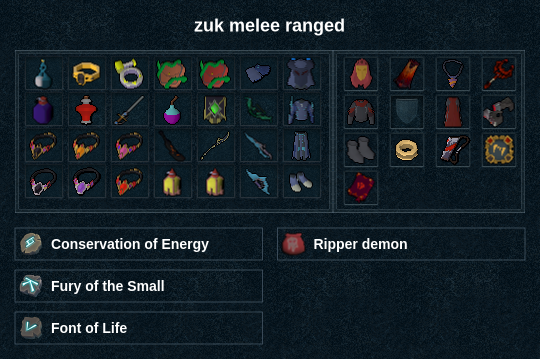
⬥ Preset Notes
• Powder at bank 

•  w/
w/ 


 (
( if
if  )
)
•  w/
w/ 

•  w/ runes for
  +
+ 
The Fight
⬥ Waves are generally broken down into alternating between melee and ranged unless otherwise specified, using melee for all igneous + challenge waves and ranged for all jad waves
⬥ Wars: (optional 
 ) → s
) → s
Wave 1
General pointers
⬥ Apply to  , use
, use  +
+  as TzekHaar-Hurs are clumping up, then
  to finish
• Aim to clear through wave 2 with
Specific rotations
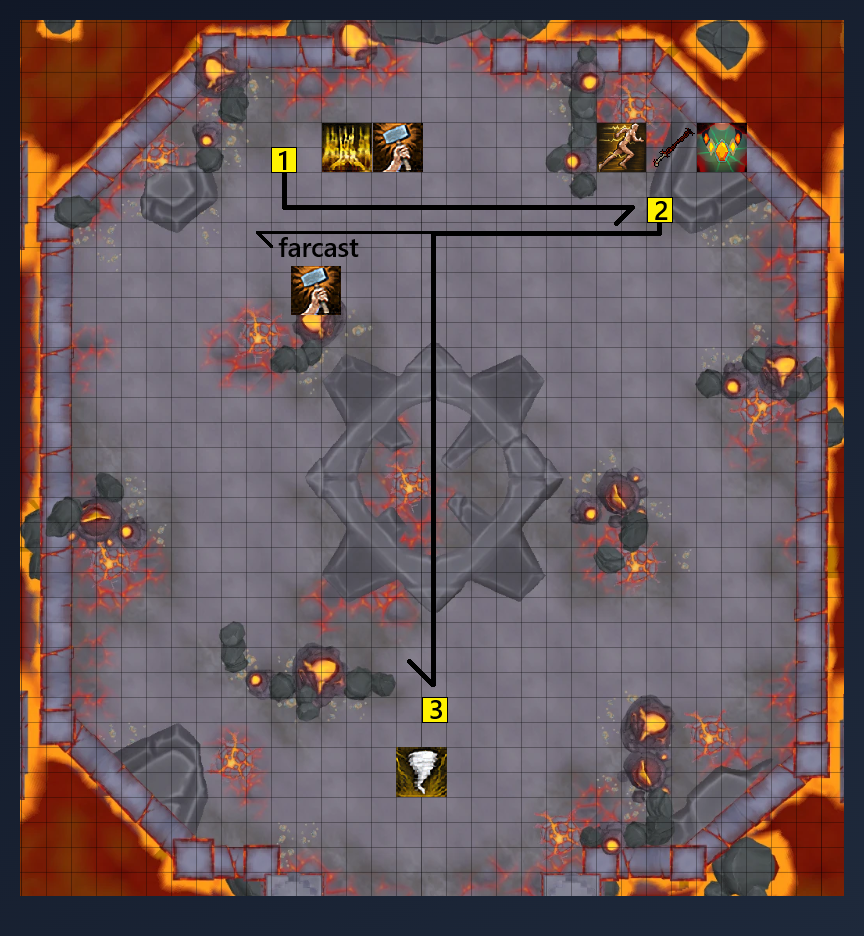
⬥ (1) Zuk:  +
+  +
+
⬥ West Hur:  → s → r +
⬥ (2) All Hurs: + wait 2 ticks →  → target + far-cast
  → target Hur +
⬥ (3) South Kihs: + 
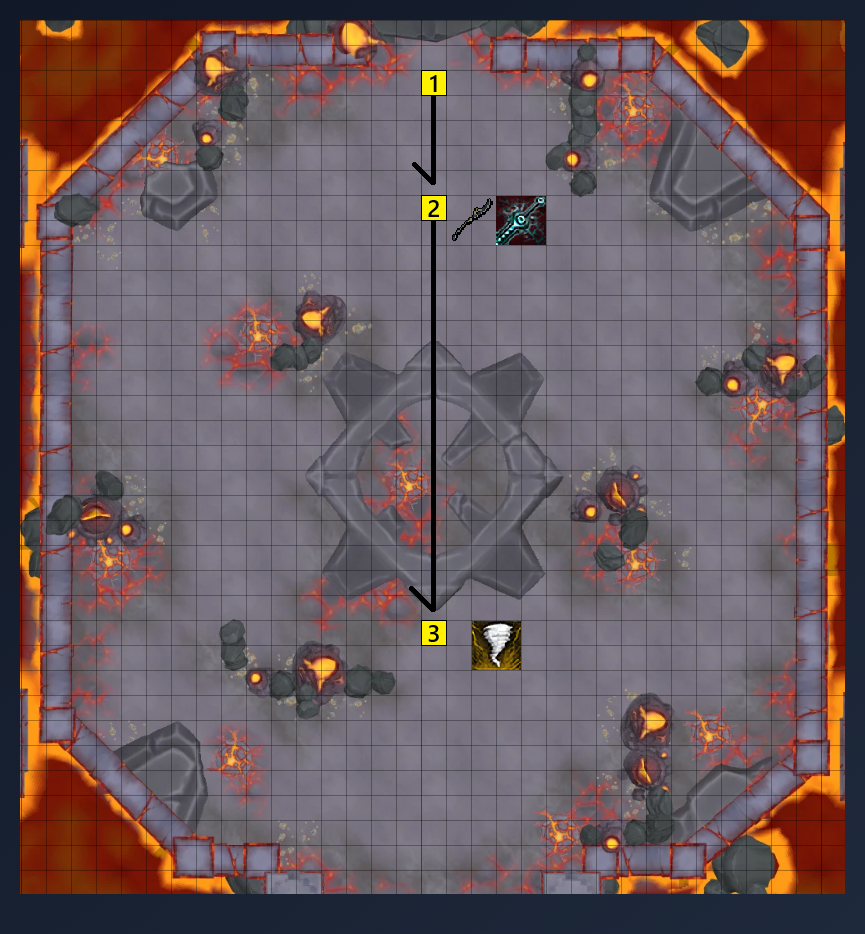 Note: Provided diagrams only cover the most important abilities and movements, some amount of improvisation may be required in general
Wave 2
General pointers
⬥ Clear all spawns of northern enemies, then to clear the southern enemies, ideally all before runs out
Specific rotations
⬥ (1) West Xil + Hur: from +  →
→ 
⬥ (2) East Xil + Hurs: wait for second spawn of Hurs → →  → target far Hur + far-cast
⬥ (3) Yt-Mejkot:  → position yourself in the middle of the enemies +
Wave 3
General pointers
⬥ Set up  +
+  , clear all Yt-Mejkot with +
  , then pick off remaining enemies with single-target abilities
• Entering the next wave is somewhat timelocked to cooldown, so there is some amount of leeway on this wave
Specific rotations
⬥ (1) Zuk:  →
→  → → → →
• A Wall of Flame will occur around this time, make sure that all Yt-Mejkot have walked around any obstacles before moving away
⬥ (2) Center-Most Yt-Mejkot: →
⬥ Remaining Enemies: Pick off using  /
/  /
/  → end on 100 adren
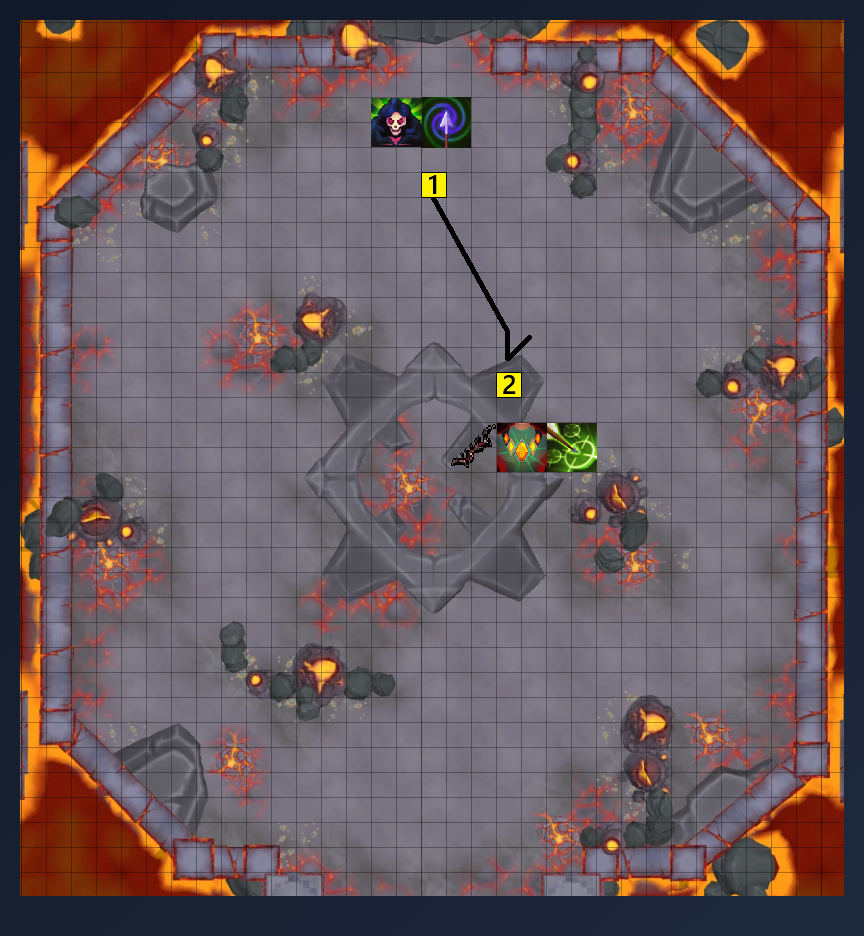
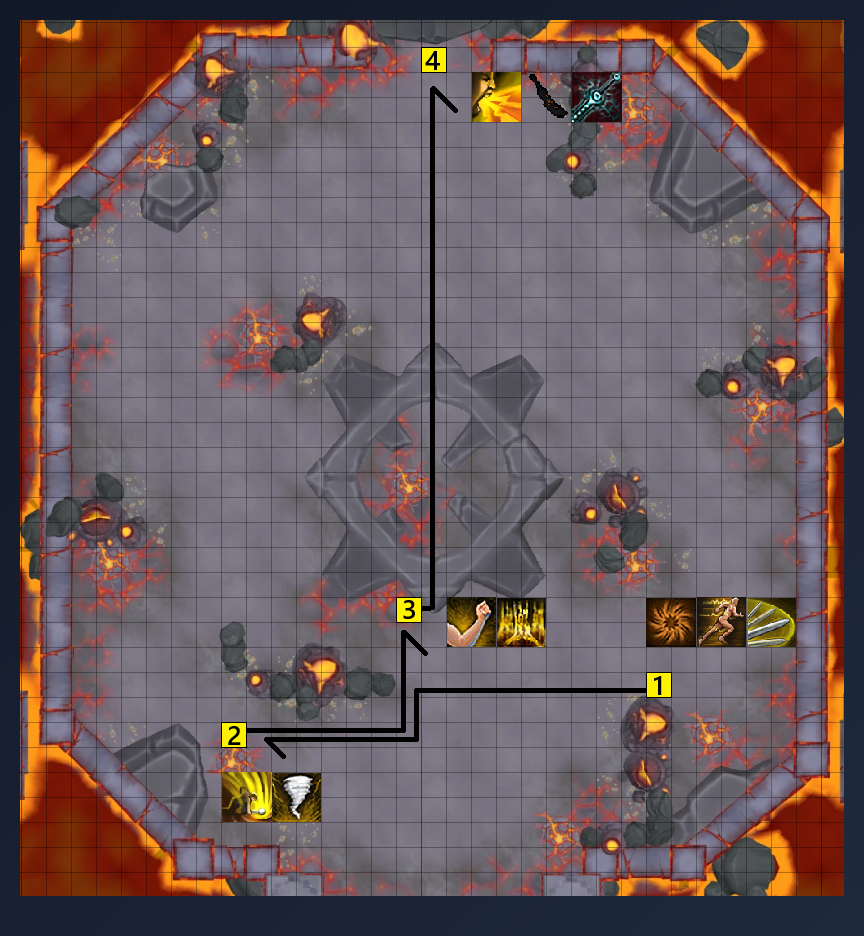
Wave 4 (Igneous wave)
General pointers
⬥ For the sake of consistency, all igneous waves are handled the exact same throughout this guide. Rotations assume  is being used on all three igneous enemies.
Specific rotations
⬥ (1) Igneous Mej: +  → → → → wait 2-3 ticks + to Igneous Xil
• Wait for to finish it since the will cause you to lose line-of-sight
⬥ (2) Igneous Xil: → → basic if needed
⬥ (3) Igneous Hur:  → →
→ →  if needed
• The basic to finish both Xil and Hur can be consistently skipped with an active  proc
proc
⬥ (4) Zuk: + →
Wave 5 (Challenge wave)
⬥ Step between three Hurs + → between remaining two +
• See example video for specific positioning
Wave 6
General pointers
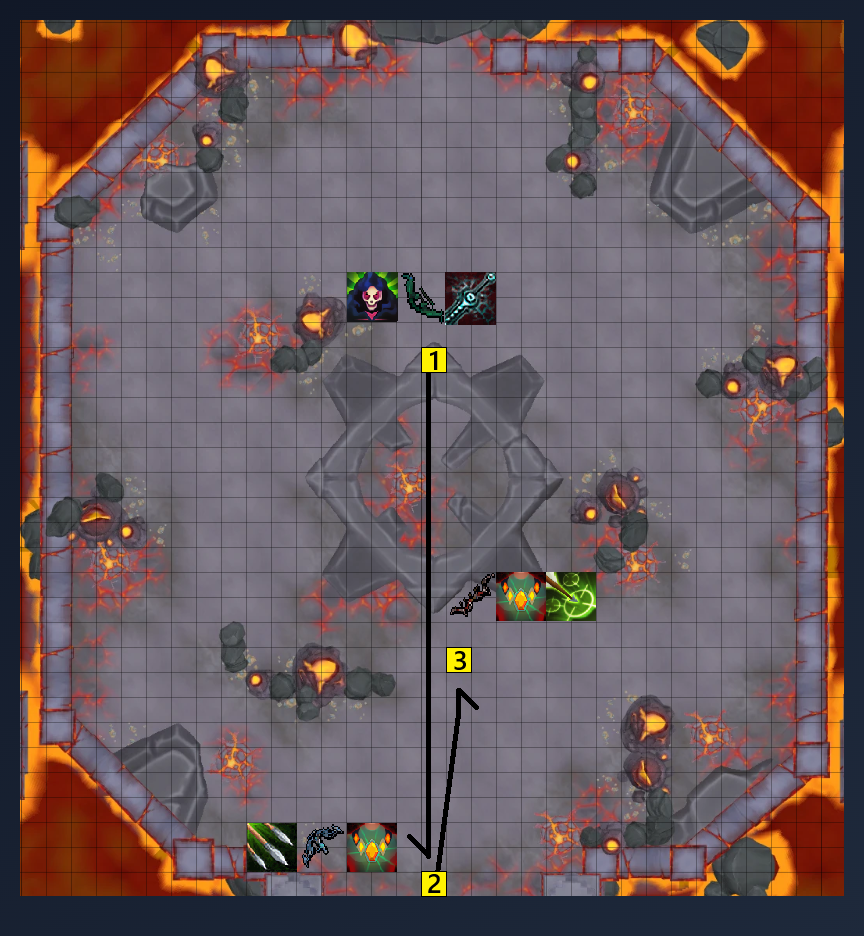
⬥ Set up + + on Zuk + northern Xil, go all the way south to clear the Jad, then clear remaining mobs with
Specific rotations
⬥ (1) Zuk + North Xil: → → → →
• Move further south once Xils spawn to prevent the north-west one from getting stuck
⬥ (2) Jad: → → + through to south wall →  →
→
⬥ (3) Southern-most Xil: + →
• The exact Xil to be targeted is usually the one that took 1-2 hits from the end of
• If done correctly the should clear all remaining enemies, otherwise usually one Yt-Mejkot should be finished with +
Wave 7
General pointers
⬥ Set up + while clearing northern enemies, the Yt-Mejkot, then run around to clear remaining enemies
Specific rotations
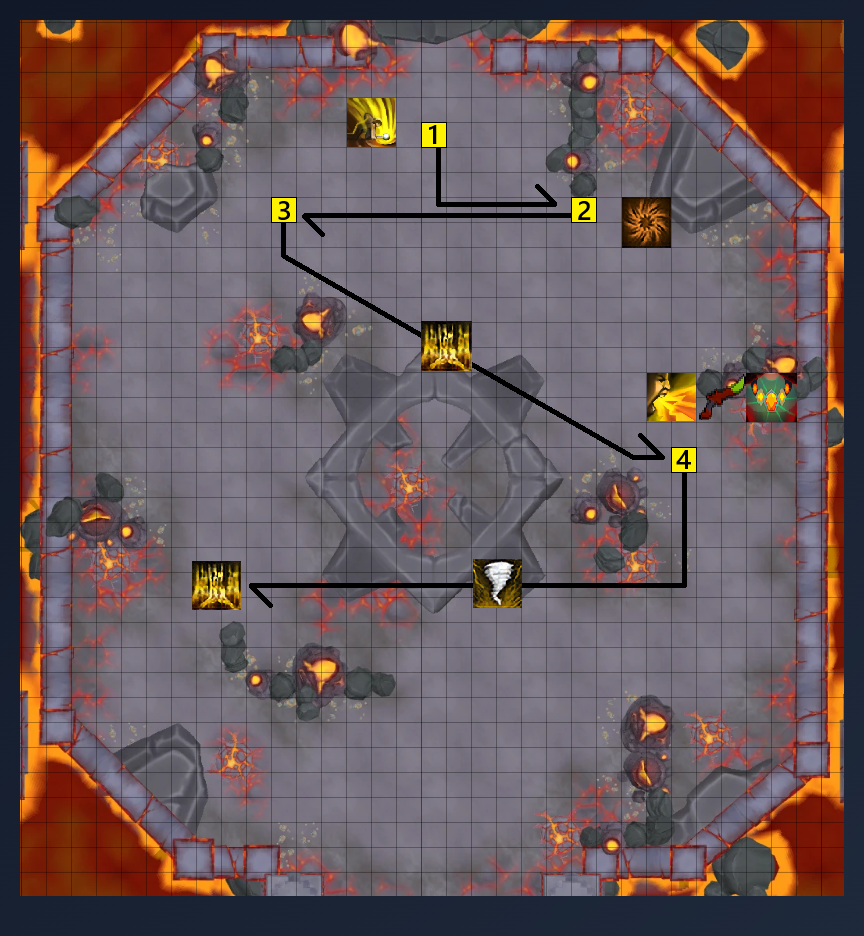
⬥ (1) North Mej: s / any basic → release when Mej spawns + clear with basics
⬥ (2) West Xil: →
⬥ (3) East Xil: →
• Kihs should be taken out by splash damage by the end of the wave, just ignore
⬥ Center Yt-Mejkot:
⬥ (4) East Tok-Xil: →
⬥ Center 2x Xils:  →
→
⬥ West Tok-Xil:
Wave 8
General pointers
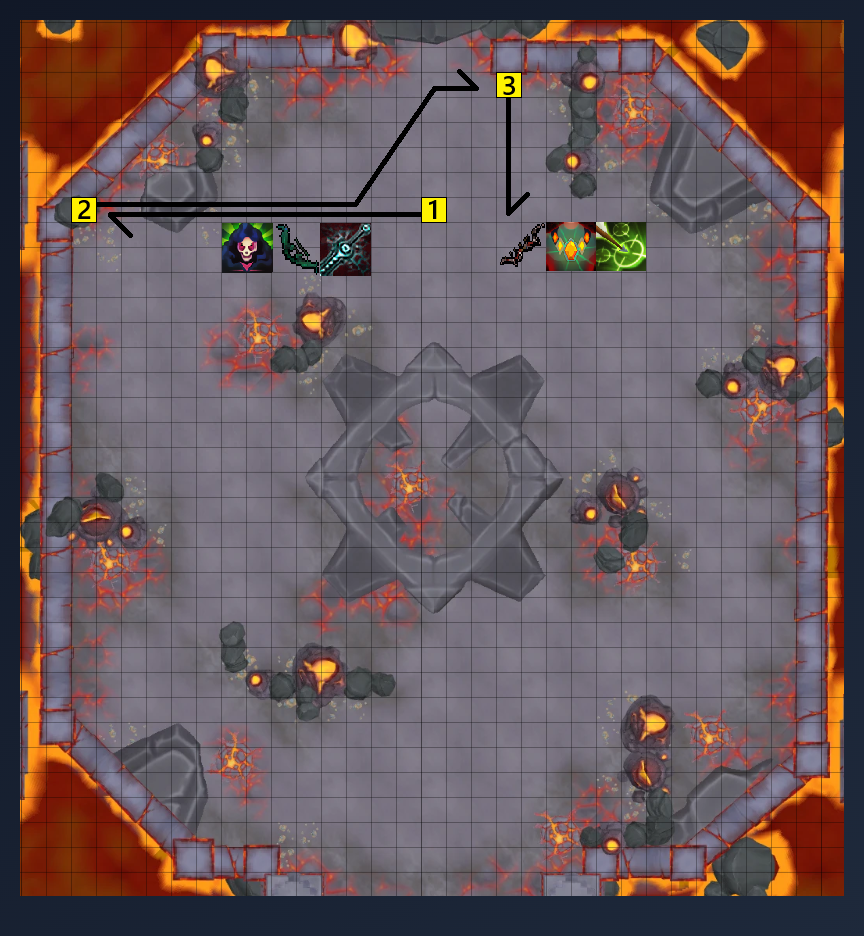
⬥ Clear out northern enemies while clumping southern spawns up, then clear with →
Specific rotations
⬥ (1) Zuk: → → →
⬥ (1) North Xil: →
⬥ (2) North-west Tok-Xil:
⬥ (2) 2x Mej:  →
→
⬥ (3) North-east Tok-Xil:  → →
→ →
⬥ (3) Center-most Tok-Xil: →
Wave 9 (Igneous wave)
General pointers
⬥ Same as previous, end with → → → on
Wave 10 (Challenge wave)
⬥ (w/ should guarantee kill)
Wave 11
General pointers
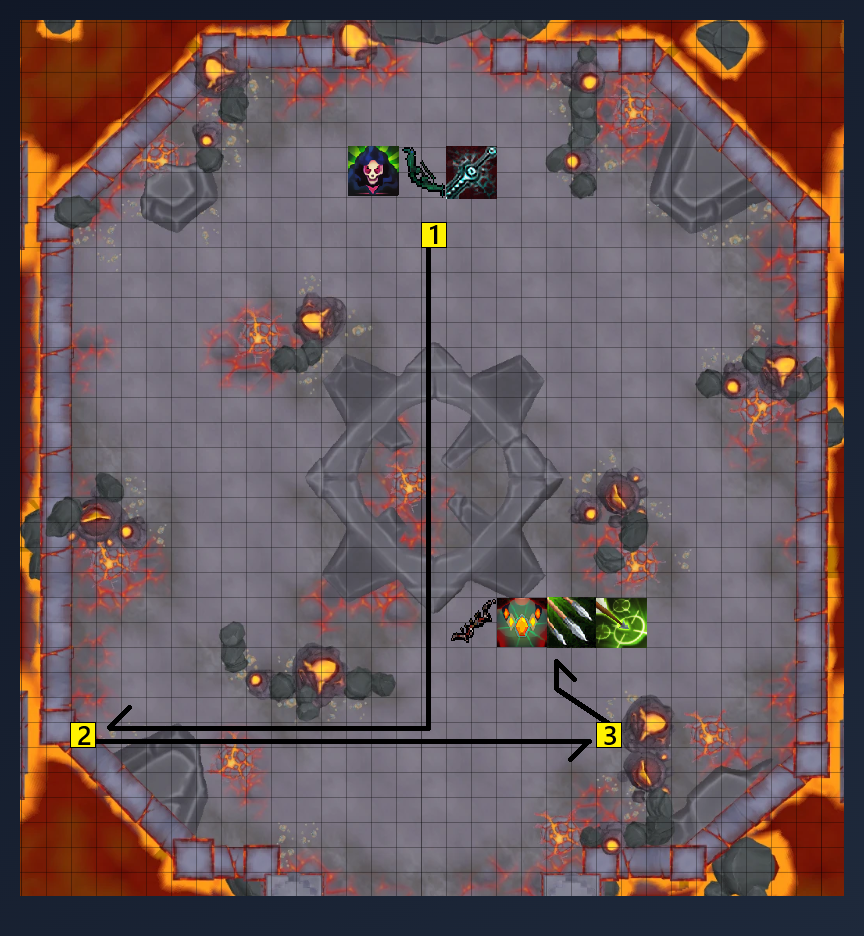
⬥ Set up and pick off initial set of spawns, lure Jads + stragglers to center and clear with → →
Specific rotations
⬥ (1) Zuk + North Mej: → → → →
⬥ South Kih:
⬥ (2) South-west Kih: +
⬥ (2) South-west Mej:
⬥ (2) South Yt-Mejkot: → →
⬥ (3) South Mej:
⬥ (3) Center Jad: → →
• Jad lure may be tricky depending on how you move from (2) to (3), walk halfway then the rest should keep them in range
• The two remaining Mej should be caught in the AoE as well, otherwise finish with
Wave 12
General pointers
⬥ North Kih, to clear out east and southern enemies, then AoE the remainder in the center
Specific rotations
⬥ (1) North Kih: s on Zuk → release with basic to kill
⬥ (2) East Tok-Xil: →
⬥ (2) East Mej: →
⬥ South Kih:
⬥ (3) West Mej:
⬥ Center Tok-Xil:
⬥ North-west Ket + Mej: +
⬥ Center Ket + Mej:
• AoE + damage should clear out all enemies, finish stragglers off with  basics if not
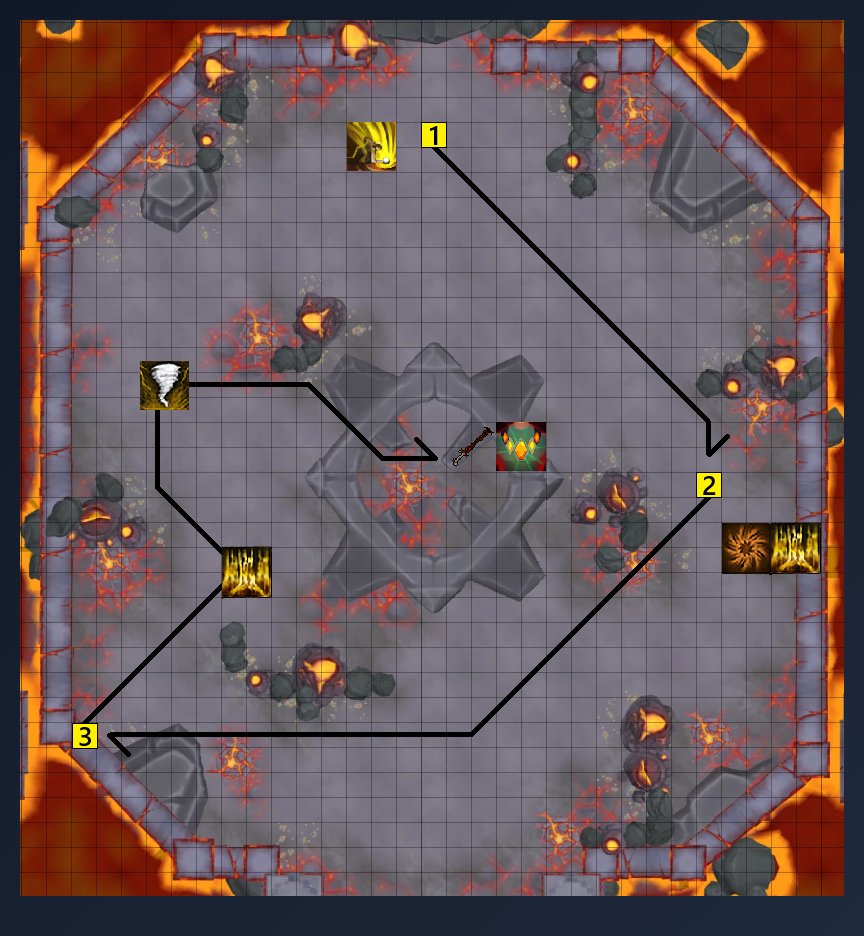
Wave 13
General pointers
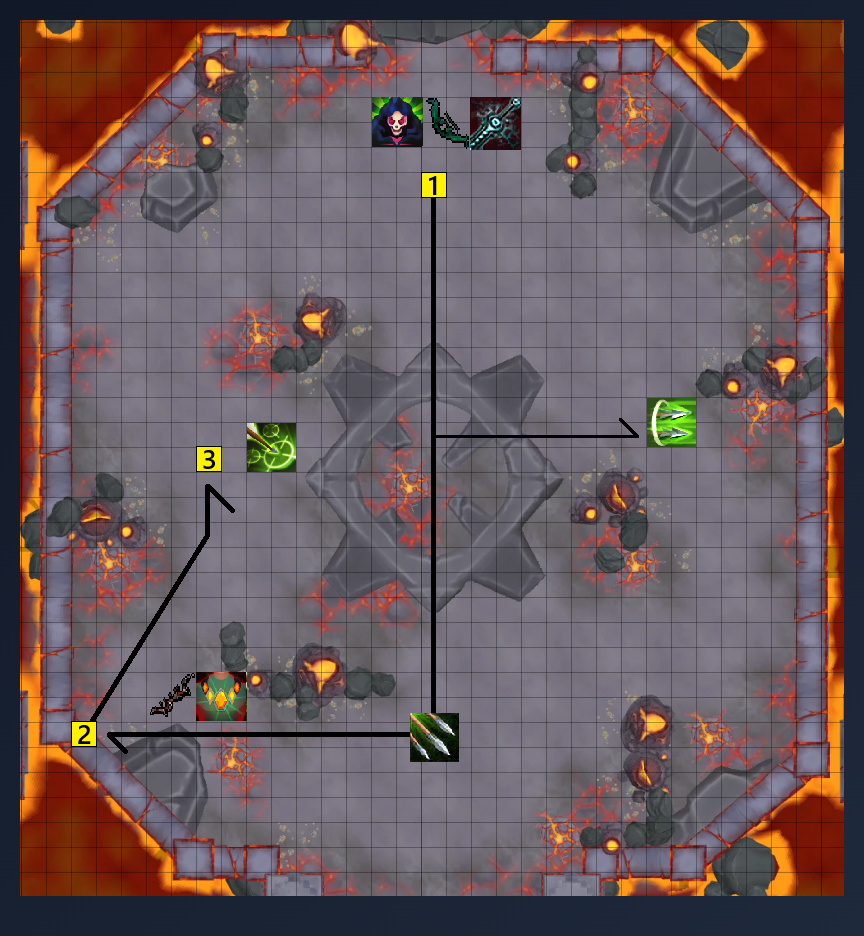
⬥ Set up , clear both Tok-Xils, then group up remaining enemies to →
Specific rotations
⬥ (1) Zuk + North Tok-Xil: → → → → →
⬥ East Mej: →
⬥ South Tok-Xil: (cancel once low enough) →
⬥ (2) South-west Ket: →
⬥ (3) Center-most Ket: → / to get line-of-sight on all enemies → → any stragglers
Wave 14 (Igneous wave)
General pointers
⬥ Same as previous, stay on melee when Zuk is cleared for adren
Wave 15 (Challenge wave)
⬥  →
→  → let meteor tick up to at least 70 adren → → →
Wave 16 (Triple Jad)
General pointers
⬥ Similar to double Jad lure, let them clump up middle, then clear with → →
Specific rotations
⬥ (1) Zuk: → + + all the way south-west →
⬥ (3) Jad: once lured → →
• Use /  if attacks overlap
Wave 17 (Har-aken)
⬥ Zuk → s →
⬥ Har-Aken: + → → → → → → →  →
→ 
Wave 18 (Tz-Kal Zuk)
Zuk
⬥ Start near the middle and build to 100% adren
⬥ Equip  + Apply + + build with → → + be on 3-7
⬥ Zuk: 3 ticks after starts moving → → → → → → → → → → → → → → → → → + → → → dump adren to finish
• / as necessary to deal with mechanics
• Zuk should be lowered to ~220k or less by this point
Pizza
⬥ Igneous Hur:  + build while killing →
  + when rain is about to disappear
⬥ Igneous Xil: + + → + build adren while killing
⬥ Igneous Mej: + + → swap to  and finish with basics
⬥ Zuk: s → r + → / (depending on his remaining hp) → → → if needed
• Time it such that the extra action button to interrupt Zuk is usable after
Conduits
⬥ Some improvisation may be needed, but generally just keep pressing strong abilities while following the listed defensive order
⬥ Deal with Zuk's charged attacks using the following:
• C1 →
• C2 →
• C3 →
• C4 →  (make sure sign is not available, unequip cape if needed)
⬥ Conduits:  → wait 2 ticks + → → → → / → → → / → → → equip + improvise to finish, use if it comes up while is still running
• Take advantage of the lack of bombs during Zuk's charging attack to use more channelled abilities ( / )
Example videos