Amascut, the Devourer
Introduction
The aim of this guide is to provide a basic overview of how to get consistent kills at Amascut, the Devourer. Due to the boss' high defence levels, demanding DPS checks and mechanical complexity, contents of this guide assume you have at least made it to the end of Stage 1 of #upgrade-order for your chosen style. As Amascut is enrage-based with fixed enrages of 100, 500, 750, 1000, 2000 and 4000%, mechanics and strategies may differ based on enrage. For the purposes of this guide, 100% enrage will be utilized.
Disclaimer
This guide, and its contents thereof, assume you are getting started with Amascut, and does not necessarily cover meta strategies.
General Information
⬥ Amascut, the Devourer is located in Menaphos. Fighting her requires completion of the Eclipse of the Heart quest.
⬥ She has variable LP based on chosen mode and enrage:
• Normal Mode: 4.0M
• 100%: 5.5M
• 500%: 7M
• 750%: 8M
• 1000%: 9M
• 2000%: 12M
• 4000%: 16M
⬥ Defensively, Amascut has a Defence  level of 95, with 2765 Armour and an affinity of 55 Affinity against all styles.
⬥ Amascut is immune to stuns  and poison
  .
.
• Her minions can be poisoned and stunned.
⬥ Amascut is mechanically complex, consisting of 5 phases in Normal and 7 phases in Enrage mode.
Gear, Relics, Familiars
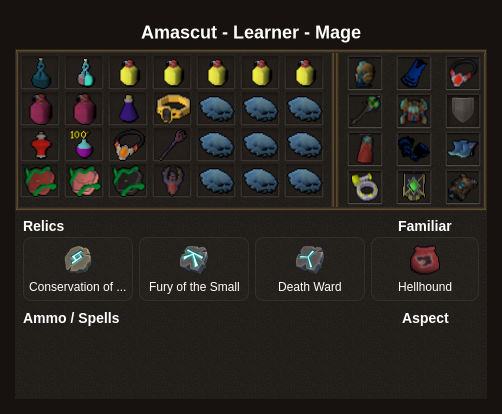
The following presets are based on Stage 1 and provided by Amascut, the Devourer Discord:
⬥ Magic
Fight Mechanics (Phases 1 & 3)
⬥ Amascut attacks with  and
and  , with a mechanic every 3 auto attacks
• Magic attacks deal damage to all players, and is telegraphed by Amascut raising her left hand and shooting out a green ball of energy
• Melee attacks deal damage to whoever has Amascut's aggression, and any player within 2-3 tiles near them; telegraphed by Amascut raising her right hand and slashing her target
⬩ Melee attacks will additionally cause  arrows to fly at anyone within 10 tiles of her target once the melee hit lands
⬥ Every 4 auto attacks, Amascut will perform Rapid Swipes where she starts viciously swiping at her target, dealing 2 quick hits of or damage based on her last used style, followed by a double hit that inflicts both types of damage
• In higher enrages, this has massive KO potential
Attack Rotation
⬥ This rotation assumes Amascut is not phased by reaching her hitcap
⬥ 3 auto attacks → Tri-colour Attack → Rapid swipes + 2 auto attacks → Summon Scarabs → 1 auto attack + Rapid swipes + 1 auto attack → Soul Crush → 2 auto attacks + Rapid swipes → Triple Strike → 3 auto attacks → Tri-colour Attack → Rapid swipes + 2 auto attacks → Hard phase (Amascut enters P2 or P4 depending on which phase the players were on)
⬥ If the players reach phase hitcap for P1 and/or P3, Amascut will reset her mechanics rotation (starting over with Tri-colour attack being her first mechanic), but will not reset her auto attack rotation (if she entered P2 after landing Rapid swipes, her P3 rotation will start with 3 regular auto attacks)
Corruption 
⬥ Persistent mechanic that increases all incoming damage by 10% per stack
• Capped at 15 stacks for a total of 150% damage increase
Sources:
⬥ Amascut's auto-attacks against her main target each inflict a stack
⬥ Getting hit by Devourer's Shockwaves or Soulfire Waves inflict a stack
Tri-colour Attack
⬥ Amascut will flash 3 orbs in order, one for each style, and attack the Base Tank in the order she flashed the orbs
⬥ The attacks deal heavy damage if not prayed against, and will stun the player taking them at 500% enrage or higher
Solution:
⬥ Amascut telegraphs which styles she will attack with when she performs the mechanic:
• Pathetic: → →
• Weak: → →
• Grovel: → →
⬥  protects against being stunned at 500% enrage or higher
⬥ Only affects the Base Tank, other roles are safe
Summon Scarabs
⬥ Amascut summons 2-5 scarabs per player based on enrage, charging up over time
⬥ The scarabs are Immune to damage until they are stunned
⬥ Once fully charged, they explode, dealing soft typeless damage to all players in the arena
Solution:
⬥ Their damage can be mitigated entirely by casting 
• If unavailable,  +
+  can be used as a last resort
⬥ Stepping on them as they spawn will prevent them from spawning entirely, doing so will reset the cooldown of 
⬥ Stunning them will lift their damage immunity and kill them due to their low health (2000 LP)
Soul Crush (a.k.a. Bend the Knee)
⬥ Amascut deals massive soft typeless damage to her main target, split between all players in a 3x3 radius of her target
⬥ Has 50% piercing against defensive abilities
Solution:
⬥ Base Tank can  at the end of Tri-colour Attack at earliest to negate this mechanic, assuming they do not proc it earlier
⬥ DPS pile can  Soul Crush and split it between themselves, using + to stay alive
Triple Strike
⬥ Amascut alters the skybox colour and prepares to launch 3 devastating hits with the same style she calls out
⬥ Not praying against the hits correctly deals massive damage
⬥ Affects all players in the encounter
Solution:
⬥ Amascut telegraphs which style she will attack with when she performs the mechanic:
• All strength withers (skybox turns red): 3 hits
• I will not suffer this (skybox turns green): 3 hits
• Your soul is WEAK (skybox turns blue): 3 hits
⬥  will fully protect you from all 3 hits, as long as you are praying against the style correctly
• If timed correctly,  /
/  can gain a massive amount of healing and adren respectively from the third hit
Fight Mechanics (Phases 2 & 4)
⬥ Amascut stops attacking, becomes Immune to all damage, and charges a wipe mechanic
⬥ She will invoke the names of two of the Bau of Tumeken (Apmeken and Crondis in Phase 2, Scabaras and Het in Phase 4), causing their respective mechanics to become active
⬥ Failure to complete this phase in less than 200 seconds will result in a WIPE 
• This timer is reduced to 125 seconds at 1000% enrage, and further reduced to 100 seconds at 2000%
Statues & Fragments
⬥ The statues of the Bau of Tumeken are corrupted, and must be cleansed and restored to progress the fight
⬥ Clicking on the statue while they are glowing green will deal hard typeless damage to all players in the encounter
Solution:
⬥ The statues can be cleansed by clicking on them once they start glowing golden (indicating a Chain inside was brought to 0 HP), doing so three times will cleanse the statue, allowing it to be restored
⬥ The statues can be restored by bringing its respective Fragment of Tumeken to them, this will stagger Amascut, interrupting her channelling and removing her damage immunity, allowing the encounter to be progressed
• Once both statues for that phase are restored, the phase ends when Amascut is damaged to her hitcap, or once she fully recovers
Portals (Inside Rooms)
⬥ In order to cleanse the statues, players must enter through a portal on each side of the arena, guarded by a Gatekeeper gorilla akh
• Gatekeeper gorilla akh has crawling speed, can potentially stun players with attacks
• Once inside, the players must work together and towards killing the Chainwarden mage akh and the chains preventing the players from claiming a Fragment of Tumeken
⬩ The chains, once they drop to 0 LP, must be cleansed to fully destroy them, and once all three are destroyed, the Fragment of Tumeken can be claimed to restore its respective statue
Solution:
⬥ Gatekeeper gorilla akh can be dispatched relatively easily with high burst damage
⬥ Inside (Chains) and Outside (Statues) players must work together to take out the Chainwarden, Chains player takes out two chains and carries the Fragment of Tumeken, while the Statues player takes out one and cleanses their side's statue
• In Phase 4, both players remain inside as the Base Tank can singlehandedly cleanse both statues due to their proximity
⬥ Chains player runs the Fragment of Tumeken across the arena, the correct statue to restore is on the opposite side of where they entered through the portal (e.g. East player must ferry the fragments to the Western statues)
• While carrying the Fragment of Tumeken,  ,
,  & are disabled,
  can still be utilised
Apmeken's Burden 
⬥ Shortly after Phase 2 starts, Amascut marks one random player who is outside with Apmeken's Burden, a hard hitting bleed that deals typeless damage
⬥ The bleed wears off after a while, length based on enrage
⬥ If Apmeken's Burden deals damage to a player for the 8th time (indicated by the number of stacks on the debuff), that player is instakilled
Solution:
⬥ Players can pass Apmeken's Burden around to reset its stacks, to pass the debuff the player must be standing in a 1 tile radius of the player who never got the burden during the phase when its damage ticks
⬥ Should the debuff be applied, it can be safely ignored in enrages less than 2000% as it will never instakill
⬥ Apmeken's Burden can be skipped entirely, if Amascut cannot find a target when she tries to mark a player (e.g. all players are inside the portal) the debuff will never be applied
Modest Crocodile Demons 
⬥ At the start of Phase 2, and again once the statues are restored, two Modest crocodile demons will spawn, one for each side of the arena
⬥ Modest crocodile demons primarily attack with , sometimes attacking with if their target is too close
• Once the adrenaline bar above their head is charged, they fire a attack that cannot miss, draining the player's adrenaline by 20% and halving their adrenaline gain for a short time
⬥ These creatures have the Modesty and Provoke Immune buffs, reflecting damage from enhanced and ultimate abilities, as well as special attacks while preventing from changing their targets
Solution:
⬥ Pray against their attacks and use basic abilities and conjures  to kill them
• Necromancers are strongly recommended to  as it will speed up the kills
⬥ They will attack the first target they see until they lose them; as they are Provoke Immune, Statues roles should have their aggro once the second set spawns, Base Tank can tank/dispatch the first set
Healing in Strength 
⬥ Amascut will heal for a portion of all damage dealt by her minions (except for the Chainwarden mage akh) during Phase 4
Solution:
⬥ This mechanic can be safely ignored as the healing is usually negligible
• If going for You Shall Not Heal Combat Achievement,  /
/  /
/  is strongly recommended to stop Feline guard akhs and Gorilla gatekeeper akhs from dealing damage with their attacks
Explosive Scarab Akhs 
⬥ During Phase 4, Amascut will summon Explosive scarab akhs with 5000 LP and no damage immunity
• In addition to the scarabs, Gorilla gatekeeper akhs, Chainwarden mage akhs and Chains all gain damage immunity through the Carapace buff
⬥ On death, the scarabs will start filling a bar above their head, causing them to explode once filled dealing soft typeless damage to all players in the arena
• Any remaining scarabs at the end of Phase 4 will simultaneously die and start charging
Solution:
⬥ Scarabs can be grabbed and tossed at targets once they have been killed and start charging their explosion, doing so will lift the Carapace buff from enemies (green glow around them)
• To throw a scarab, click on a dead scarab to grab, then click on a target to throw it
⬥ At the start of Phase 5, use to null all of their damage as they explode
Floor Mechanics (Devourer's Shockwaves, Soulfire Waves, Devourer's Hieroglyphs)
⬥ Amascut will blast the ground with high damage Shockwaves, Hieroglyphs or Soulfire Waves, similar to Nakatra in Sanctum of Rebirth
• Shockwaves have a fixed pattern and deal typeless damage, disabling defensive abilities and putting them on cooldown for 6s
• Soulfire Waves sweep the arena in a set pattern dealing high damage and lowering the duration of
• Hieroglyphs split the arena into 9 5x5 tiles, dealing heavy typeless damage and disabling defensive abilities as well as putting them on cooldown for 6s
⬥ Shockwaves appear in Phases 2 (West side), Phase 3, Phase 4 (East side) and Phase 7
⬥ Soulfire Waves appear in Phase 2 and Phase 4
⬥ Hieroglyphs appear in Phase 7 only
Solution:
⬥ All floor mechanics are telegraphed, move out of the way if possible
• For Soulfire Waves, praying will mitigate some damage, and  both block one hit, can block hits while praying but will suffer duration reduction
⬥ In Phase 7, dodging Shockwaves and Hieroglyphs will reset the cooldowns of all movement abilities
Fight Mechanics (Phase 5)
⬥ Amascut will go Immune once again, and summons a pair of soul obelisks that slowly charge towards periodic bursts of damage
⬥ To progress the fight, the players must work together to charge the Fragments of Tumeken freed in Phases 2 and 4
⬥ There is no timer in this phase
Altar Charging
⬥ Four fragments of Tumeken, two on each side of the arena, will appear directly across the statues
• Far fragments are Crondis and Apmeken, and can be charged by the Solo Charge role
• Near fragments are Scabaras and Het, and must be charged by the South Charge and Interceptors
⬥ To charge a fragment, the players must form a bridge to carry Tumeken's light shooting out of the statues
⬥ Once at least 1 fragment is charged, players can click on Tumeken to start reforming him
• Ideally, at least 2 fragments must be charged before clicking on Tumeken to start reformation
Soul Obelisks
⬥ A Soul obelisk will spawn on each side of the arena, slowly charging up its health
⬥ Once fully charged, it will start dealing periodic to all players in a fairly large AoE
Solution:
⬥ So long as the obelisks take damage, they will not charge up
• Using a damage over time ability  /
/  will stop it from charging up without having to actively focus it
⬥ Finishing a charging cycle will also reset the obelisks
Lightstealer salawa akhs (a.k.a. Dogs)
⬥ While any number of altars are charging, Lightstealer salawa akhs (dogs) will emerge from the southern stairs, moving towards the charging fragments
⬥ If the dogs make it to their target, they will start to slowly charge up, then sacrifice themselves after fully charging, setting back progression for that fragment by a significant amount
• If the fragments have been recalled, they will target Tumeken instead; if they deplete Tumeken's health, it will result in a WIPE
Solution:
⬥ Players at the southern side of the arena can use / / to stop the dogs from moving
⬥ Attacking will also change their target to the player who dealt damage to them
⬥ As soon as Tumeken recalls all fragments and starts reforming, they become high priority targets; strong AoE rotations (e.g.  →
→  ) must be utilized to remove them from the arena as quickly as possible
Note: Lightstealer salawa akhs will remember their progress to snuff out the light of one of Tumeken's fragments, e.g. if one of them had their charge bar halfway full and switch target over to Tumeken himself, they will continue charging from where they left off, this can lead to unexpected wipes
Altar Strike
⬥ So long as any altars are charging, Amascut will say Your light will be snuffed out once and for all and launch 1-4 arrows at the altars based on how many altars are charging, dealing heavy damage and reducing a fragment's charge by a significant amount
Solution:
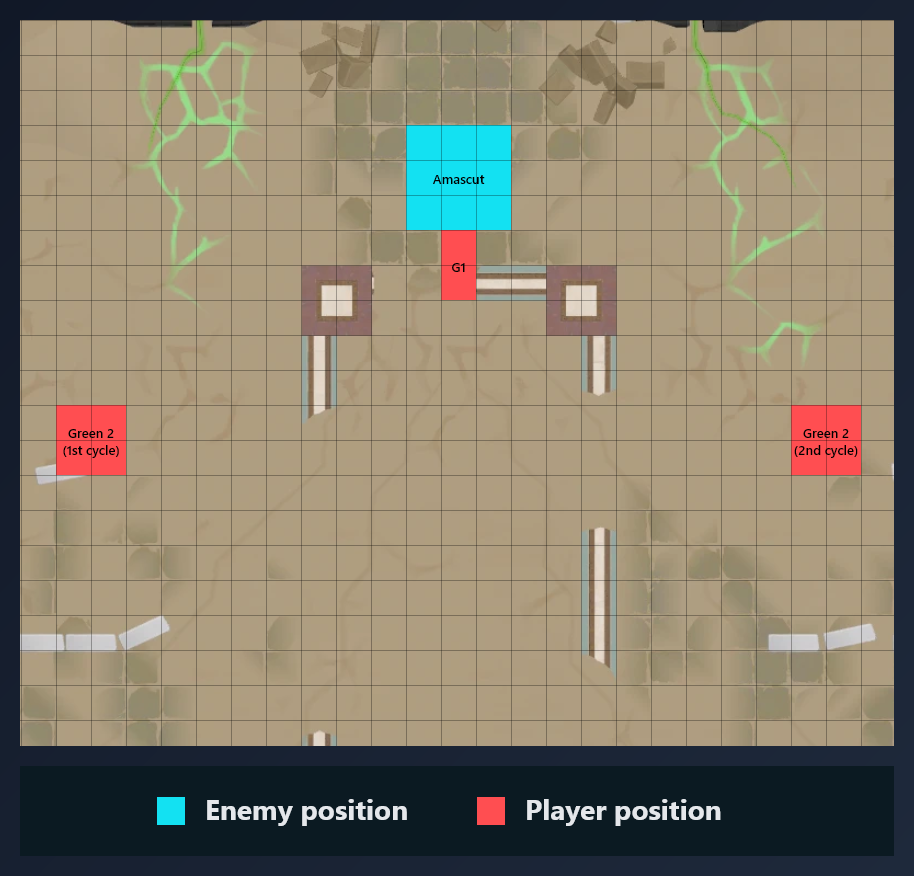
⬥ Two Interceptor players (Green 1 & Green 2) take turns to stand in front of Amascut, stopping the bolts from flying at the altars; refer to the image below for positioning
• Interrupting Altar Strike deals soft typeless damage that also inflicts the Interceptor debuff, any player with the debuff that gets hit again with Altar Strike is instakilled
⬩ The debuff is cleared if another player intercepts the bolts
⬩ Incoming damage should be mitigated with  /
/
⬥ One good tip is to drop down a  at the North Charge spot for the Interceptors to swap more easily
The God of Destruction (a.k.a. Blinking strikes)
⬥ As soon as Tumeken starts reforming, Amascut becomes damageable and blinks to a random side of the arena (North, South, West or East), dealing damage and stunning any player in her way
⬥ During this stage, Amascut will charge four devastating attacks (once per jump) that will deplete Tumeken's reformation progress
⬥ If not intercepted properly or intercepted at all, it will set back Tumeken's reformation progress and deal heavy soft typeless damage to all players as well as stunning them
• If Tumeken's life bar depletes, the players WIPE
Solution:
⬥ Tumeken will call a player to intercept the attack by saying <playername>, shield us from her shadow...
• The player who is called out will notice their skybox turn golden
⬥ The player called out by Tumeken must be the first player to be hit by Amascut's attack, intercepting it and preventing potentially lethal damage
• If they are not the first player to get hit, the attack will deal damage as if it wasn't intercepted at all
⬥ All players who are standing in a line between Amascut and Tumeken will take typeless damage and have the cooldowns of all mobility abilities reset, allowing easy repositioning
Note: Tumeken will never call the same player to intercept twice in a row
Fight Mechanics (Phase 6)
⬥ Amascut will summon an Engulfing shadow that consumes Tumeken, constantly bombarding the arena with projectiles that deal heavy typeless damage
⬥ To progress the fight, the players must follow the Path of Tumeken and take Tumeken's light
The Path of Tumeken (a.k.a. Platforms)
⬥ The center hieroglyph either on west or east side of the arena will start glowing, indicating that a player can follow the Path of Tumeken
⬥ The player following the Path of Tumeken (climbing) must kill four mage/range akhs in 30 seconds
• If the collapse timer runs out, the climber is instakilled , and Amascut will deal however much black health she has as typeless damage to players, split between all players in the arena
Solution:
⬥ Akhs have only 15k LP, high burst damage will kill them in one or (at worst) two hits
⬥ While climbing, the climber will see a glowing hieroglyph under the platform they're standing on, if another player stands on the same glyph the climber calls out, the collapse timer will be paused until the next platform
⬥ Once the four akhs are dead, the climber can click on Tumeken's light to finish climbing and gain the Enlightened  buff, for the remainder of the phase they are Amascut's main target
Climber Rotations
Both rotations assume they start as soon as Amascut calls I WILL NOT BE DENIED at the start of Phase 6
⬥ Necromancy  (assumes 8
  & 4
& 4  ):
):  +
+  →
→  → → + + (towards the Path of Tumeken) → click the Path of Tumeken → (tc)
 → → (tc)
  → → (tc) → → (tc)
 → click Tumeken's light
⬥ Melee :  →
→  →
→  → + (towards the Path of Tumeken) → click the Path of Tumeken → (tc)
  → (tc)
  → (tc)
  → (tc)
  →
→  → click Tumeken's light
Add a basic attack  /
/  if they don't die in 1 GCD
Notes:
⬥ At 2000% Enrage and higher, a climber will be chosen randomly by Tumeken, indicated by their skybox turning golden
⬥ As a last ditch effort, if the climber times out , a well timed will negate all of the damage, but Amascut will have much higher health than if she was phased normally
Engulfing shadow & Shadow tears
⬥ At the center of the arena is the Engulfing shadow, which continuously increases Amascut's shield (black health) for the phase based on how much life it has
⬥ Every time the climber kills a range/mage akh, Engulfing shadow tears will spawn across the arena, increasing in quantity for each akh killed and number of players present
• These tears will heal the Engulfing shadow for 1000 health every tick, and for 15K health if not absorbed in time
Solution:
⬥ Engulfing shadow cannot be killed; the players on ground level must deal as much damage to it as possible to keep its health low
• is counterintuitive as the shadow will respawn with more health
⬥ Engulfing shadow tears can be absorbed, preventing them from healing the larger Engulfing shadow, doing so will inflict a stacking debuff that deals damage
• will fully block the hit, but is best reserved for Clones
Shadows of Amascut (a.k.a. Clones)
⬥ Once Tumeken's light is claimed by the climber, Amascut will summon a Shadow of Amascut for each player alive who isn't the climber
⬥ If outside melee distance, they will dash at their target dealing damage, if in melee distance they will swipe at their target dealing damage
⬥ If not all of them are dead at the same time, dead clones will deal huge damage to all players who aren't standing in the climber's Enlightened buff
Solution:
⬥ Go directly behind Amascut and stack up with the rest of the DPS pile who aren't climbing, pray for the initial dash attack from clones, pray afterwards
⬥ Kill them as quickly as possible with a strong AoE rotation (assumes you start as soon as she says I WILL NOT BE SUBJUGATED BY A MORTAL!, adjust timing based on clone spawn):
• Necromancy : → / (+ ) →  →
→  → → → improvise
• Magic :  +
+  →
→  + → / (+ ) → →
  →
→  →
→  → improvise
⬥ Amascut becomes damageable once the clones are dead, unload as much damage as you can in ~20 seconds to remove her black HP and deal damage to her real HP to make Phase 7 easier
• Necromancy : Aim to enter Phase 7 with at least 8 and 4
Player Bomb
⬥ If the clones are not killed in time, Amascut will turn the players under attack by her clones into bombs, dealing ~12k typeless damage with defensive penetration to all players in a 7x7 area after a short time
Solution:
⬥ Finish off all clones before the players detonate, nulling all damage
⬥ If the clones cannot be finished off in time, players must stand near the climber who has the Enlightened buff (appears as a golden aura around them) to null most of the damage
Note: Any blast from outside the Enlightenment buff will still clip players who are inside of it
Fight Mechanics (Phase 7)
⬥ Amascut pulls all players towards her and teleports them to a twisted version of the Throne Room, gaining Inner Shadow  buff that massively reduces incoming damage
⬥ To finish the fight, players must withstand Amascut's onslaught and lower her health to 0 while preventing Tumeken from dying by intercepting her attacks on him
Tumeken Strike
⬥ After 4 auto attacks in the first cycle and 3 auto attacks in subsequent cycles, Amascut will address one of the Bau of Tumeken by name and face Tumeken directly, charging an extremely powerful attack
⬥ If intercepted incorrectly or not intercepted at all, the attack deals massive damage to Tumeken and heavy soft typeless damage to all players in the Throne Room
• If Tumeken dies, the team WIPES
Solution:
⬥ Players are assigned a quadrant based on their P2/4 roles, with Base Tank acting as fill should a player die
• Inside players are usually expected to go North, while Outside players go South
⬥ Amascut must be towards the correct statue within ~3 GCDs, based on the following callouts:
• Het - Forgive me, Het. (Southwest)
• Apmeken - I am sorry, Apmeken. (Northwest)
• Crondis - Crondis... It should have never come to this. (Southeast)
• Scabaras - Scabaras... (Northeast)
⬥ Once to correct statue, move out of the way or / to survive the massive followup typeless hit
Notes:
⬥ A singular bolt of light will shoot out from Tumeken to the correct statue, acting as a visual indicator for which statue is the correct one
⬥ Statues in the room can be examined if in doubt about which statue is the correct one to stand in front of
Tumeken Strike (cont., on Fail)
⬥ If the players fail the Tumeken Strike mechanic, players will take massive typeless damage, and shadow tears will spawn across the room, while she resumes auto attacks
⬥ Amascut's main target will also be targeted with Soul Crush after 3 auto attacks
Solution:
⬥ / pre-emptively to avoid taking huge typeless damage
• If Tumeken dies, it doesn't matter as the team wipes instead
⬥ Try to collect as many Shadow Tears as you can, as they will heal Amascut for 1000 LP/tick per orb
⬥ Huddle together or (Base Tank) → / / (depending on enrage) to survive Soul Crush
Tumeken Strike (cont., on Success)
⬥ If the players successfully handle the Tumeken Strike mechanic, Tumeken will take light damage and players will gain Light Within for 30s, lifting the damage cap from Inner Shadow
⬥ During this phase, Amascut will continuously perform her Empowered Eruption attack, as well as Devourer's Hieroglyphs and Devourer's Shockwaves
⬥ Based on which of the Bau of Tumeken was called, Amascut will invoke a mechanic from the previous phases:
• Apmeken: A random player receives Apmeken's Burden
• Crondis: Two Modest crocodile demons spawn
• Het: Amascut heals for 25% of all damage she does to players
• Scabaras: Amascut becomes shielded and summons Explosive scarab akhs
Solution:
⬥ Try to deal as much burst damage as possible within the first few seconds of receiving the buff to finish off Amascut to skip all follow-up mechanics (except if Scabaras was called)
⬥ Depending on which of the Bau of Tumeken was called:
• Apmeken: Burden acts the same way as it does in Phase 2 and can be passed around between players, on lower enrages or if the boss can be bursted to 0 this can be ignored
• Het: Can be safely ignored as the healing per hit from each attack is usually negligible
• Crondis: Can be ignored if Amascut can be bursted down to 0 quickly, otherwise prioritise them to avoid taking too much off-style damage
⬩  will bounce onto the crocodiles, resulting in potentially fatal reflection damage
• Scabaras: Players must throw 3 Explosive scarab akhs at Amascut to remove her shield
⬥ Empowered Eruption and floor mechanics will happen in tandem, players must focus on dodging the floor mechanics and praying correctly with defensives if bursting Amascut down to 0 within the first few seconds of receiving the buff isn't possible
Base Tank Troubleshooting
This section is reserved exclusively for troubleshooting Base Tank issues in higher enrages (1000%+), but may also be applicable for lower enrages.
⬥ Modest crocodile demons attack at the same time with different styles
• Solution: Prioritize praying if getting off-styled on the same tick, as the attack can miss; / can negate a lot of damage from the crocodiles
⬥ Base Tank from spot becomes immobilised after tanking Soul Crush with , leading to a follow up Devourer's Shockwaves hit
• Solution: 1 tile outside the first (outer) set of shockwaves to avoid defensives reset,  to avoid being moved back in
⬩ 2+ tiles away from shockwaves can potentially make Amascut switch targets during Soul Crush
⬩ Necessary if going for Dedicated Denial of Standing (here) Combat Achievement
⬥ If Amascut starts P3 with Rapid Swipes, third one lines up right after Soul Crush, resulting in a high KO potential situation
• Solution:  with
with  or better will cover Rapid Swipes and scarabs exploding
⬩ Alternatively, the team can and split the big hit instead
Example Kills
⬥ 1000% Necromancy Base Tank POV
⬥ 1000% Ranged/Melee Hybrid DPS POV