Vorago - Solo Hardmode w/ Necromancy
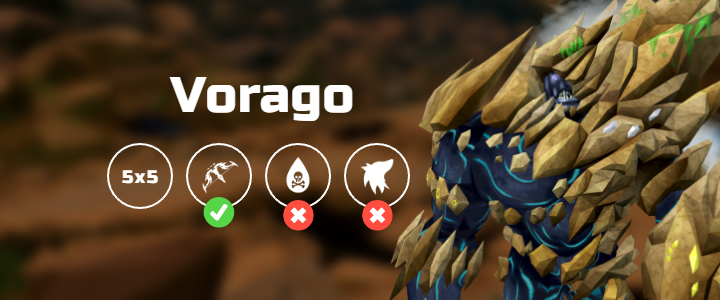
Introduction
⬥ Solo Hardmode Vorago is one of the hardest PvM challenges in the game and will require good improvisation skills. Therefore, a strong understanding of the combat system is required.
⬥ A basic understanding of the boss and P10/11 pushback is assumed and strong knowledge of solo normal mode P5 will translate well to hardmode and save time learning
• It is recommended to read #Necro Solo Vorago intro guide first to make sure you have a base knowledge of solo Vorago
• It is assumed you have 6/6 solo NM Vorago before attempting this
⬩ A good goal before starting is to solo all normal mode weeks before 2nd spec
Preset and Relics
 Double Surge - Essential for clearing bleeds
  ⬥
⬥  Zemouregal's Nexus - For
 Ogre flask (thermal) &
  Bonfire Boost
⬥
Bonfire Boost
⬥  Penance powder /
  Blessed Flask
• Your first kill can be extremely long, especially if aiming to Vit Cap
⬥
Blessed Flask
• Your first kill can be extremely long, especially if aiming to Vit Cap
⬥  2x Elder Malletops pens in PoF
• Increased Barricade
2x Elder Malletops pens in PoF
• Increased Barricade 
 Spirit Weed/Lantadyme incense sticks
•
Spirit Weed/Lantadyme incense sticks
•  Ogre flask (salt water) for P1 run energy
Preset Notes
⬥  Powerburst of Vitality is used on Phases 1, 6, and 8
• The rest of the doses are for tanking Teamsplits or Green Bombs P10/11
⬥  Numbing root to help clear bleeds on Phases 2, 5, 10 (Purple Bomb), and 11 (Vitalis)
⬥ 
 for hitpoints
  while tanking green bombs + Turtling
  switch
⬥  For dealing with Vitalis
• Not needed on TS week
⬥ 

 Runes for:


•  can also be used on extremely long encounters
Fight Overview
Phase 1
⬥ Vitality pot last tick of dropdown message. The damage taken will be calculated off of your pre- HP
⬥ Place a Prism of Restoration at the gap before starting the climb and after jumping
⬥ Do not pre-cast  as they will aggro Vorago and cause him to throw blues at you
• You can cast it while climbing before you click on Vorago
⬥ 
 are used before grabbing aggro / jumping
⬥  can be used same tick you jump
• If done properly will be applied to Vorago on the first ability after jump
⬥  After the climb
Phase 2
⬥ Same as normal mode
⬥ BHD can be accomplished via a 5 stack  ,
,  ,
, 
 ,
, 
• If having issues, right before clicking the gravity orb
•  after clicks but before he is attackable
Phase 3 - Phase 8 Overview
⬥ The P3-P8 written below focuses on surviving even if substantial time is lost
• There are instances where a phase is elongated to add ease to the follow phase by waiting on cooldowns
⬩ Turn away if looking for speed
⬥ The start of most phases starts the exact same (will refer to this as the pre-phase)
• → → → →
⬩ If done without tick loss, the next ability can be target cycled on the first tick Vorago is attackable
• Aim to also re-set  autofire to 1 during each pre-phase
⬥ Besides these starting abilities, most of the phases rely on improvisation and only general rotation guidelines will be provided
P3: Ceiling Collapse
⬥ Target cycle +  +
+ 
• If you miss a tick you will hit yourself on reflect
⬥ during reflect
•  2nd bomb
• You can before reflect ends due to its travel time
P4: Scopulus
⬥ Can omit from the pre-phase since it will be applied later in the phase
⬥ Start south so that you can tc + and have it bounce between the south two Scopulus
⬥ second ability to be able to quickly build 
⬥ Run up either east / west wall while building + 
• You will run in a giant circle during this entire phase, direction does not matter
⬥ At 8 and 2 : target cycle + →  →
→  → →
→ →
• Target cycle to a different scop since you are likely to kill the one you have been focusing on with volley
⬥ Scops are low health so  can be used to get +10s from killing 2 of them
⬥  is also recommended since it will spread to the other scops when one dies with on it
⬥ End on high adrenaline for the next phase
P5: Vitalis
⬥ Can omit from the pre-phase since it will be applied later in the phase
⬥ Very important to set reaver to 1 + as part of the pre-phase
⬥ Stand MD to Vorago to keep LoS
⬥ Target cycle + → → → 
 before reflect
⬥ During reflect target a vitalis + → → then → → on Vorago
⬩ This will kill all the Vitalis around you and let you run to clear bleeds
⬥ Pre-run away from Vorago and the next Vit orb to clear bleeds
• Save  for emergencies
• 
 to clear bleeds but always keep running
⬩ Aim to stay away from the Vitalis
• can be used to tank bleeds in a pinch
⬩ If you do this, remember it next phase since you wont have it for green bomb
P6: Green Bomb
⬥ Target cycle + →  → →
→ →
⬥ first Green bomb
⬥ during reflect
⬥ Use to tank the second Green bomb
• Can  the blue right before the GB
⬥ Should be phased before 3rd GB lands
P7: Teamsplit
⬥ Omit from the pre-phase
• Use during first TS instead
⬥ This phase is used to reset all cooldowns in preparation for P8
⬥ after second teamsplit
⬥ T95 rotation works great
⬥ Make sure to have 
 off cooldown for the next phase
P8: Purple Bomb
⬥ Omit the from pre-phase
⬥ Target cycle +
⬥ First rotation
• → → while heading to quadrant
• + → → first quadrant
• ASAP
• and click the red bombs
• on stand
• before reflect
⬩ Since is delayed damage, you can cast it before stand slightly
⬥ Second rotation
• ASAP
• Should be phased before second stand so don't click reds
P9: Waterfall
⬥ Same as normal mode
⬥ Set up in preparation for P10/11
• Make sure 
 are applied
•  is turned on
• If Vit week, summon 
• Cast in the last waterfall except on Ceilings/Teamsplit since they start with Teamsplit P10
•  Build the maul
P10/11 Overview
Stalling Vorago
⬥ One of the most important thing for this phase is extending the amount of time you have to do damage
⬥ Keep Vorago moving (Push/Pushback) because this stalls out his next attack
• String together lots of damage at the same time
⬩ used during to keep the push going
• Do not waste , instead use it only when about to maul or if the blue would not extend your DPS window
⬩ For example, the blue right before you bomb stack usually lands after reflect starts. This is the optimal bomb to
⬥ When you since there is minimal push and no push-back Vorago will quickly throw out autos
Applying Debuffs
⬥ Aim to apply when in a TeamSplit or when running out to bomb stack
• can also be used at the end of these to maximise the damage window from them
• This is VERY important on P10 TeamSplit week due to the minimal damage windows
Defence Scaling
⬥ Upkeeping is of utmost importance to raise your hitchance from ~87% to 100%
• Stacks applied P10 carry over into P11
⬩ On Ceilings / Scopulus / Purple Bomb it is important to end P10 at 100% hitchance
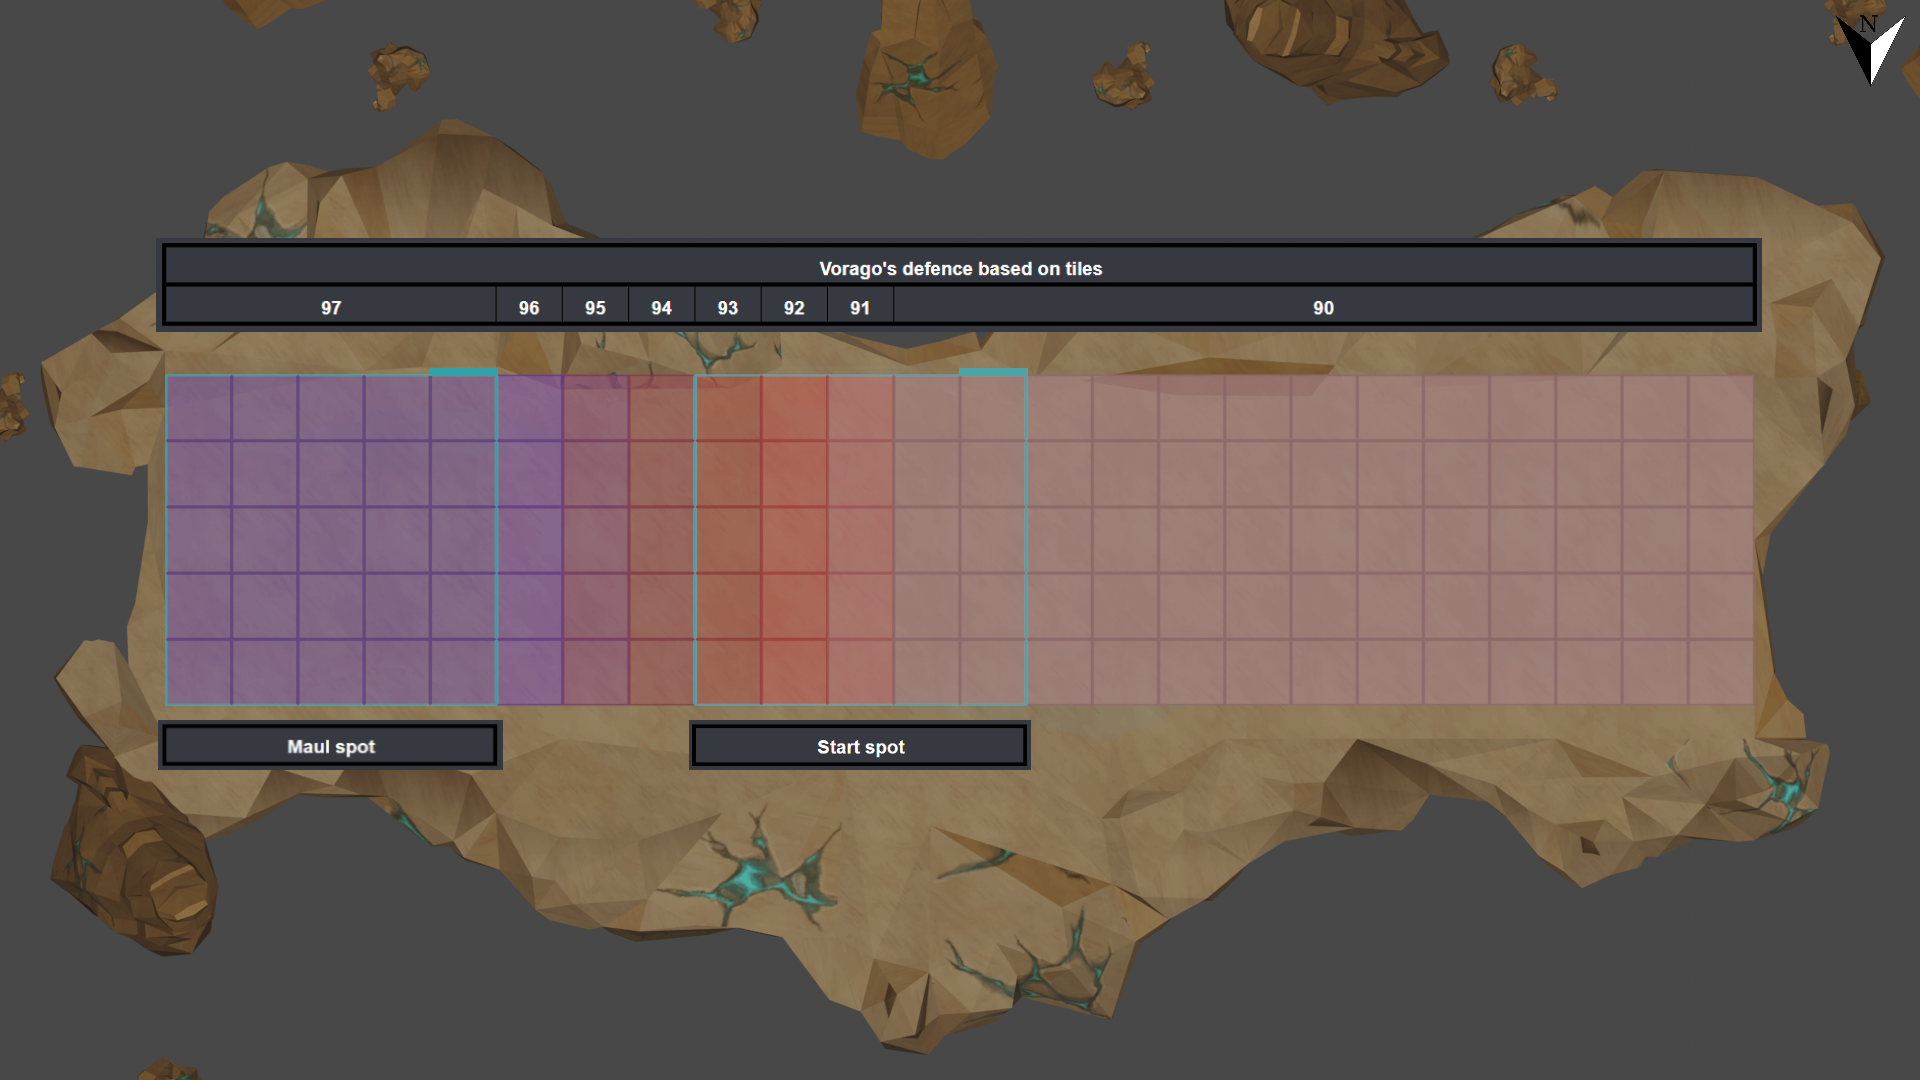
⬥ Vorago will increase its defence based on how close it is from maul spot, starting at 90 defence and scaling up to 97.
• If you get pushed back from the starting point it won't decrease below 90.
• For P11 he has maintains the max defense of 97 from P10
Stacking Bombs
⬥ Anytime you are melee distance to Vorago, you run a chance of either getting a blue or a melee hit + blue, so stacks are not perfectly consistent
⬥ 3 auto stack:
• Consists of a 9-11 tile blue → 2-3 tile blue → md auto to potentially negate 2 autos worth of pushback
• So, stand 9-11 tiles away, wait for the first blue to release, into 2-3 tile range, wait for the second blue to release, then walk md
• This requires the player to not attack the boss in order to prepare for a 9-11 square auto. Also, pushing the boss during a triple stack will ruin it
• For solo hm in particular, this is useful for P10/P11 reflects that are not barricaded
⬥ 2 auto stack:
• Consists of a 2-3 tile blue → md auto to potentially negate 1 auto worth of pushback
• If done outside of a reflect, take this time to use weaker abilities to build adrenaline. Pushing the boss while trying to stack will stagger the auto timings
• For solo hm in particular, this is useful for P10/P11 to stack 1st and 2nd autos of reflect if close to instakill ledge
⬥ PB stack:
• Consists of a PB landing + blue to potentially negate 1 auto worth of pushback
• Can go a step further and combine this with other stack methods to negate even more pushback
Broken TeamSplit
⬥ A broken TS  will occur for every teamsplit immediately after a reflect
• TeamSplit Week: Even-numbered TeamSplits during P10
• Scopulus Week: TeamSplits during P10
• Green Bomb Week: TeamSplits during P11
⬥ Vorago will be able to attack much sooner than normal during a
• If Vorago pushes you due to receiving damage after the spawns the teamsplit will be more broken than usual
⬩ It will throw 2 blue bombs  one a tick next to each other during or before the explosion
• If Vorago doesn't push you back it will result in a usual broken teamsplit, throwing the first blue bomb during or shortly after its explosion
⬥ Use one of the following to un-break TS:  / / /
/ / /
• Using /  during the TS can help immensely as well
• Example of an extremely broken teamsplit, where you get pushed back after the teamsplit spawns:
• Example of a usual broken teamsplit, where you don’t get pushed back after the teamsplit spawns:
Vitalis Orbs and Red Bombs
⬥ 3-5 Vitalis spawn every orb in hardmode
• If you stand on the orb, one less than normal will spawn (2-4)
• Often you will not have line of sight of all of them
• Multiple can spawn on the same tile
⬥ The goal should be to instantly deal with vits, and often you will want to be under
⬥ Necromancy alleviates most of the issues of vits once you get used to the timing
• + → / should deal with them
⬩ Make sure to have 5 or at least 8
⬩ If you don't should be used prior to (or if in general you aren't killing them with your first ability)
⬥ Target cycle before you can see them physically spawn (usually on vit orb explosion)
• It is worth it to lose ticks while vit orb is coming out to get the target cycle timing correct
• In this example, watch for when the EoF keybind (on the bottom action bar) lights up for the target cycle timing
⬥ Stay roughly in the center of where vits spawn to have the highest likelihood of no LoS issues
⬥ If you miss the target cycle or do not have LoS of some of the vits, focus on maintaining LoS with Vorago above all
• Otherwise he will free walk forwards and you will lose a lot of squares of push
⬥ This clip misses target cycle but manages to keep LoS of Vorago and then maneuver to a position to get LoS to kill the vit which ran away
⬥ Vitalis will still block LoS even during death animation. Make sure to get back into LoS of Vorago by running MD
⬥ After 24 Vitalis have spawned, no more can spawn
• The vit orb explosion will still deal 1 square of pushback, but just dont get hit by it
• If only 1 Vitalis spawned on a Vit orb, the cap has been reached (since at minimum 2 will spawn in other scenarios)
⬩ This does NOT happen on Vitalis week
⬥ If Vorago is within 3 tiles of pushing you off P10 or 6 tiles P11, he will throw out a red bomb instead of a vit orb
• This comes with the standard non-homing blue
⬥ This can be utilised to slowly work towards vit cap by greatly staggering when vits come out
• will always be up when dealing with vits this way
⬥ This can lead to "Red Bomb Hell"
• Since you are close to the edge, you are no longer able to do a 3-stack during reflect
• It takes a lot of push to get away from the edge and get back to spawning vit orbs
• Having ready for the push immediately after the red bomb spawns can help alleviate this
Mauling
⬥ It is very important to maul at a specific time rather than whenever Vorago is in maul spot
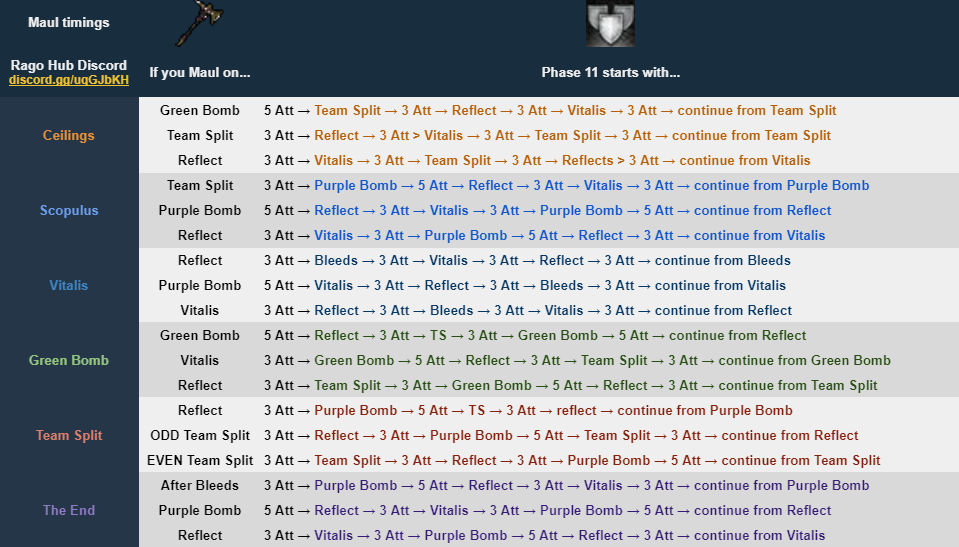
⬥ The goal for maul-timing is to avoid Vitalis for the longest period of time. There are two options for this:
• First option is to maul whenever it would take the longest for the Vit orb spec to happen
• Second option is to maul whenever Vit orb is next, but you force the red bomb special instead
⬥ There are a few main exceptions to this rule
• Teamsplit does not have Vitalis either phase
⬩ Maul on Reflect
• Green bomb does not have Vitalis on P11
⬩ If you do not vit-cap, maul whenever as long as you believe you can consistently do the P11
⬩ If you do vit-cap, maul on Reflect
• Vitalis has Vitalis on P10 and P11
⬩ Maul on reflect to be able to deal with bleeds effectively P11
Ceilings P10/11 Overview
⬥ P10 is TeamSplit/Green Bomb:
• Stall out this phase to be able to reach 100% hitchance before going into P11 to be able to deal with vits
• after TeamSplit
• the end of reflect
• / to tank the Green Bombs
⬥ Maul either on GB release or on Reflect
• If mauling on reflect you will want to bait out the red bomb start of P10
⬥ P11 is TeamSplit/Vitalis:
• When learning, may not be off cooldown every vit orb for target cycle
⬩ Just when possible and potentially you will have to kill vits during TeamSplit
• either after TeamSplit or before Vit orb
• during reflects
⬩  is needed to maximise due to tight damage windows this week
⬩ Do not rely on + without
Scopulus P10/11 Overview
⬥ P10 is PB/Broken TS:
• Stall out this phase to be able to reach 100% hitchance before going into P11 to be able to deal with vits
• Very large damage window after broken teamsplit to do a full rotation
• during PB such that it lasts through reflect
⬥ Mauling on reflect and baiting out the red bomb the start of P11 is the easiest
• It is hard to maul on TS
⬥ P11 is PB/Vitalis:
• end of reflect to be able to deal with vitalis
• end of reflects when you dont have
• isn't cleared by either mechanic and will always run the full duration, making it very strong
Vitalis P10/11 Overview
⬥ P10 is Vit/PB:
• Use solely for dealing with Vitalis
• at the end of reflect or during purple bomb
• isn't cleared by either mechanic and will always run the full duration, making it very strong
• Resummon  once you are at 100% hitchance
⬥ Maul on reflect
• To do so, get Vorago into maul position before vit orb spawns
•  and run melee distance
⬥ P11 is Vit/Bleeds:
• The beginning of this phase is where you are most likely to fail
• Save for start of P11
⬩ Vorago will throw 3 blue bombs before bleeds start
⬩ If using  to clear bleeds, you need to stand melee distance + have not lost any tiles
⬩ rotation works well to get the 2 tiles you need
• is for dealing with vitalis
• end of reflects
• isn't cleared by either mechanic and will always run the full duration, making it very strong
Green Bomb P10/11 Overview
⬥ P10 is GB/Vit:
• This is the hardest phase to aim to vit cap
• / to tank the Green Bombs
• Red Bomb Hell is even harder to deal with since to trigger a red bomb you must be even closer to the edge on P10 than in P11
• to deal with vits
• end of reflects
• isn't cleared by either mechanic and will always run the full duration, making it very strong
⬥ Maul on reflect if you have vit-capped
• If not, maul at any point if you believe you can salvage the P11
⬥ P11 is GB / Broken TS:
• in broken TS
⬩ Aim to always have , do not rely on +
• once you un-break the TS
TeamSplit P10/11 Overview
⬥ P10 is TS/Broken TS:
• during the broken TS
• after the normal TS
⬥ Maul on Reflect
• the 3rd bomb after TS while Vorago is in maul spot to do so
⬥ P11 is TS/PB:
• after TeamSplit
• end of reflects
Purple Bomb P10/11 Overview
⬥ P10 is PB/Bleeds:
• Same as normal mode P5 but the PB causes one square of pushback
• Stall out this phase to be able to reach 100% hitchance before going into P11 to be able to deal with vits
⬥ Maul after the third bleed or on Reflect if you aim to get a red bomb start of P11
⬥ P11 is PB/Vitalis:
• end of reflect to be able to deal with vitalis
• end of reflects when you dont have
• isn't cleared by either mechanic and will always run the full duration, making it very strong
Example Kills
Vorago Achievements Sheet
Once you have gotten a Solo Hardmode kill, feel free to submit your kill to the sheet!
Content Provided by: @jibyjib
Formatting Maintained by: @Unknown user