Telos: BOLG Ranged 

Introduction
This guide assumes a very strong understanding of everything found in #telos-basic, #Stuns & Mechanics Overview and #P5 Movement & Timing.
Notable Enrage Checkpoints and Changes (999+)
⬥ 1000% P4 one rock will fall, P5 multiple rocks will fall,  no longer works P5, and Telos will
  stuns and binds with a 16 tick cooldown.
⬥ 2000% "So you think you can guard?" Achievement, aka Silver Warden.
⬥ 2700% Tendrils damage required caps at 30,000.
⬥ 3300% The first prayer drain on P3 smites you from full unless Telos touches the beam.
⬥ 4000% Hard enrage cap; "True Warden" achievement, aka Gold Warden.
Presets and Relics
⬥ Ranged w/ Bow of the Last Guardian
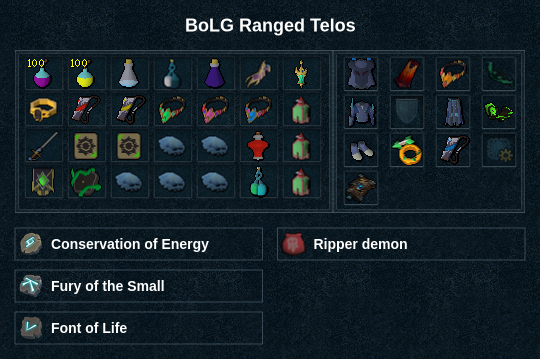
Preset Notes
⬥  should be active the entire time.
⬥  should be used.
⬥  and
and  should be used.
⬥ T2  and high
  level is required for
  with
with  and
and  during p5.
⬥  switch with
  is used during p4/p5. (optional)
Rotations
Phase 1

 →
→  +
+  →
→ 

 →
→  at 36% →
  → (tc) +
  →
→ 
 →
→  →
→  →
→ 
 →
→  →
→  +
+  to jump spot
If using  and
and  procs on
  replace
  with
with  and
and  after while
  to jump spot
Phase 2


 →
→  +
+  →
→  →
→  +
+  →
→  →
→ 

Phase 3


 →
→  →
→  +
+  →
→  → run to middle, then in
  → (1t) →
 →
→  →
→ 
Phase 4
Rotations here are left in simplified form, with a strong understanding of P4 timing and movement being assumed. If in doubt, reference #Ranged Telos (no BOLG) for a detailed font-by-font description.
Drop

 →
→ 
Font 1
 →
→  →
→  →
→  →
→  →
→  →
→  +
+  →
→  → target
  +
+ 
 →
→ 
Font 2
 →
→  →
→  →
→  →
→  →
→  +
+  →
→  → target
  +
+  →
→ 
Font 3

 +
+  →
→  →
→  →
→  +
+  +
+  → target
  →
→  →
→  →
→  +
+  → equip
Phase 5
Note: for more information on timing & moving efficiently throughout P5, read: #P5 Movement & Timing
(tc) +  +
+  +
+  →
→  →
→  +
+  → go to
  +
+ 

 →
→  +
+  →
→  +
+  to
to  →
→  →
→ 
 →
→  /
/ 
Note: if  use
use  after
after 
Example Kills
⬥ 2:28
Content Provided by: @hightdetal
Formatting Maintained by: @hightdetal