Telos: Necromancy

Introduction
This guide assumes very strong understanding of #telos-basic and #Stuns & Mechanics Overview. The rotations listed below are ideally used at 1000%+ enrage. However, they will generally work at a lower enrage as well, and it is encouraged to learn these rotations as early as possible to build good habits and muscle memory. The  safe push setup is slower but it will allow for a safer experience whilst climbing enrage and streaking, while the
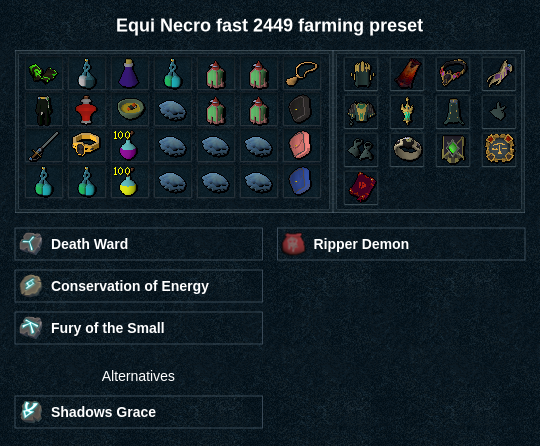
  fast 2449 farming setup may be used for fast kills while farming this encounter.
Notable Enrage Checkpoints and Changes (999+)
⬥ 1000% P4 one rock will fall, P5 multiple rocks will fall, immortality no longer works P5, and Telos will freedom stuns and binds with a 16 tick cooldown
⬥ 2000% "So you think you can guard?" Achievement, aka Silver Warden
⬥ 2700% Tendrils damage required caps at 30,000
⬥ 3300% The first prayer drain on P3 will smite you from full unless Telos touches the beam.
⬥ 4000% Hard enrage cap; "True Warden" achievement, aka Gold Warden
Presets and Relics
⬥ Equilibrium Necromancy Safe Push Preset 
⬥ Equilibrium Necromancy Fast 2449 Farming Preset 

Equilibrium Safe Push Rotation 
Prefight
⬥ Optional: to reduce P1-2 RNG pushing up from 3000% → 4000%, you can 
 at adrenaline crystal.
Dummy at War's Retreat:  →
→  →
→  (should end on 4
  3
3  ) → enter instance.

 →
→  →
→  →
→  →
→  → (wait 2t)
  →
→ 
Phase 1
(tc) +  +
+  →
→  +
+  →
→ 
 →
→  →
→  →
→  →
→  →
→  +
+ 
Phase 2
 →
→  →
→  →
→  →
→  → (tendrils)
  →
→  →
→  →
→  →
→  →
→  →
→  →
→  →
→  →
→ 
Phase 3
 →
→  →
→  →
→  →
→  +
+  to
to  →
→  →
→  →
→  →
→ 
Phase 4
⬥ For information on how to use sticky bombs  in phase 4 for minions effectively, please see #Melee Telos.
⬥ Equip your clearheaded 4  and turtling
  switch.
⬥  used here requires taking the fonts slow, or it won't be off cooldown for font 2.
• Alternatively, use  before
  in font 1.
⬥ (  ) in font 1 is optional, and should only be needed if you're at 4/5 stacks due to phasing p2/3 faster.
•  in font 1 is also optional, and may be skipped if needed.
  will cost 20% adrenaline which can be improvised around.
⬥ Use  +
+  at the end of font 3 if needed, to overheal, and reach 100% adrenaline for p4 start.
Drop Down
50% adren:

→

→
→
+
to font
<50% adren:  →
→  →
→ 
 →
→  →
→  →
→  +
+  to font
Font 1
 →
→  →
→  →
→ 

 → (
→ (  /
/  ) →
) →  →
→  →
→  →
→  +
+  +
+ 
Font 2
 →
→  →
→  →
→  →
→  →
→  →
→  →
→ 
 →
→  +
+  +
+ 
Font 3
 →
→  →
→  →
→  →
→  →
→  →
→ 
Phase 5
⬥ For more information on timing & moving efficiently throughout p5, read: #P5 Movement & Timing.
 +
+  →
→  → (tc) +
  +
+  +
+  +
+  → (
→ ( if
if  )
)  →
→  →
→  →
→ 
 →
→  →
→  →
→  until dead
Equilibrium Fast 2449 Farming Rotation 
Prefight
Dummy at War's Retreat:  →
→  →
→  →
→ 
 →
→  → enter instance
 →
→  →
→  →
→  →
→  →
→  +
+ 
Phase 1
(wait 2t) →  →
→  →
→  →
→  →
→  →
→  →
→  →
→  →
→ 
Notes:
⬥ If slow replace second  with
with 
⬥ If after  you have 5
  then
then  first to maximise
  procs.
Phase 2
 →
→  →
→  →
→  →
→  →
→  →
→ 
 →
→  →
→  →
→  to jump spot
Note: may phase on  leaving you far from jump spot if you always
  before
  . Use
. Use  +
+  →
→  if not phased, sometimes extra abilities are required depending on
  and
and  procs.
Phase 3
 →
→  →
→  →
→  →
→  +
+  to
to  →
→  →
→  →
→  +
+ 
Note: if  spawns close, run to beam and
  to jump spot.
Phase 4
⬥ For information on how to use sticky bombs  in phase 4 for minions effectively please see #Melee Telos.
Drop Down
 →
→ 
 →
→ 
Font 1
 →
→  →
→  →
→  →
→  →
→  → (wait 2t) →
  →
→ 
 →
→ 
Font 2
 →
→  →
→  →
→  →
→  →
→  → (target Telos)
  →
→  →
→ 

Font 3
 →
→  →
→  →
→  →
→  →
→  →
→ 
Notes:
*⬥ Cancel  with
with  as immunity ends.
• Equip  and drink
  during
  *
*
Phase 5
⬥ For more information on timing & moving efficiently throughout p5, read: #P5 Movement & Timing.
 →
→  →
→ 
 →
→  +
+  →
→  →
→  →
→  →
→  →
→  →
→  → (wait 2t)
  to
to  →
→ 
 →
→ 

Note: if  use
use  before first
Example kills
⬥  Safe Push Rotation:
• Equilibrium Necro Telos 4k
• Equilibrium Necro Telos 2449%
⬥  Fast 2449 Farming Rotation:
• Equilibrium Necro Telos 2449% Farming