⚠️ Disclaimer
Some methods in this guide may not work after the combat beta changes in March 2026
Know of a newer method/rotation? Got a video? Share it in #vod-and-rotation-megadump-2-electric-boogaloo!
Telos: Magic

Introduction
This guide assumes a very strong understanding of everything found in #telos-basic, #Stuns & Mechanics Overview and #P5 Movement & Timing.
The rotations listed below are ideally used at 1000%+ enrage. However, they will generally work at lower enrage as well, and it is encouraged to learn these rotations as early as possible to build good habits and muscle memory.
Notable Enrage Checkpoints and Changes (999+)
⬥ 1000% P4 one rock will fall, P5 multiple rocks will fall, immortality no longer works P5, and Telos will freedom stuns and binds with a 16 tick cooldown
⬥ 2000% "So you think you can guard?" Achievement, aka Silver Warden
⬥ 2700% Tendrils damage required caps at 30,000
⬥ 3300% The first prayer drain on P3 will smite you from full unless Telos touches the beam.
⬥ 4000% Hard enrage cap; "True Warden" achievement, aka Gold Warden
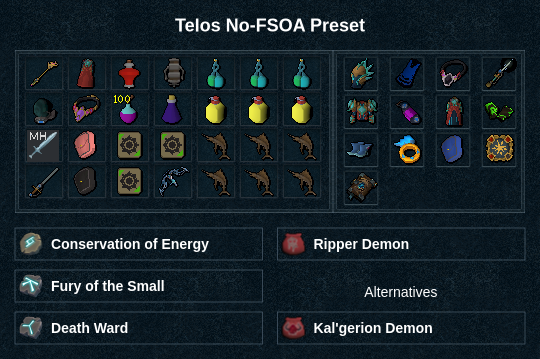
Presets and Relics

Prefight
Pre-building is recommended as it allows you to preserve your  for P3. However, it is not strictly necessary. If skipping pre-build, you must still
  and
and  properly to ensure proper target cycle timing. For more details, read "Target Cycling" in #Stuns & Mechanics Overview.
(AC  )
) 
 + click dummy →
  →
→  →
→  +
+  diss →
  +
+  → (wait 2 ticks) →
Note 1: requires dual wield equipped and Invigorating 4  - alternatively, use one extra ability.
Note 2: if ability queueing is enabled, replace  with
with 
Phase 1
You must be north of  for
for  to hit on-tick. Do this either by walking to NE corner of your
  some time after
  , or by clicking Telos just after walking
Standard Speed - Magma Tempest
 →
→ 
 →
→ 
 → 2H
→ 2H  →
→ 
 →
→ 
 →
→  →
→ 
 →
→  (3 hit) →
  →
→ 
 →
→  →
→  →
→  +
+ 
Standard Speed - no Magma Tempest
 →
→ 
 →
→ 
 → 2H
→ 2H  →
→ 
 →
→ 
 →
→  →
→  (3 hit) →
  →
→ 
 →
→  →
→  →
→  →
→  +
+ 
Fast Speed
Example clip: https://clips.twitch.tv/TentativeTrappedKuduPanicVis-WVpzU8tywKPbGori
 →
→ 
 →
→ 
 → 2H
→ 2H  →
→ 
 →
→ 
 →
→  →
→ 
 →
→  →
→ 
 →
→  →
→  →
→  +
+ 
Note: to increase consistency of reaching phase HP, it is recommended to use enchanted  for every 2H abil post-hammer, and/or enter the fight with
  available.
Phase 2
After your asphyxiate  at the beginning of the phase, you should take a step forward and escape
  or run back to the corner. Taking a step forward ensures that the black beam spawns mid arena and prevents Telos from pre-walking your escape
  which will help keep Telos out of the beam when it changes. As Telos' autos at this enrage start to deal more damage, it becomes heavily encouraged to stay out of melee distance of Telos, as his mage autos do less damage than melee. Using escape
  prior to detonate will allow you to force mage autos, while keeping you within familiar range and maximum weapon range.
(DW) 
 →
→ 
 (3 hit) →
  →
→ 
 →
→ 
 →
→ 
 →
→  →
→ 

 →
→  (3t) →


 (forces mage autos for the rest of the phase) →
⬥ Depending on HP, you can:
● Fastest (~310k hp): 
 → excal stall
  (or
(or  if not stalling)
● Fast:  (2H)
(2H)  (2-hit) →
  →
→  → excal stall
  (or
(or  if not stalling)
● Slow:  (2H)
(2H)  (2-hit) →
  → (DW)
  → (DW for accuracy)
  →
→  →
→  →
→  .
.
Note: If the phase hp is reached after  , replace
  →
→  with (DW)
  wait 2 ticks → (2H)
  (stall)
  . Doing so leads to a faster P3. https://www.youtube.com/watch?v=QexFjeAr1ik
Phase 3

 →
→ 
 →
→ 
 →
→  →
→  +
+  + walk to beam →

⬥ Depending on HP
●  (2 hit) →
  →
→  →
→  to ledge
●  →
→  →
→  →
→  to ledge
Note 1: using slow P3 with  means it is not available for fastest P4.
Note 2: using enchanted  for each 2H ability, and stalling
  in P2 will increase consistency of fastest rotation.
Phase 4
Drop
⬥ Fastest
(AC  )
) 
 →
→ 
 →
→  or walk to font
⬥ Fast
(AC  ) DW
) DW 
 → 2H
→ 2H 
 →
→  →
→ 
 →
→  or walk to font
⬥ Slow
(AC  ) DW
) DW 
 → 2H
→ 2H 
 →
→  /
/  (2 hit) →
  →
→ 
 →
→  or walk to font
Font 1
 /
/  →
→  →
→ 

 →
→  →
→  → Golems
 →
→ 
 →
→ 

 →
→  (2 hit)
 +
+  →
→  +
+  into font 2
Font 2
(tc)  →
→  →
→  →
→  →
→  →
→ 
 →
→  s
s → r
→ r +
+  →
→ 
 →
→  +
+  to font 3
Font 3
(AC  ) (tc)
  →
→  →
→  →
→  →
→ 
 →
→ 
 →
→  →
→ 

 →
→  (2-3 hit) →
Phase 5
Note: for more information on timing & moving efficiently throughout P5, read: #P5 Movement & Timing
Phase 5 is a phase where significant changes occur at 1k. Most importantly, immortality will no longer block the instakill, so you will need to either 0 font or font minions. Also due to the number of rocks that fall and how much damage the virus deals, it becomes almost a requirement to Barricade  . An armour switch with Turtling 4
  and Clear Headed 4
  is heavily recommended to allow you to Barricade
  with your Kalphite Rebounder
  .
.
Starting Rotation Option 1
Start with 

 →
→ 
 → ...
→ ...
Starting Rotation Option 2
Start with 
 →
→ 
 → ...
→ ...
Sidebeam Green/Black
 →
→  →
→  →
→  →
→  →
→  (3t) →

 →
→  →
→ 
 →
→  (4-hit) →
  →
→ 
 clear virus
Sidebeam Reds
 →
→  →
→  →
→  →
→  →
→  (3t) →

 →
→  →
→ 

 (4-hit) →
  →
→  →
→ 
 clear virus
Clearing Virus
⬥ Green or Red Virus
get into red beam and (tc) golems  + (tc) Telos
  (
( if red golems) →

 → if low adren
 (
( if red golems) →
  →
→  →
→ 
⬥ Black Virus
get into black beam and begin running toward red beam → (DW) 

 →
→  → (tc) golem
  + (tc) Telos
  (
( if under 50 adren) →

 →
→  →
→  if low adren
Backbeam
 (
( if red golems and you're going to be stunned before being able to
  ) →
) →  →
→  (golem) →
  (
( ) →
) → 
 (4 squares from Telos, run to the back edge of your sun to lure rocks) →
 →
→  (run 2 square north then start running back south)
  →
→  (2H)
(2H)  (4-hit) → (2H)
  →
→  →
→ 

 →
→  (3t) →

 →
→ 
 →
→  →
→  →
→ 
 (
( if reds) →
 (2-hit) →
 →
→ 
Changelog
The latest additions to this guide are:
⬥ 2023-06-09
● Update preset
● Update formatting + adjust P4
● Assorted note cleanups
⬥ 2023-04-25
● Fix incomplete P3
⬥ 2023-04-11
● Update font 2 to stall  rather than
⬥ 2023-04-06
● Add P1 variant with no  , add fast P1