⚠️ Disclaimer
Some methods in this guide may not work after the combat beta changes in March 2026
Know of a newer method/rotation? Got a video? Share it in #vod-and-rotation-megadump-2-electric-boogaloo!
Solak - Solo Melee
Introduction
⬥ This strategy successfully rootskips 75-80% of the time if executed properly.
• A successful rootskip is done by getting Solak's HP down to ~1510K or lower at ~45s.
• If you don't meet this threshold it's advised to ignore the rootskip attempt entirely.
⬥ This strategy is very switch heavy. It's highly advised to be familiar switching  /
/  ,
,  and
and  /
/  comfortably.
⬥ There is a known bug where  doesn't gain adrenaline during the instance start. This occurs when the user has been out of combat for a prolonged time without dropping their previous target.
• The bug is frequently encountered from teleporting out and re-entering quickly.
• The  can be used prefight to enter combat to avoid this bug.
⬥ Your  will frequently lose their main-target during roots
  of Phase 1.
• Click  before arms/legs.
Presets and Relics
⬥ Melee
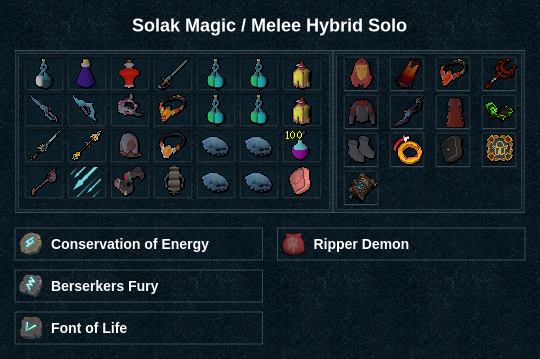
Pre-fight preparations
⬥  for
for  spamming and
  for increased poison damage.
⬥  Might of Het,
  Thermal Flask buff increased HP.
⬥ Armour spikes 
 do not get triggered by Solak's autoattacks. They do however get triggered by Erethdor.
• If inventory slots are concerning do not bring them.
Assumptions unless noted otherwise:
⬥ Abilities are cast with
⬥ and are juggled throughout the fight.
• at 92+ adrenaline or non-basics.
• at < 92 adrenaline.
⬥ All bleeds are cast with
⬥  is cast with 4 piece vestments.
⬥  is only used for casting
• All other abilities are cast with  equipped.
Phase 1
Focus on achieving the following in Phase 1:
⬥ Dealing 500k, within the first ~45s of the fight for the rootskip
• Spamming with  is necessary.
• Be mindful the damage from 
 is backloaded so leaving ~15k health is okay.
⬥ Killing the efficiently.
•  switch and use
  effectively.
• Stall basics to minimise ticks lost during movement.
Wars
 at crystals.
Prephase
 → Deploy + auto +
  →
→  + Dismantle
Phase 1
Stand at center circle → wait 2t (start) → (tc) +  + →
+ →  →
→  → →
→ →  →
→  →
→  → → →
→ → →  → →
→ →  → +
→ +  →
→  → → walked
  →
→  →
→  → →
→ →  → → → → → or +
  → proceed to
Volatile Rootlings
Target first + s → r + + and target second → +  + target third → s
  → r + + → improvise
Solak's Arms
First arm: + + → →  → →
→ →
Second arm: + + → → → → →
Solak's Legs
First leg: + auto +  → → →
→ → →
Second leg: +  → → → → →
Core
→ + → (tc) +  → → walk under → bleed → →
  → → or
Phase 2
This phase is divided into two major sections, Eruptions and Blight Bombs/Barrage. Kill the storm and eruptions quickly. Afterwards, survive and DPS to drain his blight.
P2: Eruptions
⬥ Use the two South eruptions to kill the storm. While killing the SE eruption, start a → on 
• Do not during the bleed as will snipe the buff.
⬥ Kill the two Northern eruptions ASAP without going up.
South Eruptions
• SW: → → (tc) + cleanse → + → cleanse + → → → go up
• SE: → → → (tc) → → → → go up
North Eruptions
• NE:  + → → +
• NW: s → r + → → → → (tc) + equip + → →  + north
P2: Blight Bombs and Barrage
⬥ Expect to take a lot of damage here. If bombs spawn on top of you early, ignore them and  . In order to armskip or be near armskip, a full rotation, + and frontloaded
  are needed.
⬥ Conserve food for Phase 3:
• During Phase 2's blight barrage, the first hit, and  later hits.
• can be used here or in P3 .
Berserk Entry
+  → equip + + → → bleed → → → → → → → 3-hit → + → → → → → → walked →
Arm Climb Skip
→ → → → → → → → → → → → → → → → improvise
Phase 3
⬥ Quickly DPS to 300k while charging the first pad. Leftover food should be used here to prepare for Erethdor.
⬥ At 300k begin charging the second pad and lower Solak to 200k. Enter the realm at 100+ Adren.
• are good abilities to use here.
⬥ You may  Erethdor's bombs to reflect damage to him.
⬥ Burst Erethdor with  , exit with high adrenaline.
Berserk Entry
→ → equip + + → → → → → → → → → 3-hit → +
Pad DPS
→ → → →  +
+  →
→  → → → → → → → → → → → → charge + → → improvise to 120 adren →
  →
→
Erethdor
→ (tc) + + → bleed → → → equip + → → → → → improvise
Phase 4
⬥ Utilise and  to finish off as quickly as possible.
No Realm
+ → → (tc) → equip + → 4t + → equip + → → → + → equip + → → + equip → bleed → → → → → improvise if bad rng.
Video Example