⚠️ Disclaimer
Some methods in this guide may not work after the combat beta changes in March 2026
Know of a newer method/rotation? Got a video? Share it in #vod-and-rotation-megadump-2-electric-boogaloo!
Solak - Magic
Introduction
With powerful  ,
,  and
and  special attacks, alongside
  and
and  , Magic
  has the potential for extremely high damage output everywhere, while needing no food due to the very high healing potential with
  . However, due to the nature of the and , no two magic rotations will be the same. While magic has really high damage, magic still struggles to deal with some time-gates in the Solak fight due to the high cooldown on the
  .
.
⬥ This channel will go over guidelines for Duo Base or Dps kills, with the aim of sub 5:30 non storm-tank kills with a capable partner.
⬥ The use of a fractured staff of armadyl is required for this style to work.
General Notes
⬥ Spell switching between  and is not needed, can camp all the way through, a good trick is to swap to
  auto-cast while under on p2 and p3.
⬥ The auto attack may be replaced by any other auto attack.
⬥ The guide contains rotations for root skips. Phase timing is expected to be 37-40 seconds.
⬥ In duo, it is advised that the DPS pre-places their dominion mines  on the SE roots
  , and the Base on the NW roots .
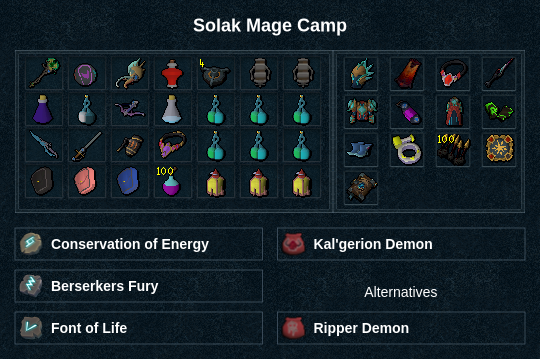
Presets and Relics
⬥ Magic
Preset Notes
⬥ It is assumed that dps is using a Ripper demon  and base is using a Kal'gerion demon
Phase 1
P1 Rotation:
⬥  (if base) →
  +
+  → (tc) +
  +
+  →
→  → + → → →
  →
→  (2hit) → (improvise with
  ,
,  ,
,  , , ) → → (2hit) → improvise
Roots
Use  asap after cap (around 38-42s on the kill timer)
⬥ Kill 1 root while building to 100% adren, then  +
+  (*) the other root.
⬥ Build with basics after finishing off all roots and aim to sun at 0:58-1:00 on the kill timer.
⬥ After placing your sun South of your arm (on your side) target Solak or leftover root and use basics to build adren until 1:06 on the timer. Base may use if needed.
⬥ (pre) on Solak → (pre)  +
+  under arm
Arms
⬥ (tc) close arm + +  → ( only if low adren) → → (use on partner's arm if your arm dies fast due to many crits).
⬥ Swap the order of and if 50-64% adren.
⬥ Move down next to legs during or before arm spawns.
Legs
⬥ (tc) Solak +  → + (tc) far leg + + r + , ( if needed)
Core
⬥ (pre) → + → → → → or or → → improvise if not dead while staying close to full adren.
⬥ P1 Example Base - https://youtu.be/dbF96XfS0FM
⬥ P1 Example DPS - https://youtu.be/IxTc02thEpQ
Phase 2
Overview
⬥ Eruptions are preferably killed together.
⬥ Once eruptions are killed, it is assumed that cleansing with Merethiel is done once, before going up to clear the blight storm for the first time.
Eruptions:
Storm tanking:
⬥ South Eruption: (pre) + → + → → 
⬥ North Eruption: + + → → ( → if needed)
Non-Storm tanking :
⬥ South Eruption: (pre) → + → → → finish if needed → (tc) Solak + +  →
→  ,
,  or before going up
⬥ North Eruption: + → → then  +
+  towards Solak if dps.
Post Eruptions:
⬥ + + → → → +  → → → → improvise with , , , , , 1-2x , 1-2x (2hit)
⬥ After , improvise while capping the boss.
⬥ If storm tanking and having a comfortable cap, use  and
and  during the rain.
Arm Climb
⬥ Both base and dps →  → → right as p3 starts, stack
  with if dps and storm tanking.
Phase 3
⬥ → → → + → → → → (2hit) → (improvise with , , , , ) → → (2hit) → improvise
Erethdor
⬥ + → → → + (3hit) → →  or → + → → or .
Phase 4
⬥ Deploy  fast after you're out of elf and get 5 stacks → → (skip if high adren) → →
  (dummy) → keep building on Solak.
⬥ (pre) + → (pre)  → →
→ →  → → → → 2-3 hit → or
⬥ If really high hp: (pre) + → (pre) → → + → (2hit) → → → or