Skip to content
Open in Editor

Sanctum of Rebirth Hard Mode - Solo Ranged range

Introduction

⬥ This is an advanced guide and assumes a deep understanding of the boss's rotations and mechanics for the Hard Mode version of the Sanctum of Rebirth, found in #Sanctum HM Mechanics.
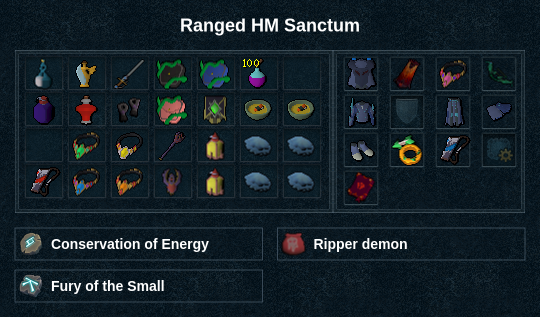
⬥ Only in Hard Mode is the Shard of Genesis Essence shardofgenesisessence dropped, which upgrades Tier 95 weapons to Tier 100.

General Information

⬥ All wenarrow uses are assumed to be at 15 stacks

⬥ Abilities denoted by wenarrow grico deathsporearrows represent wensporing. See !wenspore ‎in #bot-commands for information.

⬥ Take note of the arrow types used during each section of the fight. Messing up ammo swaps can result in slower phasing, messing up the order of mechanics.

Presets and Relics

Preset Suggestions

Checklist and Unlocks
powderofpenance Powder of Penance activated at bank ⬥ darkness Darkness activated before fight begins ⬥ kalgscroll Kal'gerion spec active before fight begins, autofire set to 1 ⬥ limitless Limitless Sigil unlocked ⬥ graspingpouch Pouches with runes for smokecloud, sbslunars, and disrupt (click preset link for setups) ⬥ pernixsquiver Quivers with wenarrow, deathsporearrows, fularrow, and blackstonearroweof EoFs with dbow, sgb, ecb, zammybow ⬥ Bonfire + thermal spa HP boosts are active

Vermyx, Brood Mother

*Notes:

⬥ Start with anima core of Sliske animahelmSliske equipped.

⬥ Sub 1:15 timer relies on a Warpriest of Armadyl/Bandos armour set effect proc from the 3-piece Anima core of Sliske armour animahelmSliske

⬥ It is important to build wenarrow and deathsporearrows stacks while Vermyx is not attackable*

Prefight

At War's Retreat dummy: Build 15 wenarrow stacks + stall incend on 0 perfectequilibrium stacks

Phase 1

dive + (tc) + (r) wenarrow incend + gdeathsswift + adrenrenewalgricosgb eofspeczammybow eofspec

Phase 2

Left Coilspawn

Target left Coilspawn + wenarrow bolg specpiercingroarofawakening incitefear gconcbolg gricoroarofawakening wracktsunamibolg piercingecb eofspec → 5t grico + return to Vermyx

Vermyx

(tc) + rapiddbow eofspecsnap

Phase 3

Right Coilspawn

Target right Coilspawn + wenarrow grico → ‎ ‎wenarrow piercing deathsporearrowsbolg specwenarrow piercing deathsporearrowsincendwenarrow corruptshotwenarrow grico deathsporearrows → improvise to 100% adren + 15 wenarrow + 5 deathsporearrows + ‎ ‎3 perfectequilibrium stacks ‎ ‎→ return to Vermyx

Vermyx

gdeathsswift → (tc) + smokecloud + wenarrow ecb eofspecrapiddbow eofspecsgb eofspeczammybowgrico

Kezalam, the Wanderer

*Note:

⬥ Start with elite dracolich edracocoif equipped.*

Prefight

At War's Retreat dummy: Build 15 wenarrow stacks + 5 deathsporearrows stacks + stall free incend on 0 perfectequilibrium stacks

Phase 1

dive + (tc) + (r) wenarrow incend + gdeathsswift + adrenrenewalecb eofspecgricolimitless rapidsgb eofspeczammybow eofspecfularrow bolg specwenarrow grico

Phase 2

Moonstone Obelisk 1

Target Moonstone Obelisk + fularrow shadowtendsnapzammybow eofspec

Kezalam

Target Kezalam + wenarrow piercingfularrow zammybow eofspecwenarrow gricofreedom + vulnbomb beneath player → (tc) Moonstone Prison + fularrow bolg spec + equip roarofawakeningincitefear gconcgchain + surge towards remaining Moonstone Obelisk → tsunami + equip bolgecb eofspecwenarrow gricorapiddbow eofspecsgb eofspeczammybow eofspecwenarrow grico deathsporearrows

Note: Should aim to burst down Kezalam after the Moonstone Prison mechanic by proccing wenarrow after freeing yourself.

Phase 3

Moonstone Obelisk 2

Target Moonstone Obelisk + deathsporearrows incendfularrow bolg specwenarrow piercinggdeathsswiftmdsgricofularrow shadowtend

Kezalam

Target Kezalam + wenarrow piercingecb eofspecrapiddbow eofspeczammybow eofspecsgb eofspecbolg specgrico

Nakatra, Devourer Eternal
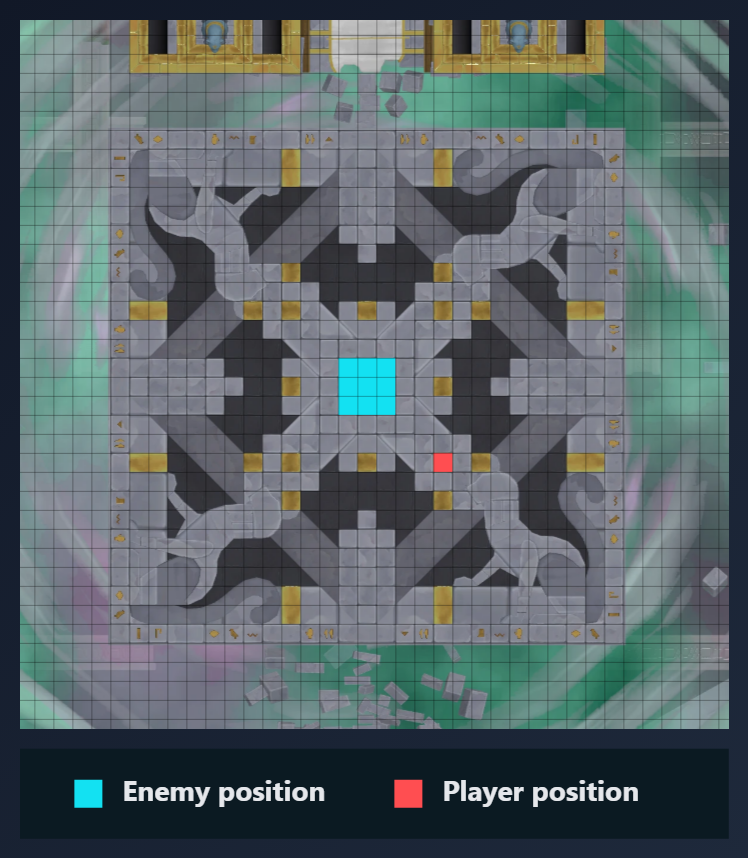
Prefight

At War's Retreat dummy: Build 15 wenarrow stacks + activate scriptureofful → stall incend

Phase 1 and 2

⬥ Do the first steps ( dive + (tc) + (r) blackstonearrow incend + gdeathsswift + adrenrenewal) same-tick, or you'll have to tank a soulfire wave hit during rapid

⬥ Image below shows where to drop your gdeathsswift so the damage-over-time hits can help proc scriptureofful

dive + (tc) + (r) blackstonearrow incend + gdeathsswift + adrenrenewalgricoecb eofspecsmokecloud + wenarrow rapidzammybow eofspeczammybow eofspecbolg specgricogrim + blackstonearrow shadowtendsnapzammybow eofspecwenarrow piercingblackstonearrow zammybow eofspecwenarrow gricorapidbolg specreflectwenarrow grico deathsporearrowsdivertincendingen + roarofawakening spececb eofspecwenarrow piercingzammybow eofspecgricosnapzammybow eofspec

*Notes:

⬥ Phases 1 and 2 are combined to preserve readability.

⬥ If no scriptureofful proc by the end of rapid, equip grim*

Phase 3

Between the Nefthys, wait 1-2 ticks after bolg spec before you dive + surge , or it can null your bolg spec

Nakatra

piercingecb eofspec → s piercing

Nefthys

r piercing + gricorapidbolg spec + (wait 2tick) + dive + surge to remaining Nefthys → (tc) + zammybow eofspeczammybow eofspecgricoshadowtend

Nakatra

piercingsnappiercingmds + equip melee gear

Phase 4

Shadowsands Feline Akhs

dive + release Soul Storm → (tc) chaosroarmeteorstrikewenarrow grico → improvise w/ basics to 100% adren + 15 wenarrow stacks

Note: May have to target Shadowsands Gorilla and stay longer in realm to build depending on adrenaline.

Nakatra

(tc) + improvise to 2-6 perfectequilibrium stacks + dive to glyph → wenarrow gdeathsswiftpiercingecb eofspecgrico ‎ ‎→ limitless rapidbolg speczammybow eofspeczammybow eofspecwenarrow grico deathsporearrowsincenddevo/reflectecb eofspecwenarrow mdsdeathsporearrows zammybow eofspecwenarrow gricodbow eofspec / zammybow eofspec + adrenrenewalsnapdbow eofspec / zammybow eofspec

Example Kills

Vermyx range

Kezalam range

Nakatra range

Vermyx Content Provided by: @geherman

Kezalam Content Provided by: @geherman

Nakatra Content Provided by: @rocket_cars

Formatting Maintained by: @duckywucky_rs