Skip to content
Open in Editor

Kerapac, the Bound Hard Mode - Solo Mage Melee Hybrid

Introduction

This guide assumes you are already familiar with the basic mechanics of Hard Mode Kerapac which can be seen here #kerapac-hm-basic and own BIS gear in both Magic and Melee.

It is highly recommended to have a Nodon dragonkin slayer task slayer as the slayerhelm helmet boost does work. You may also use the Premier Artefact premierartefact to have a 10% chance to not decrease the slayer task count with each kill.

Preface

Hybrid strategies at Kerapac can result in fast kills and are able to circumvent cooldown issues that generally affect style-camp rotations.
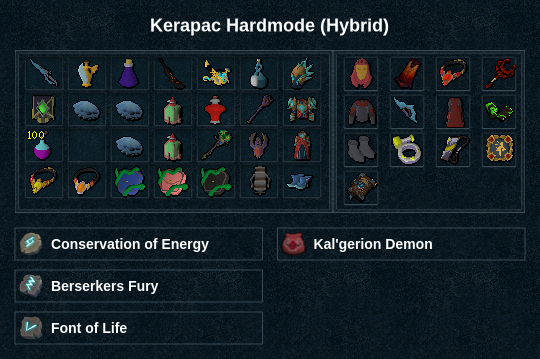
Presets and Relics

Preset Suggestions
Preset Notes
⬥ Apply weppoison at the bank, and use kwuarmsticks , lantasticksdarkness active ⬥ Slayer task + genocidal on both mage and melee gear ⬥ Camping <5k hp throughout p1-3 is ideal     •You heal when you go into first clone ⬥ Use veng off cd

The Fight

Prefight

dba spec → sincend → enter → dummy + rincend + natpiercinggrico + equip lengmh lengohzerkanti + 1t surgegbargechaosroar → sdragonclaw eofspec

Phase 1

⬥ (tc) + rdragonclaw eofspec + assault → 4t smokecloud + dragonclaw eofspecdragonclaw eofspecdragonclaw eofspecgfuryoverpowergricometeorstrike → (cane if needed) → punish → + auto cast incitefear + gconc

if you have <70 adren after the third dragonclaw eofspec, use this rot instead

rdragonclaw eofspec + assault → 4t smokecloud + dragonclaw eofspecdragonclaw eofspechydrixbakri gricometeorstrikegfuryoverpowercanepunish → (lengmh spec if needed) → gconc

Phase 2

corruptblastmagmatempest → wait for timewarp → auto cast exsanguinate + timewarp + gsunshine + bloodbarragegricofsoa specgconctsunami + dive + surge → somni (time warp ends) → romni + wmmetabloodbarrage + gconcomniasphyx 3t → ibansstaff eofspec

Phase 3

gricogconcroarofawakening specroarofawakening spec / ibansstaff eofspec → autocast incitefear + gconclimitless + smoketendrilsgconctsunamigrico + equip melee gear → prep + timewarp 2nd tick → zerkgbargeoverpowerassaultchaosroar (skip if dragonclaw eofspec will phase) dragonclaw eofspecdragonscimitar eofspec if needed

Phase 4

Clone 1

freedom → Enter echo, lose 2 ticks, gbargecanedragonscimitar eofspecassaultpunish

‎ ‎ ‎ ‎•if you used dragonscimitar eofspec during p3, do gbargeassaultdragonclaw eofspecpunish instead

Clone 2

overpowerlengmh specgfury (skip if possible)

‎ ‎ ‎ ‎• use adrenrenewal when needed, prefered on zerk

Clone 3

meteorstrikegricodivert (zerk (first if 120 adren after grico) → zerkgbargedestroydragonclaw eofspecgfury (do gfury on kerapac if clone 3 is dead)

Kerapac

vitality + grico (skip if high adren) → dragonclaw eofspecchaosroardragonclaw eofspec → improv with dragonclaw eofspec / assault / lengmh spec / punish

If jump in p3

use zerk + adrenrenewal when zerk expires. it'll be shortly after the icon on your buff hits 9s. Below may need adjustment depending on remaining p3 zerk duration.

Clone 1

prep → 2t gbargeassaultzerk + adrenrenewalcanepunishgfury (skip if dead)

Clone 2

overpowerdevochaosroarlengmh spec

Clone 3/kerapac, when you swap to kerapac varies

build to meteorstrikehydrixbakri grico → improv with remaining zerk duration, remaining high use adren (use divert if needed)

timewarp + fsoa specgconcomniroarofawakening specgconcibansstaff eofspec / limitless wm → improv with omni / smoketendrils / ibansstaff eofspec / wm / gconc

Note: be careful not to use zerk while a previous zerk is active. it will cancel the previous one, and you will loose the new one entirely.

Example Kills

Examples