Gate of Elidinis
Intro
The Gate of Elidinis is RuneScape's second skilling boss. It can be soloed or done in a group of up to 10 players. Skills used in the encounter are Mining, Divination, Crafting, Construction, and Agility. Mining and Divination make up the majority of the encounter's mechanics. Mining boosts are most important for speeding up the kill times.
Presets and Relics
⬥ Basic Preset ( Friendly)
Note: None of the worn equipment shown is necessary but will help speed up kills.
⬥  is used alongside
  to ignore a hit via
• Alternatively, can use Icthlarin's shield at the cost of ~10s to heal up.
• If no Tagga's corehammer, just use a shield for
⬥ Tier 2 Asciatops passive from RooT works.
⬥  prayer can be used losslessly to speed up passive healing.
⬥ Can also use obsidian golem (+8 ) or lava titan (+10 ) familiar for more consistency.

Mechanics
Corruption Stacks
⬥ This mechanic will exist passively throughout the encounter. You will take constant damage during the fight that scaled based on how many stacks of corruption are held.
• This damage is doubled beyond the barrier.
• You will gain 1 corruption stack per transmutation action on a shard.
• Corruption stacks are also gained if hit by avoidable attacks.
• Corruption stacks will be reduced by 2 for each Cleansed statue shard used on the Gate during an activation of Icthlarin's Aid.
Moonlight Barrier
• The Moonlight Barrier reduces damage taken from the Gate while standing behind it. The gate must be repaired using Moonstone Shards gathered from the mining nodes at the entrance to the encounter. Each moonstone shard will repair 10% of the barrier.
• The barrier will be damaged by 30% per Channeled Blast attack from the Gate, but only if stood behind the barrier.
Channeled Blast
• The Gate will say Begone! and siphon energy from the nodes around the arena. Shortly after, the Gate will fire a large attack at the players. This damage can be partially mitigated by standing behind the Moonlight Barrier if repaired, also dealing 30% damage to the barrier.
Shard Explosion
• The Gate will say Rot and suffer... and then fire attacks at some of the Shards of Elidinis in the arena. The damage is telegraphed by expanding squares from each Shard affected. The attack will then jump to another Shard and repeat the expanding squares.
⬩ Damage is avoided by leaving the radius of the expanding square.
Aid of the Akhs
• The Gate will say Children, to me! and summon a feline akh. The akh will add to the Gate's corruption until dismissed.
⬩ Clicking on the akh will deal damage to it, requiring two clicks to dismiss fully, using two moonstone fragments.
Icthlarin's Aid
• Clicking the Extra Action Button will create four pillars of increasing height near to the Gate. Clicking these pillars in-order in quick succession will give the player a 5-25% boost to cleansing the Gate, and also consume all Shards in the player's inventory and Beast of Burden inventory. The level of boost received depends on how quickly the player ascends the pillars.
• Immediately following the cleanse, the Gate will prepare for a very large attack. This attack fully breaks the Moonlight Barrier regardless of repair percentage.
⬩ Entering the shielded area next to Icthlarin will nullify the damage from the attack, and also heal the player to max lifepoints continuously until it disappears.
The Fight
This guide will focus on completing a 2-cycle kill, which can easily ignore any interactions with the Moonstone Barrier. Players can optionally repair the barrier to help mitigate the Channeled Blast attack damage at the cost of kill speed.
Some tips to keep in mind:
⬥ Keybinding actions allows you to do most of them without interrupting skilling actions.
⬥ Try to move out of mechanics directly after an "xp drop" to save time.
⬥ There is a large delay between activating Icthlarin's Aid and the pillars actually appearing. This can be used to your advantage as activating Icthlarin's Aid will pause any auto attacks or special attacks. Players frequently activate it before fully depleting the second rock on each side, using that delay to finish gathering shards before climbing pillars.
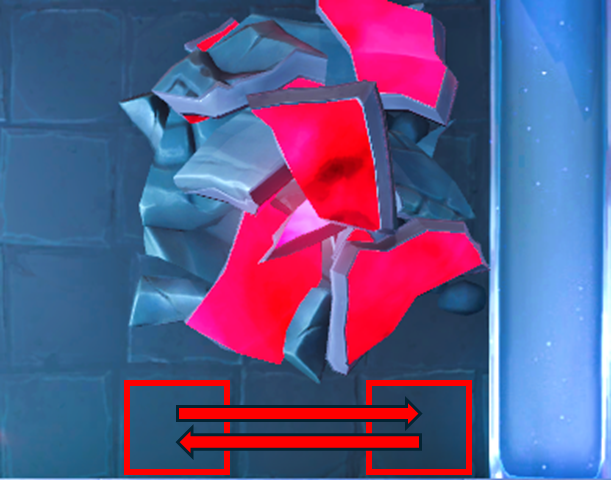
⬥ Since the rocks are 3x3 and the Gate's auto-attacks are also 3x3 (centered on player), it is wise to move between the "corners" while gathering as shown in this graphic:
Starting the fight
The Shard of Elidinis nodes do not appear for roughly 20 seconds after starting the encounter. This is a perfect time to gather enough Moonstone Shards to last for the entirety of the encounter.
⬥ Gather 30-40 Moonstone Shards.
⬥  north, repairing the barrier only if you plan on using it for reducing Channeled Blast specials.
Gathering Shards
⬥ Transmute the nearest Shard of Elidinis and begin mining. The shards that are north of the moonlight barrier give shards twice as fast as those south of the barrier.
⬥ Using the  healing effect shortly before the Channeled Blast mechanic hits is recommended.
⬥ When the Channeled Blast mechanic occurs, step or  behind the Moonlight Barrier if needed.
⬥ Avoid damage from regular and Shard Explosion mechanics. Getting hit by any tile-based mechanic will also add 2500 corruption to the Gate.
⬥ Dismiss the feline akhs as quickly as possible to prevent additional corruption to cleanse.
Jumping
⬥ After gathering all shards from the two northeastern rocks, activate Icthlarin's Aid by clicking the Extra Action Button.
• This is a good time to eat as it will not interrupt any skilling actions.
⬥ After climbing the pillars and cleansing the gate, start depleting the two northwestern rocks. After reaching these rocks, use to avoid the hit from the Gate's massive attack.
• Alternatively, use to block Begone! later.
Ending the fight
⬥ After gathering all shards from the two northwestern rocks, activate Icthlarin's Aid by clicking the Extra Action Button.
⬥ Quickly ascend the pillars and cleanse the Gate again.
⬥ If done correctly, this should kill the boss. Any remaining corruption will be due to unnecessary damage taken.
⬥ If the boss still has remaining corruption at this point, fall back to Icthlarin's shield and gather enough shards from the rock inside of it to deal the remaining damage needed.
Example Kills
Note: this guide uses Gargoyle Scrolls to guarantee all swings on rocks are successful.
Additionally, this was prior to the patch fixing the damage radius of the 3x3 autos. However, the strategy does not change.