Arch-Glacor: 0-4000% Enrage (Necromancy)

Introduction
This guide is aimed at players looking to kill Arch-Glacor at 2500%-4000%. However, all information is applicable to lower enrages. Swap to ripper demon  below 2500%.
This guide assumes strong underlying knowledge of all information presented in #Arch-Glacor Basic Guide.
The Arch-Glacor is not affected by Slayer tasks in hard mode.
A large portion of the preset below is built on sustaining high enrage kill streaks. Read the notes in the preset link if you wish to substitute some supplies for more food.
 +
+  are optionally brought to 0t spec on arms at 3500%+ enrage. Offstyle soulfire speccing arms at high enrage greatly improves consistency, however isn't necessary. This guide isn't structured with their use in consideration. Use
 !0tick in #bot-commands for more information on 0ticking offstyle special attacks with necromancy.
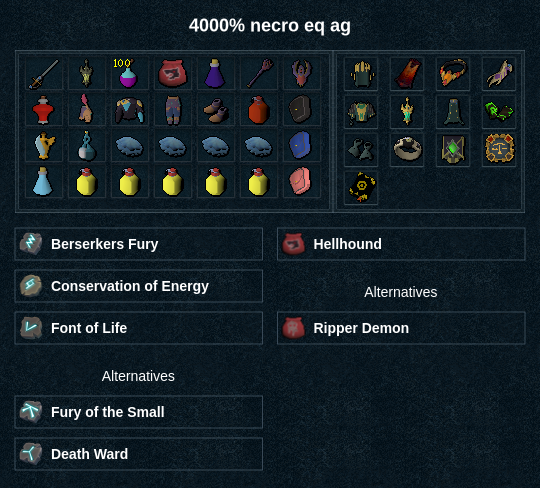
Presets and Relics

General Rotations & tips
⬥ Starting the encounter:
•  (outside) →
  →
→  →
→  →
→  →
→  →
→ 
⬥ Rotations for Arch-Glacor are not strict, as per the random nature of the boss's mechanics. Aim to upkeep & as much as possible.
⬥ At 3500%+ enrage, always reserve splitsoul  for the exposed core.
⬥ 
 ,
,  and
and  , are all high value abilities with medium-length cooldowns. Put these abilities on cooldown before the pillars of ice mechanic blocks your line of sight.
⬥ Living Death  is best used during the flurry mechanic. This mechanic gives you a long, uninterrupted window in which you can deal damage to Arch-Glacor. It can situationally be used to reset
  cooldown in anticipation of an upcoming exposed core mechanic. shouldn't be strategically reserved for arms, as the time it takes to clear the mechanic doesn't largely change with or without the ult active.
⬥ Ensure that some Necrosis Stacks  (4+) and Residual Souls
  (2+) are held for the Exposed Core.
⬥ It is best to start the fight with , as it is a low adren investment that has no cooldown, and has high use priority during the fight. There is a 2/5 chance you get a mechanic (minions/exposed core) that will nullify your first attacks.
⬥ Both tank gear and TFN should be bound for swapping.
• TFN gear should be worn in the following conditions;
⬩ Exposed core mechanic is active.
⬩ Pillars of ice mechanic is active.
⬩  /
/  /
/  is active.
⬩ Equipped before casting .
⬩ Arch glacor is not casting any auto attacks, and you are at or below your max HP in DPS gear (~11,100).
• In all other situations, tank gear should always be worn in cases when you are taking damage.
⬥ It is important to note that ranged autos during flurry will deal the most damage, as the 3pc cryptbloom buff doesn't reduce ranged damage. On average, the 3pc cryptbloom set provides superior damage reduction over 4pc deathwarden.
Exposed Core (Arms)
⬥ Have your conjures active and Ghost commanded .
• In some cases, it may be best to equip  excalibur to dismiss conjures, and re-conjure to refresh their timer before the next mechanic, if you are anticipating arms coming soon in the spec order. It is essential that conjures have a long enough timer to be active throughout the entire mechanic.
⬥ Use  /
/  where required depending on adrenaline in order to use .
⬥ If you need to , use and flick to  for 1 tick to get to 100% adrenaline.
⬥ ~15s into exposed core, you can swap to tank gear to benefit from 3pc cryptbloom's magic damage reduction% passive.
Example Arms rotation:
⬥ Closely follow the rotation below in priority of cooldowns and stacks available.
• If starting with low soul stacks (1-2), use  over
over  .
.
• Use  & where appropriate to build adren and stacks before dumping.
• , , and should always be used first, as their damage is dealt over time.
• Offstyle soulfire +  may optionally be used after .
⬥ 0-2500%:
⬩ → →
⬥ 2500%+:
⬩ → → (tc)  + → → → (until 0 stacks) → (6/8 , use
  → if at 12/12) →
  →
→  → →
→ → 
Note: Use when required.
Note: If flanking, stand central or on the south wall next to the boss.
Clearing Glacyte Minions
⬥ Use →  → once at 5 stacks. continue casting
  & until at 5/5.
• Always cast before → , as this starts its 15s cooldown which lets it be available for a second use before #3
• Always target the bolstering glacyte. This causes perks and jas book to activate on it.
• Cast on the magic minion closest to the bolstering glacyte. This will cause vulnerability to apply to all five glacytes.
Rotation;
⬥ 0-2500%:
⬩ → → →
⬥ 2500%+
⬩ → → → → → → →  →
→  → → /
→ → /
Note; movement used in example videos on minion clears helps reduce freezing blood stack gain. 10 stacks of freezing blood will apply a 3s bind and stun.
Defensive & utility usage
⬥ At higher enrage, you will want to prioritise defensives as follows,
• Frost Cannon:  →
→  + +
+ +  →
→  +
+  (In TANK GEAR & max HP)
⬩ Always wear tank gear for this mechanic.
⬩ Alternatively; → /  / /
/ /  / /
/ /  (hit 3, don't need to combo with defensives) / spam food + be overhealed with brew on first hit. Use of any one of these will ensure you survive the mechanic.
• Exposed Core (arms): → → as needed
• Glacyte Minions: on arch-glacor (2500%+) and, rarely, /  to block or clear stun the freezing blood stun.
• Flurry: / → (deals ~27k at 4000%) → if needed.
• Pillars of Ice: → →  →
→
⬩ can deal damage even if the player doesn't have LOS, depending on the skeleton's position.
Example Kills
Content and guide formatting provided and maintained by: @moxielf