⚠️ Disclaimer
Some methods in this guide may not work after the combat beta changes in March 2026
Know of a newer method/rotation? Got a video? Share it in #vod-and-rotation-megadump-2-electric-boogaloo!
Necromancy Solo AoD Basic 

Introduction
Nex, Angel of Death can be done solo using Necromancy  with relatively low requirements due to the strong multi-target damage and sustain tools available to the combat style. This guide will cover strategies applicable to solo players that will work both for getting your first kill and for consistent farming of the boss.
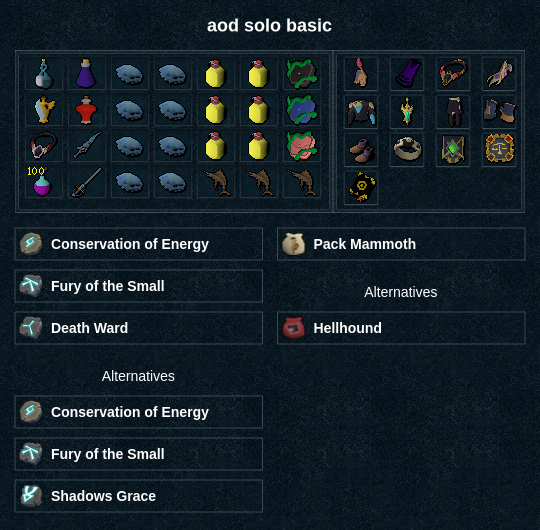
Presets and Relics
Rotation and Strategies
Phase 1
⬥ Start the fight by using Statius's Warhammer 
 three times to drain AoD's defence level
• This will last till pillars start
• Additionally apply  Lord of Bones to keep 100% hit chance when drinking brews
⬥ Use Invoke Death  and Threads of Fate
  to clear out the reavers
  , utilising the stun from Death Guard special attack
  to keep them from reaching Nex
• Note that the reavers must be close enough for threads to reach them all, this can be timed as the reavers reach the set of green-rune tiles surrounding the center of the arena
⬩ Refer to Example Kills to see this in action
• If the reavers are 1 tile away from AoD after you stun them, you can walk diagonally 2 tiles to move aod but still have the reavers be in range for threads
⬥ When using defensives, keep in mind that Nex's melee autoattacks will reset defensive cooldowns at 5, 10, and 15 enrage stacks, visible on your debuff bar
⬥ During the elements special attack, use defensives such as  /
/  to absorb the incoming damage from the quadrant Nex is facing
⬥ To prepare to phase Nex into phase 2, hold damage slightly before hitting 2.1 million health  and wait for her to start her elements special attack, using a high damaging ability such as
  / /
/ / 
 to guarantee the phase as she jumps
• Make sure to phase before ice walls and reavers can spawn
• This is to ensure as much time as possible during phase 2 before she uses another elements special attack, which will spawn additional reavers that will be very difficult to deal with during that phase
Phase 2
⬥ Phase 2 will begin as Nex hits 2.1 million health and will be shortly followed by amalgamation  spawns, which will be cleared with Invoke Death and threads
⬥ The objective is to kill all 4 amalgamations simultaneously and lure all minions into the center such that scythe combo  and threads will hit them all as well as Nex
⬥ In the meantime, focus on getting Nex down to 1.8 million health to avoid getting another elements special attack, which will spawn blocking tiles that will prevent the minions from being lured properly
 /
/  / / / on Nex to deal as much damage as possible to phase
⬥ Nex should be centred during this phase if you phased at the beginning of the elements special attack in phase 1, otherwise make sure to recenter her so that threads will hit all amalgamations
As amalgamations spawn
⬥ Tier 90 off-hand  : → → (8+
  ) →
) →  →
→ 
⬥ Tier 95 off-hand  : → → 3 stack → →
Minion Lure
 as minions spawn and automatically aggro
⬥ (2): Surge
as minions spawn and automatically aggro
⬥ (2): Surge  as the minion you dove away from reaches the center
⬥ (3): Walk into melee distance of the minions once they are all lured to be able to
as the minion you dove away from reaches the center
⬥ (3): Walk into melee distance of the minions once they are all lured to be able to 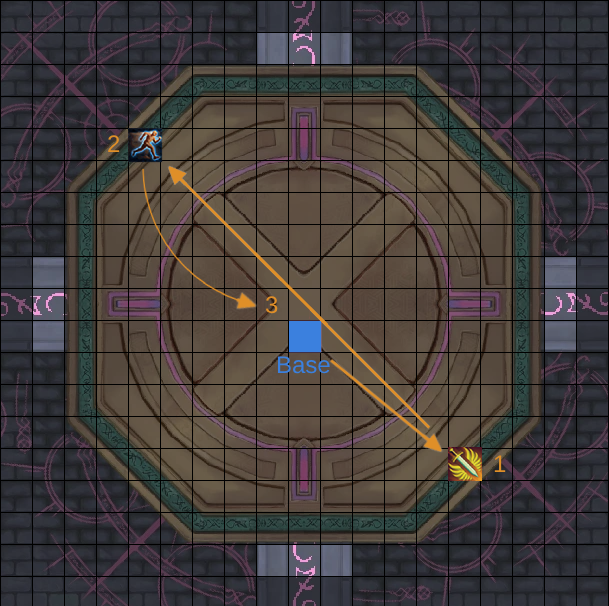
Killing minions
The recommended abilities are + 2x + 2x  + 2x
+ 2x  + → → →
⬥ Use  as minions spawn,
  on the first set of stuns and
  as comes back off cooldown to prevent it from being interrupted and potentially losing a threaded volley
⬥ Upkeep single target damage on Nex between and cooldowns
⬥ Blood Siphon  may be used for healing between and cooldowns
⬥ If done correctly, minions should die early in phase 3, leaving only Nex to deal with
Phase 3
Phase 3 involves using Necromancy's strong multi-target damage to finish off the minions' remaining health, which will then allow you to focus on Nex and staying healthy for upcoming mechanics
⬥ Start with  and use defensives /
  / as necessary to deal with incoming damage
⬥ Once minions are dead,  can be used as long as Nex's attacks are still flicked properly
⬥ Upkeep and use  / as they come up to finish phasing Nex to 600k health
Phase 3 Mechanics
Mechanics in phase 3 will happen in a semi-random order, with the primary restrictions being that ice cannot happen first and the same mechanic cannot happen back-to-back
⬥ Smoke Lines: Simply place and walk out, can use to prevent taking extra damage in case of a stun
• Remember to stay within melee distance of minions for range
⬥ Ice: You go into a 'stasis' mode where will get cancelled if it returns to you and conjures don't attack anymore
• Use to use a few more damaging abilities before you are imprisoned
• Disables defensives such as / but not 
• Use +  (if using
  ) and make sure to keep prayer flicking
• Preparation  isn't put on cooldown so can be used before ice and once you are imprisoned
• Can still use conjure abilities during ice but as said before conjures won't attack
• Other abilities such as /  can be used as ice is ending to 'save' some global cooldowns
⬥ Pool: Must have >14k health to take the pool
• Tier 90 Deathwarden gear  and boosts from bonfire / desert pantheon aura
  + thermal spa
  will put you >15k maximum health
• Fortitude  may be flicked on for up to 1000 additional maximum health
• Use  to boost life points or heal up with food
  if unavailable
• Be wary of an invisible autoattack as Nex finishes her initial animation of spawning the pool
⬥  / /
/ /  can take care of much of the healing between mechanics once minions are dead
Phase 4
⬥ All mechanics are straightforward from here on. Make sure to use on each pillar and keep cycling strong abilities such as / / / / /
⬥ can be optionally reapplied at any time after pillars begins
⬥ Bombs can be placed at max range on a wall next to a pillar or as close to the pillar as possible to leave as much open space as possible
⬥ Conjures will continue attacking when you go middle / 
⬥ Remember to upkeep on each pillar if using
⬥ / can be used to deal with the constant autoattacks from Nex
⬥ After all pillars have been defeated, you can reposition middle, only surging out to place bombs
• Make sure to keep track of which bar is the instakill / bomb if doing this to prevent accidentally bombing mid
⬥ Continue to use / / / / until Nex is defeated
⬥ Invoke Lord of Bones stacks will carry over into phase 4, with the following amounts being required to maximise hit chance:
• ~50 stacks if no 
• ~100 stacks if
• Stacks will last for 10 minutes since the last application so recasting during phase 3 may be necessary in longer kills
Example Kills
Content managed by: @akritia
Content maintained by: @akritia