Necromancy Hammer

Presets and Relics

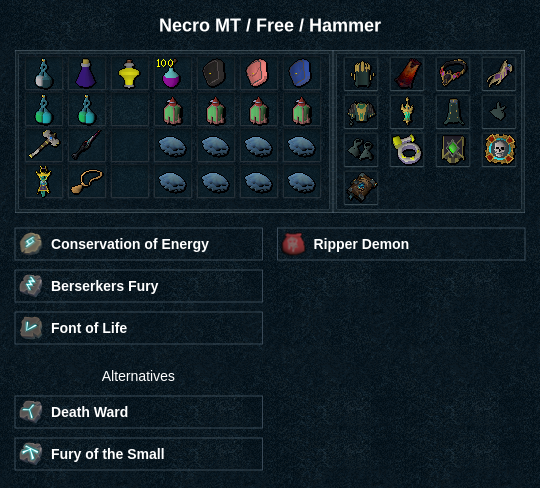
Rotation
Prebuild
 →
→  →
→  →
→  ( → (s)
 )
)
Notes:
⬥ This rotation starts on base's 
Phase 1
→  →
→  →
→ 
 →
→  →
→ 
Phase 2
→  →
→  → →
→ →  →
→  → → →
→ → →
Notes:
⬥ Time so that it hits  as she becomes damageable again
⬥ Use  instead of if short on adrenaline
Phase 3
 +
+  → → → →
  → →
→ →  → → →
→ → →  →
→
Pillars
Pillar 1 → →
Pillar 2 → →
Pillar 3 → →
Pillar 4 → →
Notes:
⬥ may be beneficial on slower pillars. See this link for more information on how to move between pillars with Necromancy.
⬥ When  is on CD stall on Pillar 3 while moving towards it.
Zaros
→ → →
Rotation (2/3+ Rangers on team)
Note: This alternate rotation requires  Fury of the Small
Prebuild
→ → → ( → (s) )
Notes:
⬥ This rotation starts on base's
⬥ Stall
Phase 1
(r) + → →  → → →
→ → →
Note: Replace with if you find yourself lacking adrenaline. If still short, instead replace with .
Phase 2
→ → → ( → ) → → → →
Notes:
⬥ Use the second only if it does not put you behind for
⬥ If the second is still getting nulled on phase 3, decide with the team whether to skip after .
Phase 3
+ → → → → → → → →
Pillars
Pillar 1 → → OR →
Pillar 2 / →
Pillar 3 → →
Pillar 4 → →
Note: Use the shorter Pillar 1 rotation if the team is consistently killing the pillar in two gcds. Swap and if Pillar 1 is not consistently dying in 3 gcds.
Zaros
→ → →
Formatting Maintained by: @swimmingfish