⚠️ Disclaimer
Some methods in this guide may not work after the combat beta changes in March 2026
Know of a newer method/rotation? Got a video? Share it in #vod-and-rotation-megadump-2-electric-boogaloo!
Amascut 1000% Magic-Melee (Hybrid DPS) 


Introduction
This is an advanced guide which assumes a strong underlying knowledge of all mechanics and information presented in #Amascut NM Mechanics and #Amascut 2000 Mechanics.
Preset Suggestions
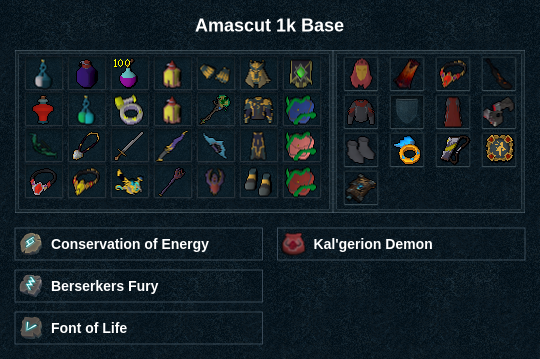
⬥  with
with  /
/  /
/  /
/  depending on role
⬥  with
with  and
and  /
/  depending on role
⬥ Suggested rune pouch setup to bring Temporal Anomaly 
• 


• 


• 


• Optimal combination rune may be dependent on GE prices
Rotations
⬥ Rotations are listed with no procs, but it is still encouraged to use it and adapt to strong resets
⬥ Defense debuffs: 1  user, 1
  user, 1
  user, 1-3 users
⬥ Use  whenever possible and hit chance is above 92%, including during
• Achievable on Amascut with enough / / 2x +
⬥ Replace  with
with  if not owned
Wars
s
Phase 1
r + 
 →
→  →
→  →
→  /
/  +
+  → (
→ ( )
) →
→  +
+  → →
→ →  →
→  → →
→ →  → improvise and phase near 100 adren
Note: / before if assigned to it
Phase 2
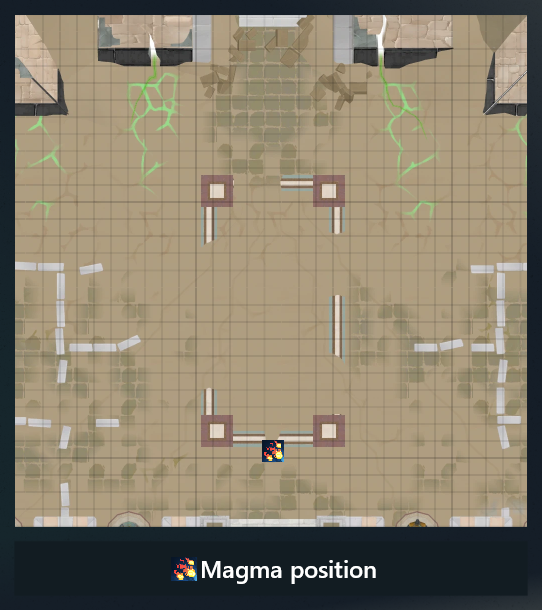
The out roles and statue clickers should drop  both inside the rooms and next to the statues to assist with light runner movement
Gorilla:  → /
→ /  (
( if assigned) →
  → →
→ →  if needed + click portal
Chainwarden:  → wait 2 ticks +
  →
→  /
/  depending on team speed →
  →
→ 
West Chains: Target middle chain +  → / → target side chain +
  →
→ 
East Chains: Target side chain +  + →
+ →  → target middle chain + /
Crocodiles:  →
→  + →
+ →  + build
  stacks
Amascut: → →  → → → +
  → → ( / ) → → improvise using as much as possible → when runs out → →
Notes:
⬥ If cooldown is not up, use even earlier during phase 1
⬥ Ideally try to land at the very start of phase 3 (<5400k HP)
Phase 3
+ build to 100 → → + → () → + → → → →  → improvise and use when available
Phase 4
Gorilla: → scarab → throw at gorilla + →  →
→  → to kill scarabs → throw/enter portal
Chainwarden: + throw scarab → → → → /
Chains: Target side chain + → → target middle chain + /
Amascut: Debuff early using / → build while statues get clicked → → → → → → / → → improvise using as much as possible → → → end on enough adrenaline to  phase 5
⬥ Use before if exiting chain rooms early enough
Phase 5 (1-Cycle strategy)
From here on, roles are typically not correlated with base/DPS. Basic responsibilities are outlined as follows:
South Charge:
⬥ Charge the two inner fragments, switching sides at 50% charge if aiming to 1-cycle
⬥ as often as possible on the following spot to keep aggro on Salawas
• Attacking them before they reach the top of the stairs may cause them to become non-aggressive
Far East/West Charge:
⬥ Charge the far fragments to 100%, then quickly +  to charge the inner statue that was left at 50% if aiming to 1-cycle
Green 1/Green 2:
⬥ Alternate blocking lines from Amascut by standing directly in front of her with a defensive 
 active
⬥ Charge the same fragment as South Charge while not blocking, making sure to keep the tether active as much as possible
• Use /  / to maintain full tether uptime
Rotation: ~9s from Tumeken being clicked → → → → → → clear Salawas w/ and → target  + improvise using / / → once available → if doing platforms + end phase with enough adren to build to ~120 adren
Notes:
⬥ Second only needed for platformer role on phase 6, everyone else have more lenient timing
⬥ Provided rotation is generally overkill if multiple players are doing it, you may comfortably phase using + also
Clicking Tumeken (Anyone):
⬥ Timing the click on the same tick that a new set of lines appear from Amascut will cause one jump to be skipped for a total of 3
⬥ If <2 charge ticks have been lost during the phase, the timing will line up near-perfectly with the final charge completion during a 1-cycle
• Lines appear exactly 9s (15t) in between each set
Phase 6
Melee Platformer
Build to 120% during transition → any basic → → + if necessary → → + + to click Tumeken
Enemy 1:
Enemy 2:
Enemy 3:
Enemy 4: →
Clones: + + + if available → → → + → → → improvise based on clone HP + end near 100 adren
Notes:
⬥ Tumeken is clickable before other audio/visual indicators by looking for his yellow dot on the minimap
⬥ Settings → Combat & Action Bar → Targeting → Set maximum distance to weapon distance ON to target cycle on platforms
• Warning: This will set your melee target cycle range to 1 for all other cases
Others
/ user should try to debuff near the start of the phase and just before phase 7 with enough time to after
 end of phase 5 or start of phase 6 → build to 100 + → → behind → → → +
  → (when clones spawn) + → → → improvise based on clone HP + end near 100 adren
Note: The earliest input timing is when the text "FALL TO THE SHADOW" appears above
Phase 7
→ → → any 2 basics → →  → → → + if quadrant is called → wait 1 tick + → → improvise until dead
Notes:
⬥ If Scabaras is called after , do → a scarab + throw → → ...
⬥ Provided rotation is generally overkill for most cases, with all 5 players alive, only → → is actually needed
⬥ The voker MUST leave the quadrant after voking for the above timing to work, otherwise wait 2 ticks before