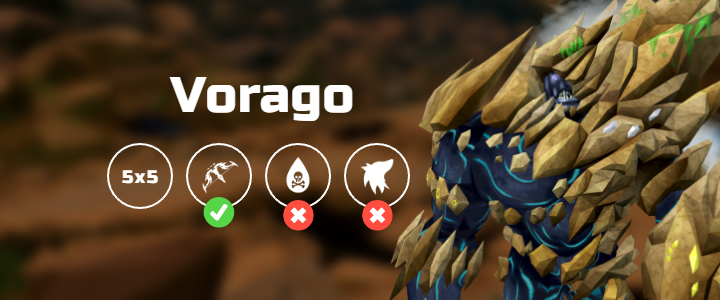
Vorago Duo Basic - Teamsplit (TS)
Introduction
This basic guide is designed to streamline players who are starting Vorago duos, and contains some information for Trio, such as the TL5 responsibilities. The strategies in this guide are safe and easy relative to Vorago. Note though, that Vorago is not an easy boss in general, and will likely take multiple attempts before you get a kill.
Each weekly rotation can be found as its own thread in the channel. The channel itself contains information related to the current weekly rotation.
Cheat Sheet
Preset and Relics
⬥ Magic
⬥ Ranged
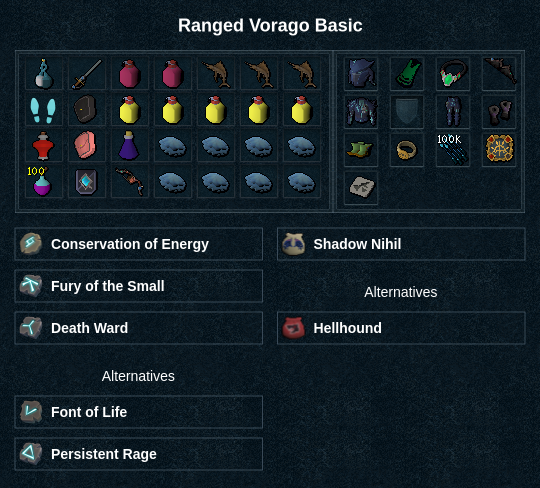
Additional Preset Information
⬥ With the use of  the preset places
  onto an armour piece.
• Note: That is Greater Bone Shield, and turtling 3, not their more common counterparts.
⬥ Melee is significantly more challenging than the other combat styles, and is thus omitted.
⬥ The last relic slot does not have a clear "best." Use what you find is most comfortable.
Misc Important Vorago Facts
⬥ BT refers to Bomb Tank, not Base Tank. Stands furthest away from Vorago to take bombs.
⬥ Base refers to Base tank, stands in melee distance of Vorago and holds aggression during most of the fight.
⬥ TL5 refers to the Top Lure 5.
• This is a trio+ role.
• They perform the climb in Phase 1, and take the 5th bleed when applicable during Phase 2 and Phase 4.
⬥ Commonly used abilities/spells unique to Vorago:  ,
,  ,
,  ,
, 
• To equip the item in your inventory and then cade.
⬩ As long as the isn't on a weapon/shield, you can switch back immediately.
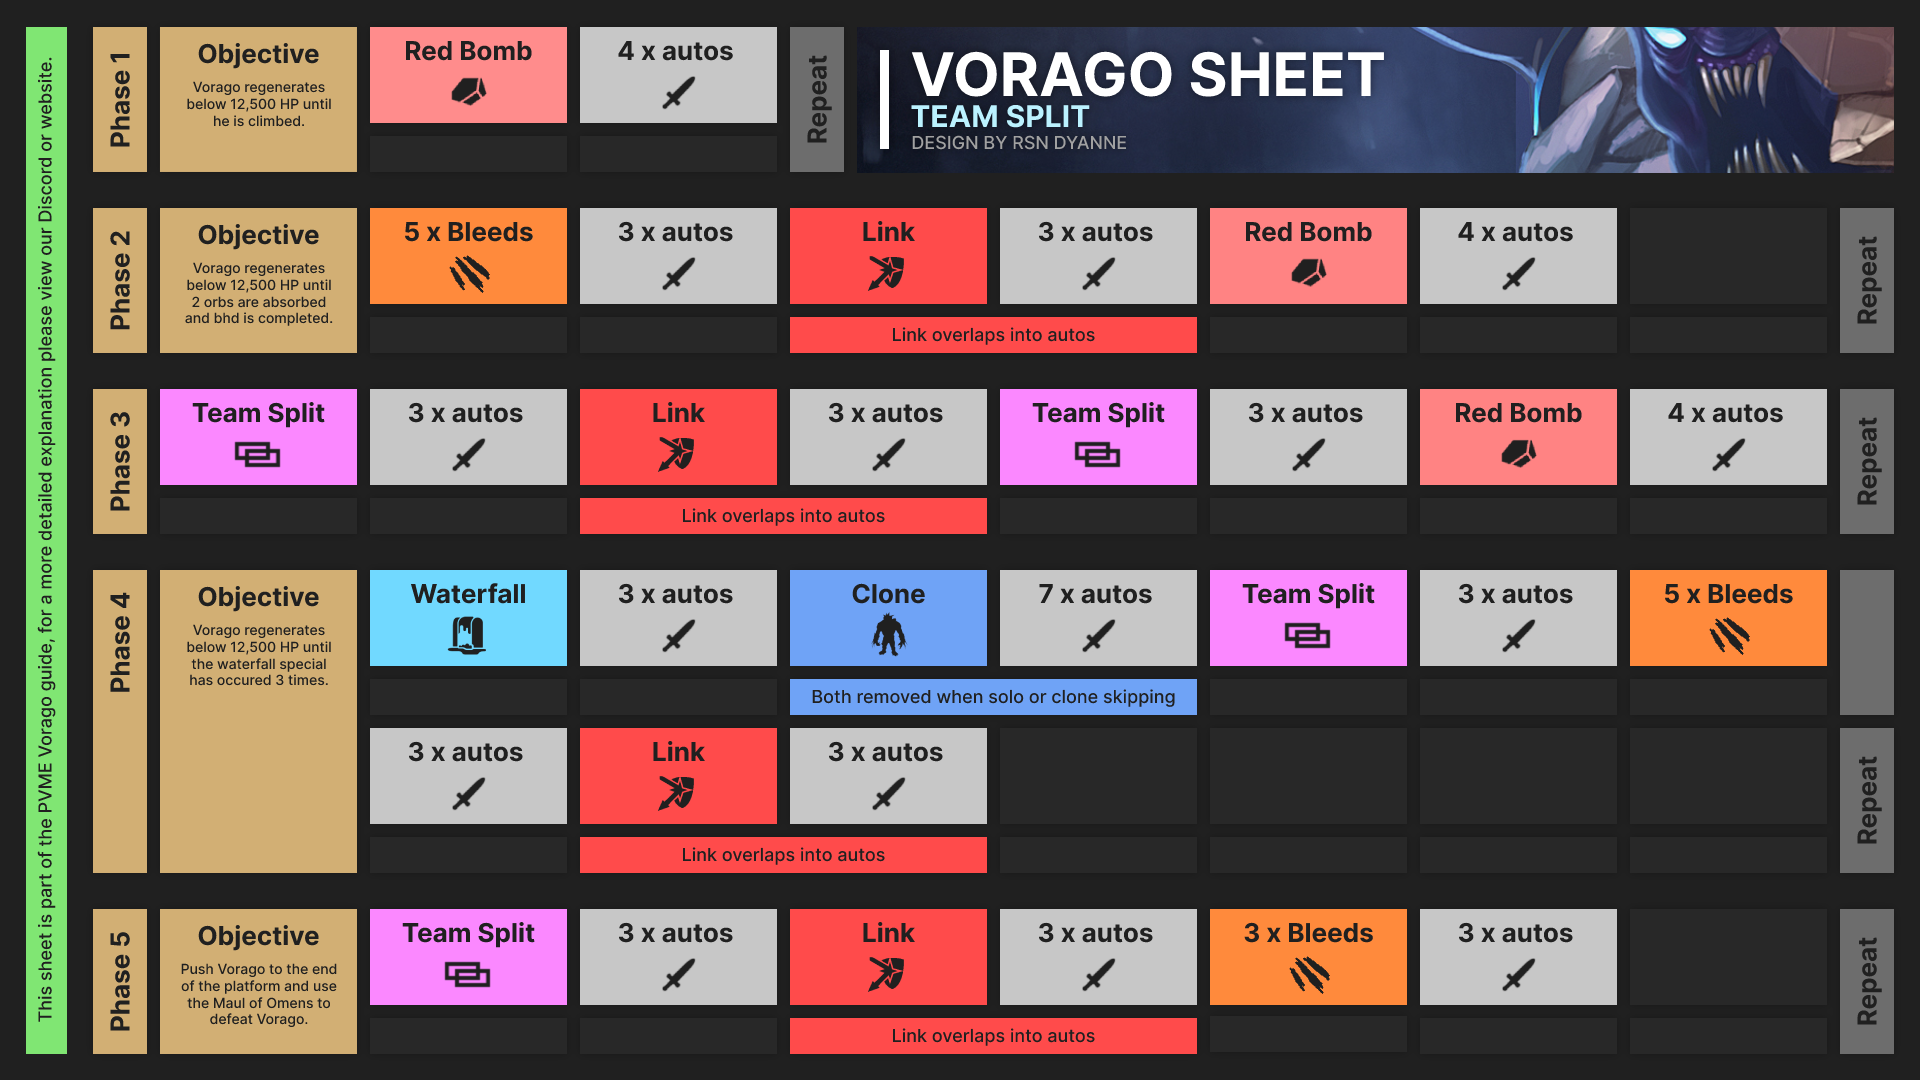
Face/Phase 0
⬥ Vorago deals 70% of your maximum life points upon entry into Phase 1.
⬥ Challenge takes 12s. A bar charges above Vorago's head to indicate when the fight will start.
⬥ Optionally to save on hp, right before the bar fills up, click your 
Phase 1
For Both Players
⬥ Vorago's attack rotation
⬥ Three types of auto attack at random: Melee swipe, magic Blue Bomb, or both at the same time
• Auto attack blue bombs home in on the furthest player from Vorago, deal AoE magic damage, and always hit.
• Melee swipes deal AoE melee damage around Vorago and around the Base Tank. They can splash.
• Vorago does not melee swipe if the player with aggro is not in melee distance.
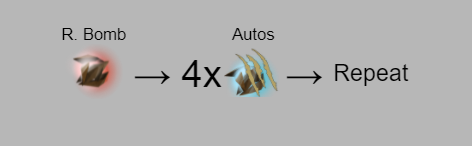
⬥ Red Bomb deals 2000 damage, comes with a non-homing Blue Bomb, clears defensives and puts them on cooldown
• Thrown at the furthest player similar to Blue Bombs
• For each player that is close to the bomb tank when the red bomb hits, an additional 1k damage occurs
• Move at least 4 tiles away from where you were stood to avoid the non-homing blue.
⬥ The phase can only end when someone has successfully jumped on Vorago to release the piece of the Maul of Omens.
• If Vorago's hp goes under about 13k before this, his HP will "reset" somewhere between 80-100k
Base Tank
⬥ Prioritise tagging Vorago ASAP.
• If Trio, as you tag.
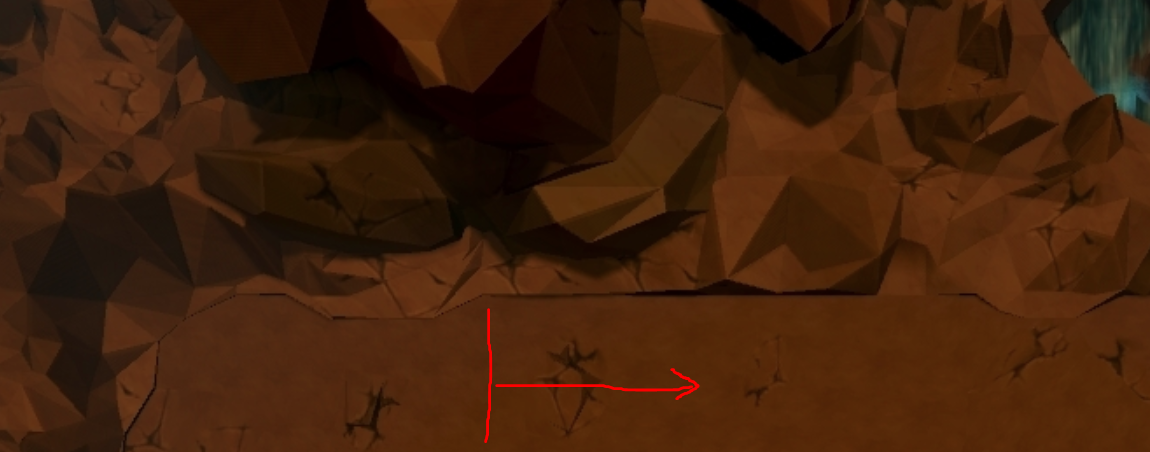
⬥ Bring Vorago to the east of the red line in the image below. Once he is there use your main damaging abilities  /
/  /
/ 
⬥ Expect a few blue bombs. Prayer flick and use defensives as necessary.  provides a big heal.
⬥ Once the BT has voked, stand directly south of the middle of Vorago and voke back at around 50k HP left.
Top Lure (The Bomb Tank in duo)
⬥ Climb speed is paramount to survival
• Less damage is taken by you and your base on faster climbs.
• Use surge and dive as frequently as possible.
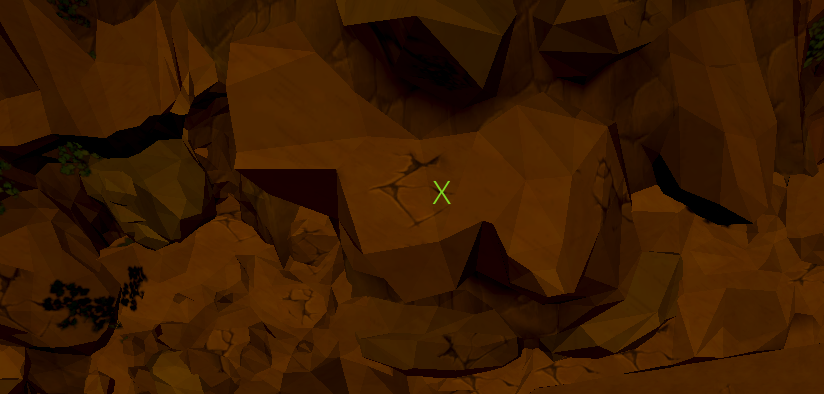
⬥ Vorago from two north and two west of the jump spot and do not move until Vorago has finished moving.
• There is no leniency on what tile to stand on for this mechanic. If you mess up, the base must revoke vorago to the east and you must try again.
⬥ Once Vorago stops moving, do a basic DPS rotation
⬥ You must have at least one inventory space free for the Maul of Omens piece to be able to jump.
⬥ Jump at <50k HP. Make sure to be high/full HP.
⬥ Food cannot be eaten during climb animations, but bombs can continue to land and stack damage upon animation finish. Make sure to maintain high HP.
• Do not risk death trying to save food. It is expected to use some this phase.
Phase 2
For Both Players
⬥ Vorago's attack rotation:

⬥ Phase 2 is largely time gated. Focus on mechanics.
• One gravity orb spawns every reflect. Two are needed to progress. Missing orbs will result in additional cycles.
⬥ Use defensives to avoid food usage.
⬥ More advanced Vorago guides will minimize Vorago's movement on this phase, but while learning the focus should be on surviving and dealing with mechanics properly.
⬥ Vorago's Bleeds break defensives (i.e. take them off. So if you have resonance / cade up, it will remove them + you will receive damage.)
• Appears as  on debuff bar
• First bleed of the phase has no animation; it occurs during Vorago's spawning animation.
⬥ Reflect (Link)
• DO NOT ATTACK ON REFLECT
• Vorago is immune to damage during this time
• Damage dealt to Vorago instead goes to someone on the team
⬥ Spam click Vorago during Bring Him Down (BHD), then deal damage to free the maul piece.
• BHD damage threshold is a collective 50k.
• Use high damaging thresholds, but refrain from using / / as you will want them for next phase.
Base Tank
⬥ Clear the first two bleeds with and 
• Use between the first and second bleeds to ensure aggro for the second bleed
⬥ You will tank the blue bomb that comes with the third bleed. is recommended.
⬥ Vorago after the fifth bleed.
⬥ It is recommended to + the BT on red bomb release.
Bomb Tank
⬥ Use after the second bleed.
⬥ the third, the fourth, and stand still for the fifth. The Base Tank will and lure the boss away to clear the fifth bleed.
• You will likely take at least one hit of bleed damage on the 5th bleed while learning.
⬥ Use any number of defensives against the Blue Bombs.
TL5 (if trio+)
⬥ Use after the fourth bleed.
⬥ Use to clear the 5th bleed when it is applied.
⬥ Step back out of melee distance after the Base vokes Vorago.
⬥ Tag red gravity orbs when they spawn.
Phase 3
For Both Players
⬥ Vorago's attack rotation

Suggested Rotations (Both Players)
⬥ Do not use ultimates after first TeamSplit (including  ), just thresholds and weapon specials

• There isn't enough time before the following reflect + TeamSplit to do meaningful damage in the ultimates (and death skulls will hit you on reflect)
⬥ During Reflect use and build adrenaline using defensives
• during the second TeamSplit
⬥ After the second TeamSplit is your main damage window
Base Tank
⬥ and stand melee distance during reflect to reduce damage to the BT.
⬥ May take Blue Bombs due to Teamsplit box positions. Move in towards Vorago ASAP to avoid taking bombs.
Bomb Tank
⬥ Focus on getting out to take blue bombs ASAP after TeamSplits
Phase 4
For Both Players
⬥ Vorago's attack rotation

⬥ Phase 4 is time gated. Focus on mechanics.
• 3 Waterfalls are required to progress the phase. Lower Vorago's HP to under 30k before the last Waterfall.
⬥ Waterfall
• Spawns in one of the four corners. Run behind it quickly, or take up to 10k damage.
• Some tiles look safe but are not. If unsure, run all the way into the corner.
• Clears active defensives and puts them on cooldown.
⬥ Clone skip
• Massive time save if done both times
• See role sections below for each player's responsibilities
⬥ Teamsplit - same as Phase 3
• No other unique mechanics. Handle the rest of the mechanics as done in previous phases.
Base Tank
⬥ Clone skip
• Base Tank walks Vorago to the wall
⬩ Turn run off, spam click Vorago + surge out of the Waterfall, , walk under Vorago, click near the wall in the direction that Vorago walks
• The BT may be out of bomb range, which means any potential bombs go to the Base Tank instead.
⬩ Eat to high HP in the Waterfall, prayer flick  for Blue Bombs, and use /
  as needed.
⬥ After the skip, Vorago goes straight into Teamsplit special.
Bomb Tank
⬥ Clone skip
• Surge to the wall opposite of Vorago
⬩ Move in when Vorago does the clone animation (fake melee swipe)
⬥ If Clone Skip fails, BT should use  against the Blue Bombs.
⬥ After the skip, Vorago goes straight into Teamsplit special.
TL5 (if trio+)
⬥ Clone skip
• Surge to the wall opposite of Vorago
⬩ Move in when Vorago does the clone animation (fake melee swipe)
⬥ Use after the fourth bleed.
⬥ Use to clear the 5th bleed when it is applied.
⬥ Step back out of melee distance after the Base vokes Vorago.
⬥ After the skip, Vorago goes straight into Teamsplit special.
Phase 5
For Both Players
⬥ Vorago's attack rotation:

⬥ Ceilings Collapse week shares the same Phase 5 as Teamsplit
⬥ Reverse tug-of-war mechanic
• 20k damage against Vorago pushes him east 1 square
• Each tick of damage received from Vorago he pushes west 1 square
• Any damage mitigated from negates any pushback
• Push Vorago all the way to the east, move melee distance, and click the Maul of Omens
• Teamsplit damage does not cause him to push west at all.
• Teamsplit cancels all active defensives.
⬥ Base Tank hugs south wall, while BT hugs north wall. Players should only move away from their respective walls to clear Vorago's bleeds.
⬥ Bleeds
• 3 bleeds with that are randomly assigned
• Vorago does not throw blue bombs during bleeds.
• Taking damage from bleeds results in Vorago pushing further west. Prioritise clearing them over DPS.
• Bleeds are cleared by distance from the tile the bleed was received, not distance from Vorago in this phase.
• Move melee distance + go to the center of the arena. That way you can properly to remove bleeds
• The safest way to clear bleeds in case you get all 3 is to the first bleed and then run back melee distance, second bleed. the third bleed.
⬥ If the phase lasts longer than one Teamsplit, the Base Tank and BT swap roles after every set of Vorago's Bleeds.
• The player who is stood furthest out should build adrenaline to use for the first Blue after the teamsplit explodes.
Suggested Rotations (Base Tank)
⬥ Use / / in melee distance shortly after the Teamsplit spawns
⬥ After the 2nd/4th/6th/etc TeamSplit you switch to the BT role. Use to tank the blue bombs.
⬥ After , build to 100% and / / during Reflect.
Suggested Rotations (Bomb Tank)
⬥ Use a threshold → basics to 100% → when the first Blue Bomb lands.
⬥ Build to 100% and / / in melee distance ASAP (and do damage after reflect ends/ bleeds begin).
⬥ You will be the BT role after the 1st/3rd/5th/etc TeamSplit
Phase End Notes
⬥ Lengthy phases can get hectic. Focus on proper and / / timings.