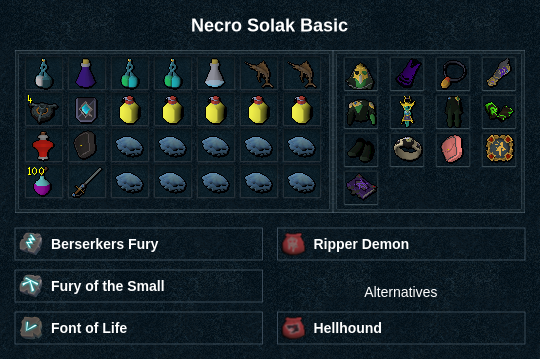
Solak Basic

Presets and Relics

Phase One Mechanics
Pads
⬥ One green pad for each player in the battle will spawn at a random location
• Use  /
/  to stand on a pad before the falling spore hits the ground
• Players will be dealt 5-6k blight damage per pad missed
• A Powerburst of Vitality  can be used to survive missing (or skipping) pads
⬩  will also be required to survive skipping pads in groups of size 3 to 6
⬩  +
+  will not guarantee survival in a group of 7, at least one pad must be taken with
  /
/ 
Personal Blight Bomb
⬥ After pads, all players will have a bar above their head
• Use  or
or  as the bar fills entirely to negate the 9-10k damage
⬩ If you are not the base you can safely  or
or  after the first auto post the bar appearing above your head
⬩ If you are the base, the timing is a little tight. A melee smack will come out right before the bomb explodes. While learning use both  and
and 
Volatile Rootlings
⬥ At 0:21, 8 Volatile Rootlings  appear around the edges of the arena
• It is recommended for each player to pre-place a set of two  underneath rootling spawn points before starting the fight
⬩ Both  should be placed same-tick. If not, the second one will sometimes not explode
⬩ A second set of two  can be placed while killing the remaining rootlings
• Rootlings have 20,000 hp in a duo and gain 12,500 hp for every additional player in the fight
• If not killed by around 1:30, they will become Blightbound Lashers 
⬩ Lashers will attack with  and can deal heavy damage
⬩ If two consecutive rootlings turn into Lashers, the second will heal to full
Personal Roots
⬥ At 1:06, 2 random players will be given a text box informing that they have Blight Roots as well as a timer that counts down
• There will be yellow arrows at the players' feet, on the minimap, and on the arena itself indicating where the roots will be coming from
• When the timer hits 0, the roots will launch towards the players' location in a triangle shape
• The player must move 1 or more tiles away from their pinpointed location and away from the roots to avoid damage and a stun
⬩  or
or  before the timer reaches 0 to ensure you won't be stunned
AoE Blight Bomb
⬥ At 1:32 and 1:49 (and throughout Phase 3, as well), up to 3 non-base roles will receive a bar above their head
• When filled entirely, an explosion will deal 3-4k damage (AoE)
•  can be used for a heal
⬩ Alternatively,  ,
,  , or tank it
• Solak's auto attacks will speed up after these bombs
Arms and Legs
⬥ At 1:55 (1:06 for rootskips, 1:32 and 1:49 respectively for bomb skips), Solak will root his arms to the center of the arena
• Arms must be killed within 30 seconds
• After both arms die, Solak will stand up, exposing his legs. Legs must be killed within 20 seconds
• Being too slow on either arms or legs means that Solak will stand up and spawn Blightbound Lashers 
Core
⬥ After both the arms and legs have been killed, Solak will expose his core
• The core has 125,000 hp per person, and is exposed for 18 seconds
• If the core is not finished within this time, P1 mechanics will repeat
• Once the core is dead, Phase 1 ends and Phase 2 begins
Phase Two Mechanics
Eruptions
⬥ At the start of Phase 2, an eruption will spawn in each corner of the arena
• When killed, these eruptions will spawn a blue circle that will teleport everyone within up to the Anima Storm 5 seconds after the eruption dies
Anima Storm
⬥ Persists from the beginning of Phase 2 until it is killed
• Every 10 seconds, it will drop blight rain onto the arena hitting all players for 2k damage and will add a Blight Stack  to the player's debuffs
• It is destroyed by teleporting via the eruptions and spam clicking the storm in the sky
• As the storm "rains" down onto the arena, a puddle of blight rain will begin to form in the center
⬩ Stay away from the puddle as it hits for almost 2k damage per tick and will add a Blight Stack  for each hit
⬩ While in the sky, players can position themselves away from the center to ensure they return to the ground outside of the puddle
Cleanse/Blight Stacks
⬥ In Phases 2 and 3, Merethiel can be clicked to activate a green circle on the ground at the south
• Blight Stacks  appear on the players' debuff bars
• It will remove all blight stacks from players standing within it
⬩ Players will do 1000 less damage per click to the Anima Storm per stack, and receive 1% more damage
Blight Spores
⬥ 6 auto attacks after all eruptions die, Blight Spore bombs will spawn all around the arena
• Spores will rise into the air, fall back to the ground, and explode
• The longer the mechanic has progressed, the more damage they will deal
⬩ Towards the end of the mechanic, they will hit up to 8k and should be avoided at all costs
Anima Rain
⬥ 12 auto attacks after spores, five hits of Anima Rain will fall from the sky
• Players should click the golden sphere in the north to consume the Blessing of Nature
• Immediately before the first rain, players should press their extra action button to deploy the blessing
⬩ The Blessing of Nature shield dome lowers the Anima Rain damage by 75%
• Players can run outside of the shield and use  for a heal
Arm Climb
⬥ 2 auto attacks after the last Anima Rain, Solak will pull and root one player to the ground
• The player should  from the roots and move away
⬩ Failure to do so will result in being insta-killed
• After Solak slams his arm, a player should click the arm to climb up
⬩ This will deal a deadly blow to Solak
• After the climb, Solak will hit the climber with a massive melee hit, up to 9k
⬩ Climber should  /
/  this hit
Phase Three Mechanics
Charge Pads
⬥ At the start of Phase 3, 8 pads will spawn around the arena
• As Solak stands on this pad, it will charge up (indicated by a blue ring)
⬩ It takes 15 seconds for a pad to become fully charged
• When fully charged, Solak will stop attacking and begin to shake rapidly for 12 seconds
⬩ This makes for a good time to heal with 
• Random bombs can fall onto pads throughout the phase, tank, move away, or  /
/ 
• During this 12 second window, players may use their extra action button to access the Realm
• If all 8 pads are fully charged, P3 will end
⬩ This is not commonly done; instead, it is recommended to enter the realm and kill Erethdor
The Realm
⬥ Accessed on Phases 3 and 4 by using the extra action button
• If clicked during P3, the player will be in the Realm for 20 seconds before returning to the regular arena
• When in the Realm, food cannot heal you, but other sources of healing still work (e.g. excalibur)
• In Phase 3, the Realm is used to kill Erethdor ("the Elf")
⬩ The phase will end when Erethdor is killed
AoE Blight Bomb & Stun
⬥ AoE blight bombs also occur in Phase 3, and are dealt with the same as in Phase 1
⬥ Throughout the phase, Solak will stun all players in the regular arena
• If he is not stunned back, players will be hit with a bleed that escalates in damage over time
⬩ Weapons with Flanking  will still work for this mechanic
Phase Four Mechanics
Realm Manifestations
⬥ Entering the Realm on P4 should not be done under normal circumstances, instead, prefer to No-Realm
⬥ Manifestations will spawn inside of the Realm and attempt to consume Solak's mind
• If the mind is consumed, all players will be insta-killed
• The HP of Solak's mind is the bottom of the two displayed on-screen
• The rate at which manifestations consume the mind increases the longer they live
• More manifestations will spawn the faster Solak's HP bar is depleted
⬩ This means delaying the use of some high damage abilities can be useful
⬥ Manifestations can be tanked by a player through entering the Realm
• Manifestations attack with 
• While in the Realm, players can sacrifice their own HP to heal Solak's mind
⬩ This should be done by first using  and then clicking Solak
Burst of Nature
⬥ Appears as a purple tornado surrounding Solak
• Deals a large hit every ~28 seconds
⬩ Damage can be lowered tremendously by using stunning abilities
⬩  /
/  /
/  /
/  /
/  /
/  /
/  /
/ 
 will still reduce damage even with
The No-Realm
⬥ The general approach to succeeding on P4 is to ignore the Realm, and instead finish Solak before his mind is consumed
• Enter the phase with a fairly high level of adrenaline
• Build up to 100%, and wait for Solak to rush forward, and then be pulled backwards
⬩ You can build on Solak before the pull-back, but he will be immune to damage
• Execute a strong ultimate ability rotation after Solak is pulled back
• Stunning abilities should be used early to reduce Burst of Nature damage


 /
/  /
/  /
/  ⬥ Damage Solak while avoiding Blight Spores
⬥ Use the blessing of nature when the Anima Rain comes
• Run outside of shield and